Search the Community
Showing results for tags 'Death Korps of Krieg'.
-
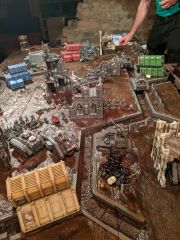
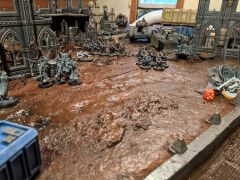
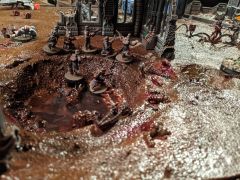
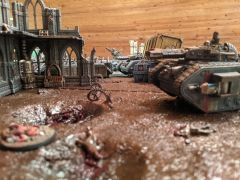
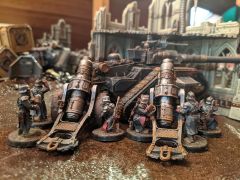
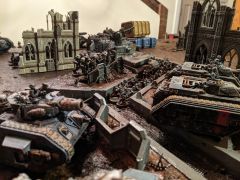
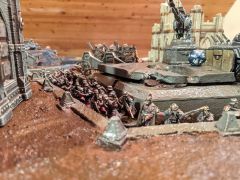
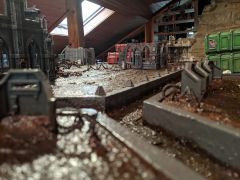
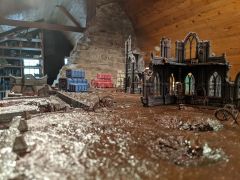
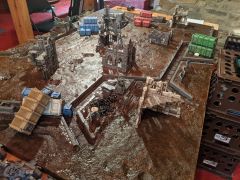
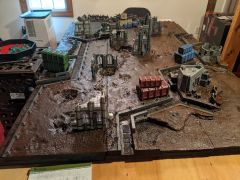
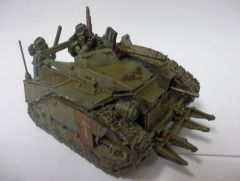
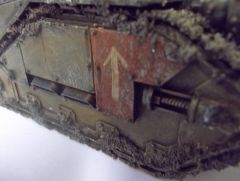
I've been awfully lazy about this, and meant to make something about this months ago... Figured fellow Guard lads, especially fellow Kriegers would appreciate the desire and hard work that went into making a board for Krieg to live their bests lives on. All credit and work was done by my good friend (Who also did the "octoblade" baneblade build for me). You can find his reddit user and the original thread here: https://www.reddit.com/r/TerrainBuilding/comments/pn2zw6/40k_seige_of_vrax_trenchline_4x6_panels/ We both had a random sudden desire to Realize the barren, WW1-esque battelfields of Vraks, and with a bit of planning, DG bits donations, and unused bastion/aegis defense line, and a LOT of foam, the realization was made. The Battleboard Itself: (Apologies for the removeable terrain, have to make it more 9th Ed. friendly with "obscuring" elements. Will endeavor to take better, no-LoS terrain pics down the road) Some shots of the lads making an offensive in the first game on it: (Pardon the random Dark Eldar raiders who decided to try to take advantage of the protracted siege between traitor and loyalist elements) That's it. Just wanted to share, make sure people know about all my bud's amazing hard work coming to fruition. Any future Battles (Intend to do one bare with 30k rules to REALLY Vraks it up) I'll endeavor to remember to slap in here! I'll definitely endeavor to also get better detail shots of all the features such as the bastion, the various lads bled out in the trenches, craters, wire, destroyed pillboxes/bunkers, etc... Cheers, all!
- 4 replies
-
- 12
-

-
- Siege of Vraks
- Death Korps of Krieg
- (and 1 more)
-
Krieg Display Board 2023 Pt 3 - More 40k Zeppelin Construction
Captain Caine 24th posted a blog entry in 40K Feast & Famine
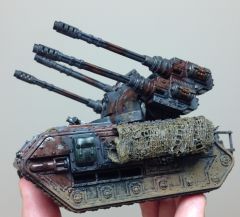
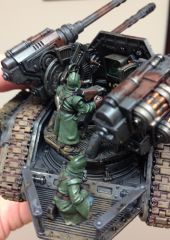
Warhammer 40k Zeppelin... So, the Rob Hawkins blog entry from 2013 (appropriately entitled "Oh the Humanity") really remains the key inspiration. Length You can see it's actually fairly big. It's also then a pain to transport on it's own. Lots of fiddly bits on the bottom. Unfortunately I also wanted double heavy stubber emplacements on the top, matching old WW1 artwork. This doesn't really work for transport. It needs to lay on one side. And though it does stand upright... I also wanted to add a left to right rudder (presently I only have up and down). I suppose again here that if I were to keep the project sectionalized/modular then separate pieces could be transported and put together at location. If (a big "if") I make a bigger one, I'd certainly figure out a way to make it in separate sections. Texture Here is one area where I departed from the inspiration. I tried to paper mache a texture, or more specifically a cloth mache. So I got some cheese cloth and used wood glue. The cheese cloth was too unwieldy. It streches when cut, and doesn't like being cut to the point it clings on stretches out in unexpected ways. In short, it worked, but was really uneven. Fixing it was going to be a terribly long endeavor. On a whim, I'd previously thought to look for athletic/cloth tape, thinking that would make it easier to cover gaps. This however turned out to be the better solution for the whole blimp. It's hard to cut really uniform lines on the curved rear and front sections, but it's good enough. Also, 100x easier than cloth mache. 100x. Lines. I wasn't sure that I really needed to run a pattern of supports like the Hawkins blimp. Also it was going to take a lot of time. I decided to just run a few lengthwise, and abandoned the plan to run them widthwise too. In the immediate run up to Adepticon there just wasn't time. I used evergreen #175 styrene strips (square shaped). I did this instead of balsa, as I found much the same as in the Hawkins blimp that balsa just didn't bend well. To be sure, styrene also doesn't like to bend too much. It was a pain to glue. With more time I'd have run some caulk down each lateral styrene strip to blend it in more with the texture (glue spots are obvious at present). Engines. Part of where this project came from was seeing the engine bits on that new ork buggie. Shokk jumpa or whatever. I saw that and thought I could make a blimp engine. An odd thought, but it stayed with me. Notably, styrene is not really that strong, so this design is not recommended. Some kind of brazed brass cage would be much better. The Sharpie marker design isn't necessarily what I wanted, but it was in the ballpark, easily reproducible, and saved me several hours of custom fabrication on each engine. I'd imagine many household items might have stood in here just fine - small bottles or travel bottles. The fins are from RC/drones, I found on ebay for fairly cheap. Steering. The old WW1 artwork had some really cool designs for steering, that wouldn't make much sense with modern innovation. But, 40k isn't about engineering efficiency, it should look a little crazy. So we're doing four fins - elevators controlling pitch, up and down. I'm not a pilot. I'm learning this. This was a bit of a catastrophe to get straight and aligned. Brass rod and plates might have been much stronger and reliable. Also, it still needs a lot of detailing. I'm not satisfied, but i'm out of time. Painting. I wanted grey, I think, but didn't have any on me in the time crunch. So, I went green. I then realized I had created a giant pickle. Facing a literal and metaphorical pickle, I went and found some brown and black. So, camo it is. In hindsight I should have sealed the whole thing with a spray varnish first as the cloth didn't take paint well at all. Also, since it's so big, I just used craft paint through the airbrush. This is not really a great way of doing it, cheap though it may be. I think a couple of cans of spray paint would do just fine. I should mention since this is foam... I did worry it would melt with spray paint so that was a limiting factor I did consider (but I'm not sure what all melts this particular foam and it certainly could work - I just couldn't risk melting my project this far in and days before the tournament). Burning the midnight oil!- 2 comments
-
- 1
-
-
- Death Korps of Krieg
- Astra Militarum
- (and 2 more)
-
Krieg Display Board 2023 Pt 1 - Making a 40k Zeppelin
Captain Caine 24th posted a blog entry in 40K Feast & Famine
Death Korps of Krieg Display Board 2023 - Adepticon and Beyond. So, I'm catching up from work these past two months. 100+ hours in, but never finished. Anyway, step one, I'm building a blimp display board this year. Last year was great. I got a lot of really great feedback at Adepticon and on B&C. People were really kind. But, the question is how to improve it? The problem with going to a new army is that I have to paint a new army, and make a new display, and learn all the rules. Huge, if not insurmountable, time commitment in my context. But, doing Krieg again... we'll it's more of the same. So it's got to stand out. Time to make a Zeppelin. Inspiration & Options. WW1 "dirgibles," "airships," "zeppelins." Now, in practical hobby terms, the Rob Hawkins hobby blog did it 10 years ago - "Rivet Wars Diorama: The Blimp." It's really great. I've also seen on various forums people attempted zeppelins in 40k via the mechanicus terrain (it being roughly cylindrical in shape. You can buy skeleton frames made of laser cut MDF. But they didn't fit my size expectations. Also, the cost was more than what I'd be ok with to test it out. If I didn't like it, it'd never get used. Construction of the shape. First, I attempted to use a 3-liter bottle filled with expanding foam. it was roughly a usable shape from the start. Expanding foam however, can only be added to a certain depth in one use or it will not set properly. So, go slow with the expanding foam can if you build it this way. I think it'll work just fine. I just didn't get a good effect and gave up on it. Second, I switched to cutting circles out of foam with a proxxon wire cutter table. That works great. 1" x 2' x 2' foam sheets (menards, home depot, lowes). I also got a circle cutter jig made of MDF. It's not strictly necessary, but it's helpful. Gorilla Construction Adhesive (for use in a caulk gun) is the magic glue. It doesn't dry fast and it's not super strong. But, it dries regardless of air supply. It also doesn't dissolve the foam creating noxious fumes. A hot glue gun can work, and it is very fast, but it is a fumes hazard and may melt the project to some degree (I suppose more or less depending on the heat of the glue gun). With the rough cylinder cut, it's time for shaping. For the rear and front cone shapes I used a knife to cut a rough cone. Then I used an electric sander with 120 and 220 grit to soften it up and shape it more. This can be easier without the whole blimp constructed. I think it's better to make a front cone, middle cylinder, and rear cone. Put them together only at the end. *Note: the electric sander kicks and gouges into the foam very easily - proceed with caution or it makes a lot more work. *Note: I used plastic bags and rubber bands to secure the end of the caulk gun - that way the gorilla construction adhesive didn't dry out when i stopped the project for the day. Worked great. Construction of the fins. I used Basswood sheets, 1/8" x 4" x 24." I didn't want to cut any more than necessary as the tiniest mistakes really show. So, the 4" width was very close to the radius I needed to install the fins. The 24" length was too long, but not a hard cut to make. Later on I came to realize styrene sheets might have been better because the stabilizers I installed were a real chore - breaking constantly. Not great. Gluing styrene to styrene is easy enough. Gluing styrene to wood or whatever doesn't work well. Maybe there's a better glue to consider. In hindsight I also should have been cognizant of the glue used to secure the foam discs to each other in making the overall shape. So I did it wrong - I glued the foam discs together and then went ahead and cut out foam for the fins to fit in. Don't be dumb like me. Glue doesn't cut easily with the hot foam knife. Plan the glue so perfect cuts can be made for the fins to attach. Actually the rear cone could have just been cut in 4 equal pieces, really. Transportation. Ultimately moving this thing is a disaster. I believe designing this in three separate sections would have been better. I think a center hole through the length of the ship, with a rod installed along the length would have been a better way to make this and also be able to transport it. Seams from the three sections could be easily hidden. -
Vraks - Battle 1, Turn 3 Overview
Dark Legionnare posted a gallery image in Terrain, Scenery, Bases, and Game Tables
From the album: Vraks & Battles
-
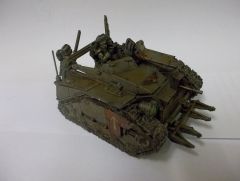
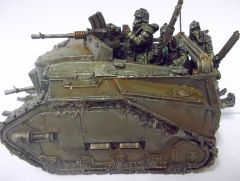
Vraks - Battle 1, Lads - 6
Dark Legionnare posted a gallery image in Terrain, Scenery, Bases, and Game Tables
From the album: Vraks & Battles
-
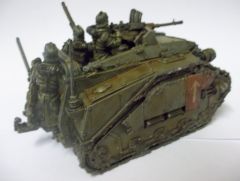
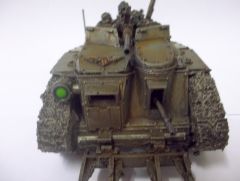
Vraks - Battle 1, Lads - 5
Dark Legionnare posted a gallery image in Terrain, Scenery, Bases, and Game Tables
From the album: Vraks & Battles
-
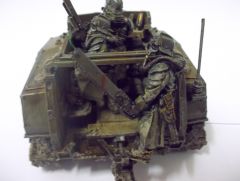
Vraks - Battle 1, Lads - 4
Dark Legionnare posted a gallery image in Terrain, Scenery, Bases, and Game Tables
From the album: Vraks & Battles
-
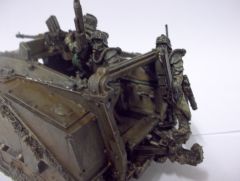
Vraks - Battle 1, Lads - 3
Dark Legionnare posted a gallery image in Terrain, Scenery, Bases, and Game Tables
From the album: Vraks & Battles
-
Vraks - Battle 1, Lads - 2
Dark Legionnare posted a gallery image in Terrain, Scenery, Bases, and Game Tables
From the album: Vraks & Battles
-
Vraks - Battle 1, Lads - 1
Dark Legionnare posted a gallery image in Terrain, Scenery, Bases, and Game Tables
From the album: Vraks & Battles
-
Vraks w/Terrain for 9th Ed. - 4
Dark Legionnare posted a gallery image in Terrain, Scenery, Bases, and Game Tables
From the album: Vraks & Battles
-
- 1
-
-
- Siege of Vraks
- terrain
- (and 1 more)
-
Vraks w/Terrain for 9th Ed. - 3
Dark Legionnare posted a gallery image in Terrain, Scenery, Bases, and Game Tables
From the album: Vraks & Battles
-
Vraks w/Terrain for 9th Ed. - 2
Dark Legionnare posted a gallery image in Terrain, Scenery, Bases, and Game Tables
From the album: Vraks & Battles
-
Vraks w/Terrain for 9th Ed. - 1
Dark Legionnare posted a gallery image in Terrain, Scenery, Bases, and Game Tables
From the album: Vraks & Battles
-
- 1
-
-
- Siege of Vraks
- terrain
- (and 1 more)
-
From the album: Nicodemus' Astronomi-con WIP
-
From the album: Nicodemus' Astronomi-con WIP
-
From the album: Nicodemus' Astronomi-con WIP
-
From the album: Jud's Dkok
-
From the album: Jud's Dkok
-
From the album: Jud's Dkok
-
From the album: Jud's Dkok
-
From the album: Jud's Dkok
-
From the album: Jud's Dkok
-
From the album: Jud's Dkok
-
From the album: Jud's Dkok