Blindhamster Posted December 6, 2017 Author Share Posted December 6, 2017 Thanks Bjorn Firewalker! This evening I've not had a huuge amount of time, but i've done my least favourite part of any model - the decals (seriously, I hate them, ruined two squad markings doing the knees - such an awkward shaped decal for an awkward shaped surface).Will hopefully be able to matt varnish them all tomorrow and continue with the rest of the painting on the models. Midnightmare, Doghouse, Silas7 and 3 others 6 Back to top Link to comment Share on other sites More sharing options...
deathspectersgt7 Posted December 7, 2017 Share Posted December 7, 2017 They look great. decals the bain of the hobbiest. I have some squad decals from the Flesh Tearer sheet GW did a few yrs ago . Looking at them I do not think they would even fit Primaris. Link to comment Share on other sites More sharing options...
Blindhamster Posted December 7, 2017 Author Share Posted December 7, 2017 The mk X shoulder pads are actually ever so slightly taller and wider, so they might fit! I've got one or the large BA sheets forgeworld did with all the successors and two of the GW large sheets with fancy art. Not bothered with the heresy one yet, but may have to soon because it has a few really nice things Link to comment Share on other sites More sharing options...
Soldier of Dorn Posted December 7, 2017 Share Posted December 7, 2017 Beautifully clean work. I'm constantly in awe of the models you produce, and by Jove do I wish I had an ounce of your technical skill. Been debating what Chapter to delegate the small army of Primaris that I've accumulated, and the Blood Angels are certainly the tempting choice... Blindhamster 1 Back to top Link to comment Share on other sites More sharing options...
Panzer Posted December 7, 2017 Share Posted December 7, 2017 I don't think I've ever done decals...and I'm really not looking forward to trying it. Blindhamster 1 Back to top Link to comment Share on other sites More sharing options...
Blindhamster Posted December 7, 2017 Author Share Posted December 7, 2017 (edited) There are lots of good tutorials online for them!It's basically a case of:- Paint the area a decal is going to go- gloss varnish the area- let the varnish dry (I gave it a few hours)- cut out the decal, with our chapter symbol I make a point of slicing the decal between the wings, it allows it to conform to the pad easier.- put water on the decal to loosen it.- put micro set on the shoulder pad- use brush with micro set on it to slide decal off decal paper.- place decal on model, use micro set on brush to position it how you want it.- remove excess micro set.- apply micro sol to decal and surrounding area- leave it for a minute or two.- use a cotton wool bud (q tip) dipped in micro sol to gently roll over the decal.- repeat the micro sol steps till the decal is flush to area.- use dry end of cotton wool bud to remove excess.Thanks for the kind words Soldier of Dorn! I've never been good with decals so they take me longer than I'd like. But I'm reasonably happy with these. Let me know when you get painting! Would like to see them:) Edited December 7, 2017 by Blindhamster Sgt. Blank 1 Back to top Link to comment Share on other sites More sharing options...
deathspectersgt7 Posted December 7, 2017 Share Posted December 7, 2017 these were the Decals I was refering to. Blindhamster 1 Back to top Link to comment Share on other sites More sharing options...
Blindhamster Posted December 7, 2017 Author Share Posted December 7, 2017 these were the Decals I was refering to. squad markings for knees! I remember those now, yeah I cant imagine trying to neatly fit those on... The newer decal sheet has just the symbols, which is pretty cool. Once I finish the 5 I'm working on, I'll be doing 4 to go with the Anniversary Sergeant I've already done, which makes members for 1st and 2nd squad. I then plan to jump to 5th squad - because I want to try out the white crosses lol deathspectersgt7 1 Back to top Link to comment Share on other sites More sharing options...
DeathbyWes Posted December 7, 2017 Share Posted December 7, 2017 Super sharp, looking forward to the next update! -W Link to comment Share on other sites More sharing options...
Blindhamster Posted December 8, 2017 Author Share Posted December 8, 2017 Thanks @DeathbyWes it's much appreciated! Only a small update tonight, my youngest was awake for hours, really didn't like the idea of sleep today apparently. And then I cooked and did normal house related stuff. So by the time i got to sit down and do hobby things I only had an hour or so (and I'm still a slow painter lol). The decal areas have all been given a coat of matt varnish, i base coloured and washed the sergeants helm, picked out a few ports on various legs, painted the grips on the pistols and painted the eye lenses on the helmets... I have to say though, I'm not particularly happy with any of them, not sure if I'm just tired or something, but I don't feel they came out very well - definitely not when compared to the inceptor and hellblaster ones a couple pages back, but anyway... progress! (and i may touch them up tomorrow or something)! cretacianborn, Bryan Blaire, Silas7 and 3 others 6 Back to top Link to comment Share on other sites More sharing options...
Bjorn Firewalker Posted December 8, 2017 Share Posted December 8, 2017 Your Primaris Marines look great! Link to comment Share on other sites More sharing options...
Blindhamster Posted December 14, 2017 Author Share Posted December 14, 2017 minor update, been a long week with poorly kids. But I sorted the skin on the bare head in the 2nd intercessor squad, areas that are black have been blacked in, bases are painted to the same stage as the first squad (both need rust added and weathering powders). Silas7, Anamnesis, Midnightmare and 1 other 4 Back to top Link to comment Share on other sites More sharing options...
Anamnesis Posted December 14, 2017 Share Posted December 14, 2017 Thoses heads look pretty boss Blindhamster 1 Back to top Link to comment Share on other sites More sharing options...
Blindhamster Posted December 14, 2017 Author Share Posted December 14, 2017 Thanks man! Not up to your standard but I managed to get the walking guya head to that stage over the course of an episode of fear the walking dead, so was fairly happy with the speed as much as the result. I'll probably go back and add stubble to him too I think. Suggestion on best way to do that? Link to comment Share on other sites More sharing options...
LutherMax Posted December 14, 2017 Share Posted December 14, 2017 These are looking sweeeeet BH! Blindhamster 1 Back to top Link to comment Share on other sites More sharing options...
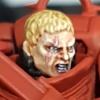
Blindhamster Posted December 14, 2017 Author Share Posted December 14, 2017 Thanks man! Slow going but getting there bit by bit. so... tonight has been a mixed bag. I got some magnifiers that I can wear over my glasses, as I've found that I simply don't have the ability to focus on the small details as well as I once could (depressing as I'm only 29... but my opticians always said my focusing power was strong whilst I was young but would be the first thing to go :( )Anyway, yeah, so new magnifying glasses for my head, I used them to look at the head I did yesterday, and discovered I had a hair going across part of the face that obscured detail, tried to get it off and promptly ruined it . With that epic failure out of the way, I decided to just paint up a totally fresh one, Took about an hour (so similar amount of time). I've not painted the pupils yet, as i'm tired and want better light for it honesty, but it's probably one of the smoother faces I've done. I've still got to do final highlight (pallid wych flesh) on it, but will do that sparingly. Anamnesis, Kurgan the Lurker, cretacianborn and 7 others 10 Back to top Link to comment Share on other sites More sharing options...
Blindhamster Posted December 15, 2017 Author Share Posted December 15, 2017 So... Having done the head above, I want to go back and replace the head on the two marines I've already done, the magnifier does help get things nice and neat... anyway, I did pupils! Technically I did pupils on all three models, but this is the only one I bothered to get pictures of for now lol Silas7, That Guy Matt, Checkmate and 9 others 12 Back to top Link to comment Share on other sites More sharing options...
Soldier of Dorn Posted December 15, 2017 Share Posted December 15, 2017 Incredible work. Simply stunning in the precision of execution. Blindhamster 1 Back to top Link to comment Share on other sites More sharing options...
Dagoth Ur Posted December 15, 2017 Share Posted December 15, 2017 I just had a quick flick through your thread (Bookmarked it for later), and the precision you do your work with is astounding. Especially the faces! Blindhamster 1 Back to top Link to comment Share on other sites More sharing options...
Anamnesis Posted December 15, 2017 Share Posted December 15, 2017 So... Having done the head above, I want to go back and replace the head on the two marines I've already done, the magnifier does help get things nice and neat... anyway, I did pupils! Technically I did pupils on all three models, but this is the only one I bothered to get pictures of for now lol Holy crap that's smooth As for the stubble, take your base paint for the flesh and mix it with a bit of dark sea blue from vallejo or something similare like dark reaper and just glaze de part you want :) Very nice progress brother! Anamnesis Blindhamster 1 Back to top Link to comment Share on other sites More sharing options...
Sanguinius Chosen Wing Posted December 15, 2017 Share Posted December 15, 2017 Looks awesome mate, always stunned at your models. I feel your pain with early eyesight problems it's frustrating to have to whip out the glasses or lenses to make out detail Blindhamster 1 Back to top Link to comment Share on other sites More sharing options...
Pearson73 Posted December 15, 2017 Share Posted December 15, 2017 The work on that head is simply fantastic, such realism and detail. Blindhamster 1 Back to top Link to comment Share on other sites More sharing options...
Blindhamster Posted December 15, 2017 Author Share Posted December 15, 2017 Thanks guys! I think I'm going to try and paint the majority of outstanding bare heads I've got to do all in one go. When I say all in one go, I probably mean over the course of a few days, but still... It's frustrating to need a magnifier as well as my glasses, but it is what it is, and it's certainly helped :) Thanks Anamnesis, I'll give that a look in, although I feel like this guy will remain bic shaved now haha. Anamnesis 1 Back to top Link to comment Share on other sites More sharing options...
Ovidius Incertus Posted December 15, 2017 Share Posted December 15, 2017 Great work! Looks stern and war-worn, especially once you pop it on the model. What colors did you use for your layers? Blindhamster 1 Back to top Link to comment Share on other sites More sharing options...
Blindhamster Posted December 15, 2017 Author Share Posted December 15, 2017 painting steps were fairly quick and simple: undercoat white basecoat of kislev flesh (two thin coats lol) reikland flesh shade all over druuchi violet around eyes and around lower lip and metal areas touched it all up with kislev flesh painted lip screamer pink highlight everything (including lip) with flayed one flesh. blend highlights in with a bit of kislev flesh as needed. lamian medium + scorched brown (2:1 ratio) used to accentuate specific shadows. it'll get a pallid wych flesh highlight too at some point. It's the same technique as the anniversary model, I just did a better job as I could see it better (and i hand painted the under coat, which seems to have helped a lot). Silas7 1 Back to top Link to comment Share on other sites More sharing options...

Recommended Posts
Create an account or sign in to comment
You need to be a member in order to leave a comment
Create an account
Sign up for a new account in our community. It's easy!
Register a new accountSign in
Already have an account? Sign in here.
Sign In Now