The_Chaplain Posted April 28, 2012 Share Posted April 28, 2012 Howdy all, Finishing up university, and was planning on getting back into warhammer. My question for the PC&A is, how can I paint decent looking bone colored power armor? Not like the Deathwing, that is far too white looking. Should I go for a black or white undercoat? (Or is the Army Painter 'Skeleton Bone" spray worthy of undercoat status?) Any tips and tricks would be greatly appreciated Link to comment https://bolterandchainsword.com/topic/251533-bone-colored-armor/ Share on other sites More sharing options...
GhostLegion Posted April 28, 2012 Share Posted April 28, 2012 personally I work bone using the Reaper Master Series of paints. the bone triad there ends up with a nice, polished appearance off of three colors...add in a wash of gryphonne sepia or two and it comes out really nice. unfortunately I dont have recent pics of the combination and result, but i think i used it on the skulls on this model. Link to comment https://bolterandchainsword.com/topic/251533-bone-colored-armor/#findComment-3049627 Share on other sites More sharing options...
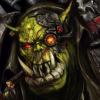
Subtle Discord Posted April 28, 2012 Share Posted April 28, 2012 Shameless personal plug: Taken from my own WIP thread, I would do something like the following. I kept the picture to give you an idea what the results are like. All of the bone, claws, and metallics are done with this process. If you start with a bone-like colour, or slightly darker, you'll get a deeper/darker end result. You can also add an extra layer or two of wash to darken it down to where you want it. Feel free to ask questions if you have any. http://i1080.photobucket.com/albums/j332/SubtleDiscord/WIP%20Thread%20Photos/Champion_02.jpg After much trail-and-error, I present a lesson on painting bone, skin, and other pale white-based colours: Most importantly: Do not start with a dark colour base and try to 'blend up' to the brighter colours. Unless it's simple layering, that is an exercise in tedious frustration, and will drive you to madness. A much easier method, that I think produces better results, follows... 1) Start with a very light base. In the case of bone, I would choose Bleached Bone Ushabti Bone or straight White. 2) Now, 'blend down' the light base using washes to give depth and shadowing. Start with a very pale colour wash like Gryphonne Sepia Seraphim Sepia, and paint it over the entire surface. This layer should be very thin, and only just start the darkening effect. Slopping it on too thick will overwhelm and mute the pale colour you're going for. This first layer of wash also makes the surface very uniform. A layer of wash seems to lay smoother on a dried wash layer, making the next steps more consistent. 3) After letting that dry, go back and add a second layer of the wash. This time, be more selective, and only add it where you want richer tones and shadows like the temples, brow ridge, cheekbones, jaw line, and below the nasal hole. As always, keep a clean damp brush handy (I clench mine in my teeth) to soften/blend any hard edges that might try to form. 4) Once that is dry (A hairdryer is your best friend when working with washes), start adding wash layers that will add serious shadow to places like below cheekbones, around teeth, and the underside of the jaw. I find Devlan Mud Agrax Earthshade is wonderful for this task. Again, be very selective and smooth edges that might form with your, always handy, clean damp brush. How many layers you add comes down to how dark you want the shadows. 5) Now, go in with a Black wash like Badab Black Nuln Oil, and hit all of the really dark places like eye sockets, the nasal hole, around teeth, rivets, bands, and very shadowed areas. More than one layer might be needed to get really deep Black, if that is desired. More is less here most times, so keep the amount small, but really close to what's getting this dark shadow. Tiny dabs that aren't blended too much. 6) Finally, to really get the raised areas to pop, go back with your base colour and 'scrape' (use the sides of the brush bristles, not the tip) a light trace of it over the raised edges. The trick here is to have the brush loaded with paint almost like you were going to dry-brush. Thin the paint down signifigantly, load the brush, and then wipe most of it away. Unlike true dry-brushing, you want the brush to have thin 'damp' paint in it, but only a trace. Carefully drag the side/edge of the brush bristles (again, not the tip, the sides) along the edges you want to highlight. You just want to leave a trace of paint on the edge. Repeat and/or brighten the colour to enhance effect until the desired point. For teeth on skulls, do the exact same process, just with pure White. Once you get the hang of just how much paint you need, you'll be amazed how easy it is to get a wonderfully smooth result. This process might seem like a lot of effort, but I've found the wash does most of the work for you. In the long run, this actually saves time and gives you much more control, and consistent, easily repeatable results. Compared to trying to 'blend-up' from a dark base there's no contest, and the results speak for themselves. If you take this method and change up the colours a bit, things like skin, claws, horns, leather, even metallic Gold, (this is a very similar process as the way I paint Gold and Bronze) all become much less daunting. Start bright, 'blend-down' the dark areas with wash, and pick out the highlight edges to finish. Link to comment https://bolterandchainsword.com/topic/251533-bone-colored-armor/#findComment-3049666 Share on other sites More sharing options...
The_Chaplain Posted April 28, 2012 Author Share Posted April 28, 2012 thanks for the replies so far. Link to comment https://bolterandchainsword.com/topic/251533-bone-colored-armor/#findComment-3049685 Share on other sites More sharing options...
Millicant Posted April 28, 2012 Share Posted April 28, 2012 I know you said "not like Deathwing," but... I play Angels of Absolution (DA successor - all bone-white armor). I use Les Bursley's scheme for deathwing and made my own adjustments. You can see his method I add another top-down spray highlight and I wash with thinned quickshade, but it comes out pretty nice. Link to comment https://bolterandchainsword.com/topic/251533-bone-colored-armor/#findComment-3049714 Share on other sites More sharing options...
The_Chaplain Posted April 28, 2012 Author Share Posted April 28, 2012 I know you said "not like Deathwing," but... I play Angels of Absolution (DA successor - all bone-white armor). I use Les Bursley's scheme for deathwing and made my own adjustments. You can see his method I add another top-down spray highlight and I wash with thinned quickshade, but it comes out pretty nice. Should have said "not like GW's painting guide of highlighting all the way towards white". That tutorial is pretty sound. It requires an airbrush, but pretty sound. Link to comment https://bolterandchainsword.com/topic/251533-bone-colored-armor/#findComment-3049775 Share on other sites More sharing options...
Millicant Posted April 30, 2012 Share Posted April 30, 2012 Should have said "not like GW's painting guide of highlighting all the way towards white". That tutorial is pretty sound. It requires an airbrush, but pretty sound. Heh heh yeah... I take it for granted. Sorry. He adds the line highlights in the video but frankly I skip them. The results are still quite amazing, especially with one more lighter airbrushed highlight to give a "shine" to it. Though it clearly has little to do with this thread, I'd like to take this opportunity to recommend using an airbrush to you. :P I would never have even started this hobby without mine. And for 40k, you really don't need a nice one*, just something that gets the job done. (*not a nice one does not mean GW's...) Link to comment https://bolterandchainsword.com/topic/251533-bone-colored-armor/#findComment-3050507 Share on other sites More sharing options...
puck Posted April 30, 2012 Share Posted April 30, 2012 I can vouch for Les Burley's scheme. I does require an airbrush but the real crux of the paintjob is the oil wash IMO so an airbrush may not be totally nessesary. I used it for my LPC model this year. Link to comment https://bolterandchainsword.com/topic/251533-bone-colored-armor/#findComment-3050783 Share on other sites More sharing options...
The_Chaplain Posted May 9, 2012 Author Share Posted May 9, 2012 any recommendations for a decent and relatively economically priced airbrush for the task? Link to comment https://bolterandchainsword.com/topic/251533-bone-colored-armor/#findComment-3056929 Share on other sites More sharing options...
Tanhausen Posted May 9, 2012 Share Posted May 9, 2012 Any dual action airbrush will probably do the job. They go for anything between 20 and 40 Euros, depending whether you ebay or support your local store. Artesania Latina has a nice pack for around 80 Euros IIRC, known as the Elephant kit (its air compressor looks like an elephant). Link to comment https://bolterandchainsword.com/topic/251533-bone-colored-armor/#findComment-3057024 Share on other sites More sharing options...
The_Chaplain Posted May 10, 2012 Author Share Posted May 10, 2012 I'll be sure to check those out, thanks Tanhausen Link to comment https://bolterandchainsword.com/topic/251533-bone-colored-armor/#findComment-3057838 Share on other sites More sharing options...
lhg033 Posted May 10, 2012 Share Posted May 10, 2012 the GW new paints range bone guide is pretty nice - just painting up a DW terminator to test it at the moment. gives a bit more of a realistic colour than my old method of white base/bestial wash/layer up to bleached bone(maybe my painting has also improved a little, maybe...) and if you wanted a darker colour then you can top a stage or two earlier. Link to comment https://bolterandchainsword.com/topic/251533-bone-colored-armor/#findComment-3057973 Share on other sites More sharing options...
Dremen Posted May 11, 2012 Share Posted May 11, 2012 I've found, with my Deathwing (I know its not the color you go for), that if you go to bright it spoils the models. I start with a deep brown and use successive mixes up to a bleached bone highlight to make my bone coloring. They come out "aged" as opposed to bright bleached bone. I feel it makes the models a bit more worldly than a bright color. I'd post pics but my camera is still broken, and im to cheap to buy a new one. Link to comment https://bolterandchainsword.com/topic/251533-bone-colored-armor/#findComment-3058456 Share on other sites More sharing options...

Recommended Posts
Archived
This topic is now archived and is closed to further replies.