Onisuzume Posted December 11, 2007 Share Posted December 11, 2007 Black ink? Why not simply use dark green ink? Link to comment https://bolterandchainsword.com/topic/124707-dark-angel-painting-tutorial/page/2/#findComment-1439657 Share on other sites More sharing options...
Lion in the Stars Posted December 11, 2007 Share Posted December 11, 2007 depends on what effect you're going for. Also, black ink ends up with darker shadows than Dark Green. That said, I'm trying to come up with a better pain scheme that my DA Green/Dark Green Ink wash/DA Green highlight, myself, so YMMV. Link to comment https://bolterandchainsword.com/topic/124707-dark-angel-painting-tutorial/page/2/#findComment-1440226 Share on other sites More sharing options...
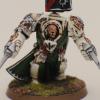
dark angels wannabe Posted December 30, 2007 Share Posted December 30, 2007 how did u do the highkights so thin? and great job! Link to comment https://bolterandchainsword.com/topic/124707-dark-angel-painting-tutorial/page/2/#findComment-1454936 Share on other sites More sharing options...
Gillyfish Posted April 17, 2008 Author Share Posted April 17, 2008 Well, it's been a long time since I last posted inthis tutorial, so it's past time for me to make some progress. Here is the next installment. I'll be posting in this several times in order to ensure that it doesn't crash. So, without further ado: Metal: A nice simple stage, this. Paint all the metals areas boltgun metal. http://i119.photobucket.com/albums/o126/Gillyfish2010/Photo8-1.jpg Once it’s dry, give it a wash of armour wash (you can use black ink mixed with a little brown ink and thinned for this). http://i119.photobucket.com/albums/o126/Gillyfish2010/Photo9.jpg Then paint over the metal areas again with boltgun metal, leaving darker areas where there would be shadow, for definition. http://i119.photobucket.com/albums/o126/Gillyfish2010/Photo10.jpg Lastly, paint over the edges of the metal areas with Chainmail. Aim to paint this anywhere that is likely to catch the light. http://i119.photobucket.com/albums/o126/Gillyfish2010/Photo11.jpg Link to comment https://bolterandchainsword.com/topic/124707-dark-angel-painting-tutorial/page/2/#findComment-1546847 Share on other sites More sharing options...
Gillyfish Posted April 17, 2008 Author Share Posted April 17, 2008 Boltgun casings: I tend to paint my marines with red or black weapons. I used to paint them bright red but found this detracted from the dark and moody look I was going for. So I found a way to give a nice muted red which provided contrast but didn’t draw attention away from the rest of the miniature. Paint the bolter casing dark flesh. http://i119.photobucket.com/albums/o126/Gillyfish2010/Photo15.jpg Then mix dark flesh with blood red (about 50/50) and use this to highlight the edges of the casing. You can see this clearly in the photo below (taken at a later stage, because I forgot to take one at this point). http://i119.photobucket.com/albums/o126/Gillyfish2010/DSCF1200.jpg Link to comment https://bolterandchainsword.com/topic/124707-dark-angel-painting-tutorial/page/2/#findComment-1546848 Share on other sites More sharing options...
Gillyfish Posted April 17, 2008 Author Share Posted April 17, 2008 Eyes: The eyes are one of the focal points of the model, so it’s important to get them to look right. I try to make mine look like gemstones as GW used to do that for all their Space Marines and I always wanted to get it to work. This can be pretty fiddly, but practice will help. Paint the eye socket white. Try to leave black around the edges, but don’t worry if you can’t. A very fine detail brush is almost essential here! http://i119.photobucket.com/albums/o126/Gillyfish2010/Photo14-1.jpg Then paint over the white with blood red. At this point the marine looks particularly evil, I think. http://i119.photobucket.com/albums/o126/Gillyfish2010/Photo16.jpg Next, carefully dab a blob of dark flesh paint towards the rear of the eye. You’re aiming to leave a crescent of the lighter red around the bottom of the lens. Finally, put a tiny spot of white in the middle of the darker red. http://i119.photobucket.com/albums/o126/Gillyfish2010/DSCF1200.jpg Link to comment https://bolterandchainsword.com/topic/124707-dark-angel-painting-tutorial/page/2/#findComment-1546850 Share on other sites More sharing options...
Gillyfish Posted April 17, 2008 Author Share Posted April 17, 2008 Insignia: You can use transfers for these and they will probably look better than my attempts, but I prefer to paint my insignia on by hand. If you fancy trying this out, then here’s how to do it. Try to break what you’re painting up into a skeleton form. For example, for the arrow below I painted a straight line of dark flesh parallel to the rim of the shoulder pad. At each end of the line I then painted diagonally backwards and joined the two lines up into a triangle. Check that both rear lines are parallel and adjust if necessary. http://i119.photobucket.com/albums/o126/Gillyfish2010/DSCF0166.jpg Then fill in the triangles and paint lines of dark flesh either side of your original line to thicken it. http://i119.photobucket.com/albums/o126/Gillyfish2010/DSCF0171.jpg If you’re feeling really adventurous, you can highlight this with the same mix you used for the boltgun casing. Numbers: This is trickier than the arrow and will take practice. Again, the same principle applies. Break it up into as few lines as possible and build it up that way. I find it incredibly helpful to have a reference book to hand to help guide your hand! In this instance, I’m painting the number 4 (curved numerals are harder!). Paint a back-to-front ‘L’ over the arrow. Ensure that the bottom is parallel with the pad rim and the upright is parallel with one of the uprights on your arrows. http://i119.photobucket.com/albums/o126/Gillyfish2010/P1010096.jpg Now paint two lines. One going diagonally downward and the other so it crosses your upright line (keep it parallel to the rim again). http://i119.photobucket.com/albums/o126/Gillyfish2010/P1010097.jpg Then paint another upright line with a dot on the end (I’ll have to get a photo of this at a later date, as I forgot to take one. Sorry!) Things still to do: Flesh. DA insignia. Gold. Purity seals. Holsters. Cloth (which I might save for another tutorial on robes) Link to comment https://bolterandchainsword.com/topic/124707-dark-angel-painting-tutorial/page/2/#findComment-1546856 Share on other sites More sharing options...
Lemariont Posted April 17, 2008 Share Posted April 17, 2008 Good tutorial battle brother. Link to comment https://bolterandchainsword.com/topic/124707-dark-angel-painting-tutorial/page/2/#findComment-1546917 Share on other sites More sharing options...
Antman677 Posted April 18, 2008 Share Posted April 18, 2008 hey gilly! jus saw your green power armor paint jobs...they look good. they have a glowing quality to it since all the edges are highlighted... have you ever painted any marines with the 'halo of light' highlights instead of extreme highlights on all edges of the armor? curious to see wat that might look like.. im been painting DW so havent gotten a chance to do darker power armor...although my RW are sitting pretty on the shelf waiting for a nice paintjob. Link to comment https://bolterandchainsword.com/topic/124707-dark-angel-painting-tutorial/page/2/#findComment-1547498 Share on other sites More sharing options...
Gillyfish Posted April 18, 2008 Author Share Posted April 18, 2008 Thanks for the responses. Antman, no I haven't tried the halo of light effect on power armoured miniatures. Probably the closest I've come tot hat are my Deathwing where I've tried to give them a less contrasting paint job, but it isn't truly halo effect. I will try to do some more tutorials for RW and DW, but they are likely to be a long way off I'm afraid! Link to comment https://bolterandchainsword.com/topic/124707-dark-angel-painting-tutorial/page/2/#findComment-1547671 Share on other sites More sharing options...
Isiah Posted April 18, 2008 Share Posted April 18, 2008 Gilly I think you ought to consider this article for submission to the B&C Librarium. Link to comment https://bolterandchainsword.com/topic/124707-dark-angel-painting-tutorial/page/2/#findComment-1547821 Share on other sites More sharing options...
The Unforgiven Angel Posted March 26, 2011 Share Posted March 26, 2011 Hi, i am new to space marines( just finished my nids) and i was looking at painting dark angels I think this is a great tutorial so far. Love to see how the finished model comes out as. ;) :ph34r: :lol: :D Link to comment https://bolterandchainsword.com/topic/124707-dark-angel-painting-tutorial/page/2/#findComment-2702222 Share on other sites More sharing options...
Beef Posted March 26, 2011 Share Posted March 26, 2011 Kind of bright but then again the OP did say "extreme highlights", looks good and with a wash to tone down the colours it would look great but then i cant talk as i paint my SW with extreme highlights as well/ Link to comment https://bolterandchainsword.com/topic/124707-dark-angel-painting-tutorial/page/2/#findComment-2702324 Share on other sites More sharing options...
Brother Caliban Posted January 24, 2012 Share Posted January 24, 2012 Brother Gillyfish, I am not into crudding all over you're post. However as a tutorial I think most forum users have expressed that the highlights are... just too much. Extreme highlighting is not an excuse for 'tron marines', or something. I consider this test model below extreme highlighting but merely with a little more subtlety as a highlight demands. The paint is far far too think on the example models. http://img.photobucket.com/albums/v153/caliban_knight/DAWIP.jpg If interested the original post is here http://www.bolterandchainsword.com/index.p...c=98614&hl= Link to comment https://bolterandchainsword.com/topic/124707-dark-angel-painting-tutorial/page/2/#findComment-2975573 Share on other sites More sharing options...
YounGunner Posted November 5, 2012 Share Posted November 5, 2012 I really like the extreme highlighting. I can understand how some others might not but I am definitely going to use your tutorial as my starting point when I paint my test models for my DA. I might try to tone it down a little by taking a "zenith lighting" kind of approach to the last highlight on the armor but I imagine that contrast looks really good from farther away. I normally paint with the "3 foot rule" in mind and I think these dark angles probably look cooler than a lot of other dark angels from 3 feet away. When I finally get around to it maybe I'll post the results on here if you want. Thanks a lot for the guide. Link to comment https://bolterandchainsword.com/topic/124707-dark-angel-painting-tutorial/page/2/#findComment-3229632 Share on other sites More sharing options...
Mithrilforge Posted November 5, 2012 Share Posted November 5, 2012 i think Gilly needs to redo this tutorial as from its inception to now, paints and inks/shades/glazes have come a loooong way ;) still,...it was a nice trip down memory lane :P mithril Link to comment https://bolterandchainsword.com/topic/124707-dark-angel-painting-tutorial/page/2/#findComment-3229642 Share on other sites More sharing options...
Komodo Posted November 5, 2012 Share Posted November 5, 2012 It's not bad to go from almost black green to almost white. But imo it must be done in a more subtle way. When I paint black, I go from the darkest grey to white. But white is applied only on corners, where that kind of reflex is possible. I'm not telling that your way is a bad way, no, they look good. It's just a matter of taste I guess. Link to comment https://bolterandchainsword.com/topic/124707-dark-angel-painting-tutorial/page/2/#findComment-3229819 Share on other sites More sharing options...
Recommended Posts
Archived
This topic is now archived and is closed to further replies.