Dorns Padawan Posted November 12, 2008 Share Posted November 12, 2008 Cool look forward to the Chaos Marine when you got the time (know what its like having no time!). Depends what Chapter you are gonna paint him but i quite liked the banner myself, the Halo just looks kinda Chaos'y (is that a word?). Overall its a nice little piece tbh, look forward to the finished article! Keep up the great work! ;) Link to comment https://bolterandchainsword.com/topic/151271-actual-scale-captain-orar-using-doghouses-tutorial/page/2/#findComment-1770096 Share on other sites More sharing options...
RazakelXIII Posted November 13, 2008 Share Posted November 13, 2008 He does look a lot better now. :) Can't wait to see this guy painted, nor can I wait for the Chaos marine. ^_^ Link to comment https://bolterandchainsword.com/topic/151271-actual-scale-captain-orar-using-doghouses-tutorial/page/2/#findComment-1770220 Share on other sites More sharing options...
Pig Of Sparta Posted November 14, 2008 Author Share Posted November 14, 2008 Cool look forward to the Chaos Marine when you got the time (know what its like having no time!). Depends what Chapter you are gonna paint him but i quite liked the banner myself, the Halo just looks kinda Chaos'y (is that a word?). Overall its a nice little piece tbh, look forward to the finished article! Keep up the great work! :D I think I get what you mean about the halo, he's going to be a Son of Orar, possibly even Orar himself, (although this is probably too much of a stretch of the imagination as I don't know what wargear he'd have or infact anything about him, but then does anyone except the fluff designers at GW?) The simplicity of the colour scheme appeals to me and I'm dying to try highlighting red up using a tutorial from white dwarf. Thanks Raz, I think he does too, his waist was waaay too skinny. The Chaos marine won't be here for a wee while yet, but I have started to carve up some bits to make him. James Link to comment https://bolterandchainsword.com/topic/151271-actual-scale-captain-orar-using-doghouses-tutorial/page/2/#findComment-1772706 Share on other sites More sharing options...
Doghouse Posted November 16, 2008 Share Posted November 16, 2008 Looking good mate, I really like the addition of the stomach plate. Nice touch that. I'll be watching where you go from here. :) Link to comment https://bolterandchainsword.com/topic/151271-actual-scale-captain-orar-using-doghouses-tutorial/page/2/#findComment-1774238 Share on other sites More sharing options...
Pig Of Sparta Posted November 16, 2008 Author Share Posted November 16, 2008 Looking good mate, I really like the addition of the stomach plate. Nice touch that.I'll be watching where you go from here. ;) Thanks Doghouse ;) , I'll be keeping this as up to date as I can. I got the mini primed today, so all the bits are on painting rigs just now for ease of access and I'll be starting the actual paintwork this week. I'll post pics once I've got some of it done. Link to comment https://bolterandchainsword.com/topic/151271-actual-scale-captain-orar-using-doghouses-tutorial/page/2/#findComment-1774407 Share on other sites More sharing options...
Captain Mick Posted November 16, 2008 Share Posted November 16, 2008 A really great looking marine, cant wait to see it painted ;). You can be proud of it :D. Link to comment https://bolterandchainsword.com/topic/151271-actual-scale-captain-orar-using-doghouses-tutorial/page/2/#findComment-1774416 Share on other sites More sharing options...
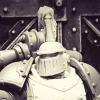
Pig Of Sparta Posted November 18, 2008 Author Share Posted November 18, 2008 Not much done so far except to get the basic colours on the mini, but I started to work the red up from mechrite red to nice bright red this afternoon ^_^ this took a little more work than I thought and involved multiple coats of very thin blood red. A few bits on the torso and legs need tidying up, but now it's on to the arms and back packs! front: http://i347.photobucket.com/albums/p456/pigofsparta/c-2.jpg back: (appologies for the poor focus) http://i347.photobucket.com/albums/p456/pigofsparta/b-2.jpg Once Ive got all the red done I'm going to get everything else painted up to the right 'flat' colours then I'll start the highlighting. As a slight aside (but not too far off topic) I discovered a couple of things when I started painting this guy; 1) whenever you work with greenstuff make sure you really smooth it into the rest of the model - as you can see there are a few places where my greenstuff work is visible. this however leads me on to; 2) Paint and Patience can yield amazing results - by going a little heavy with the basecoat in a few places and then taking time to touch up the subsequent coats I hope I've hidden and disguised some of my oversights quite well. Hopefully anyone trying this, or anything like it might find that useful, and I'm sure there's loads of people who will say "well, duh!" but as I'm still a greenstuff novice really I figure that there might be others out there who could learn from my mistakes. More pics to follow, James Link to comment https://bolterandchainsword.com/topic/151271-actual-scale-captain-orar-using-doghouses-tutorial/page/2/#findComment-1776497 Share on other sites More sharing options...
marine Posted November 18, 2008 Share Posted November 18, 2008 looks good in red Link to comment https://bolterandchainsword.com/topic/151271-actual-scale-captain-orar-using-doghouses-tutorial/page/2/#findComment-1776857 Share on other sites More sharing options...
The Emperor's Champion Posted November 18, 2008 Share Posted November 18, 2008 They need belts. They're too skinny in the middle ATM IMO. Link to comment https://bolterandchainsword.com/topic/151271-actual-scale-captain-orar-using-doghouses-tutorial/page/2/#findComment-1776882 Share on other sites More sharing options...
Pig Of Sparta Posted November 18, 2008 Author Share Posted November 18, 2008 They need belts. They're too skinny in the middle ATM IMO. I'll be adding some pouches/grenades to the waistline to bulk him up a little, hopefully he won't look so skinny then ^_^ Link to comment https://bolterandchainsword.com/topic/151271-actual-scale-captain-orar-using-doghouses-tutorial/page/2/#findComment-1776979 Share on other sites More sharing options...
RazakelXIII Posted November 18, 2008 Share Posted November 18, 2008 Wow, normally I don't like that bright Blood Red look too much, but you really pulled off just the right shade. I can't really tell where the GS is (if it really starts giving you trouble at some point though, you might try painting those areas black and then putting some boltgun metal on it to make it look battle-damaged/scratched, but then, and I realize he's not done yet, but I'm likin' this straight-out-of-the-manufactorum look). This will be amazing when it's finished. :lol: Link to comment https://bolterandchainsword.com/topic/151271-actual-scale-captain-orar-using-doghouses-tutorial/page/2/#findComment-1777067 Share on other sites More sharing options...
Dorns Padawan Posted November 19, 2008 Share Posted November 19, 2008 Pig Of Sparta: I have to say that it is certainly looking very good so far! It only looks skinny at the back but like already mentioned, you can hide that with a couple of pouches or even add some more GS? Like the paint job, it is certainly taking shape now! Which helmet and back pack are you going with? Can't wait to see the finished article! Link to comment https://bolterandchainsword.com/topic/151271-actual-scale-captain-orar-using-doghouses-tutorial/page/2/#findComment-1777103 Share on other sites More sharing options...
Octavulg Posted November 19, 2008 Share Posted November 19, 2008 I think it might actually help if you put the arms on a little further forward. Damn nice work, though. :P Link to comment https://bolterandchainsword.com/topic/151271-actual-scale-captain-orar-using-doghouses-tutorial/page/2/#findComment-1777144 Share on other sites More sharing options...
Ompfris Posted November 19, 2008 Share Posted November 19, 2008 That is a really nice red! my Blood Angels arer never that clean - I put it down to the lack of time I spend on each model. Again Good work Link to comment https://bolterandchainsword.com/topic/151271-actual-scale-captain-orar-using-doghouses-tutorial/page/2/#findComment-1777361 Share on other sites More sharing options...
Pig Of Sparta Posted November 19, 2008 Author Share Posted November 19, 2008 @RazakelXIII: thanks, it was really trial and error to get the red mix right to start with. I'm thinking of trying to scuff his armour up a little, but I'm not sure if I'd be pushing myself to far there, I really don't want to ruin this mini by messing up something that's not entirely necessary, so I may end up keeping the 'straight from the manufactorium' look, I'll decide closer to finishing him if it's worth attempting. @Dorns padawan: At the moment I'm veering towards the backpack with the banner, and either the mark iii or mk iv helmet, but that could all change when he's assembled. @Octavulg: thanks for the tip, there's a couple of holes drilled for pinning the arms just now so hopefully I'll get it right when I re-assemble him. @Ompfris: The secret's in adding water to it to get a nice smooth and brushstroke free finish, although there were a few places I had to go back and really water the red down to smooth out, you're right though, it takes too long to do an army that way. I've found with other mini's that blood red goes really well over skull white spray paint though and that can help speed things up. now a few pics of today's work: Helmets: (ignore the middle one for now) http://i347.photobucket.com/albums/p456/pigofsparta/d-1.jpg Left Arm: http://i347.photobucket.com/albums/p456/pigofsparta/e-1.jpg Right Arm: http://i347.photobucket.com/albums/p456/pigofsparta/f-1.jpg Banner: http://i347.photobucket.com/albums/p456/pigofsparta/g-1.jpg Backpack: http://i347.photobucket.com/albums/p456/pigofsparta/h-1.jpg There's a few paint splashes here and there I need to take care of, but that's most of the basic colours done now though, just the gold for the banner top to do. I'm not sure what colour to do the Skull and Laurel on the powerfist though, I'm torn between white, silver and gold, although gold is my least favoured of the three. I'm also thinking of maybe changing the wreath on the banner to a NMM gold effect but again, I'm not 100% sure just now. I'm also contemplating trying an actual mkiii helmet on the mini, I've got one kicking about on another model, but I don't really want to paint strip him if I can help it, hopefully one of the ones I've done so far will look okay. As always, all c&c is welcome, James (edit: I managed to get the gold basecoat on the crest of the banner pole this afternoon) Link to comment https://bolterandchainsword.com/topic/151271-actual-scale-captain-orar-using-doghouses-tutorial/page/2/#findComment-1777723 Share on other sites More sharing options...
Mr.Wolf Posted November 19, 2008 Share Posted November 19, 2008 Great job on the red, looks great. +1 on beefing up the waist ;) Link to comment https://bolterandchainsword.com/topic/151271-actual-scale-captain-orar-using-doghouses-tutorial/page/2/#findComment-1777927 Share on other sites More sharing options...
Pig Of Sparta Posted November 19, 2008 Author Share Posted November 19, 2008 @Mr Wolf: Thanks, although I still need to highlight it up. Ok, probably the last up date til next week, still quite a bit to do, but he's getting there. Mainly details, highlighting and the white left to do now. Oh and I've got to paint some pouches and grenades and see what fits him :P. I've decided that he's definately Captain Orar, from some time between the Horus Heresy and his death. Latest pics: Mark iii helmet: http://i347.photobucket.com/albums/p456/pigofsparta/j-1.jpg Mark iv helmet: http://i347.photobucket.com/albums/p456/pigofsparta/i-1.jpg Banner (decided against NMM): http://i347.photobucket.com/albums/p456/pigofsparta/k-1.jpg He's still in pieces for ease of painting, I just wanted to know which helmet you think looks better now he's got some colour on him, I'm swinging towards the mark iv one myself. When I get the chance I'm going to stick an Aquila transfer on his chest so that i can scuff it up a little to make it look like it's painted on his armour rather than sculpted, I want it to look like it was added to show his alliegiance during the Heresy. til next time, c&c is always welcome James Link to comment https://bolterandchainsword.com/topic/151271-actual-scale-captain-orar-using-doghouses-tutorial/page/2/#findComment-1778153 Share on other sites More sharing options...
Octavulg Posted November 19, 2008 Share Posted November 19, 2008 You may want those arms a little higher. Probably should be equal with the top of that little...thingy on the side of the helmet. Or with that collar on the back. Looking quite nice, BTW. :) Link to comment https://bolterandchainsword.com/topic/151271-actual-scale-captain-orar-using-doghouses-tutorial/page/2/#findComment-1778235 Share on other sites More sharing options...
Pig Of Sparta Posted November 20, 2008 Author Share Posted November 20, 2008 You may want those arms a little higher. Probably should be equal with the top of that little...thingy on the side of the helmet. Or with that collar on the back. Looking quite nice, BTW. :P Thanks mate. I've still got quite a bit to do on him though, should be a lot closer to completion this time next week. Thanks for the tip on the arms, they're proving a little awkward to get in the right place. At the moment they have pins in them and there's some corresponding holes in the torso, but I was thinking of making a couple of greenstuff fillers and using those to position them. Link to comment https://bolterandchainsword.com/topic/151271-actual-scale-captain-orar-using-doghouses-tutorial/page/2/#findComment-1779137 Share on other sites More sharing options...
Octavulg Posted November 20, 2008 Share Posted November 20, 2008 Blue tac works, though there can be a bit of a residue. That, or just glue them with a tiny amount of glue. Get em where you want em, note the position and *pop*. Link to comment https://bolterandchainsword.com/topic/151271-actual-scale-captain-orar-using-doghouses-tutorial/page/2/#findComment-1779205 Share on other sites More sharing options...
Asmodeus' Swordhand Posted November 20, 2008 Share Posted November 20, 2008 Wow, that red is ace! :D Link to comment https://bolterandchainsword.com/topic/151271-actual-scale-captain-orar-using-doghouses-tutorial/page/2/#findComment-1779222 Share on other sites More sharing options...
Shortsonfire79 Posted November 21, 2008 Share Posted November 21, 2008 Heh heh, I just thought of something..is this guy going to be a 'count as' Terminator? Because you only have one of him =-D ...as good looking as he is though. Link to comment https://bolterandchainsword.com/topic/151271-actual-scale-captain-orar-using-doghouses-tutorial/page/2/#findComment-1779485 Share on other sites More sharing options...
Octavulg Posted November 21, 2008 Share Posted November 21, 2008 Also, make sure to attach the backpack before you finalize the arms. You'd be surprised how much they change the look... Link to comment https://bolterandchainsword.com/topic/151271-actual-scale-captain-orar-using-doghouses-tutorial/page/2/#findComment-1779497 Share on other sites More sharing options...
Pig Of Sparta Posted November 22, 2008 Author Share Posted November 22, 2008 @Octavulg: thanks for the tips, I'll let you know what method I go with. @Asmodeus' Swordhand: thanks mate, I've never been the biggest fan of blood red cause no matter what I did it'd always have brushstrokes in it. I now kinda like the colour, although it takes a bit too much effort to get it like this for me to want to paint many more mini's this colour for a while :devil: @Shortsonfire79: I'm not sure, I kind of want to make him a nice scenic base and have him as a display mini, however I have worked out a profile and wargear for him, so I figured I could use him as a captain 'on loan' as it were as well, which would mean making him detachable from said scenic base, which takes effort, so at the moment I'm not sure. Link to comment https://bolterandchainsword.com/topic/151271-actual-scale-captain-orar-using-doghouses-tutorial/page/2/#findComment-1781399 Share on other sites More sharing options...
Pig Of Sparta Posted November 25, 2008 Author Share Posted November 25, 2008 Hi all, here's today's update. The cap is assembled now, as you'll see from the pics below, I've gone with the banner backpack, and the mark iv head. still a few bits and pieces to do, mainly highlighting, and the shoulder pad markings and banner insignia. I know what I want to put on 'em, just not the best way to go about it. without further ado, the pics: front: http://i347.photobucket.com/albums/p456/pigofsparta/l-1.jpg back: http://i347.photobucket.com/albums/p456/pigofsparta/n-1.jpg left side: http://i347.photobucket.com/albums/p456/pigofsparta/m-1.jpg right side: http://i347.photobucket.com/albums/p456/pigofsparta/p.jpg as usual, any c&c is welcome James Link to comment https://bolterandchainsword.com/topic/151271-actual-scale-captain-orar-using-doghouses-tutorial/page/2/#findComment-1785123 Share on other sites More sharing options...
Recommended Posts
Archived
This topic is now archived and is closed to further replies.