Rosco151 Posted December 18, 2009 Author Share Posted December 18, 2009 Argh, haven't done anything for ages! Finally got my sniper scouts prepped for painting, have done the red sections and am just deciding how to paint the camo cloaks. Will post a WIP picture later tonight. Also ordered some more stuff, got a pack of regular scouts so I have the option of fielding a ten man squad with mixed armament (bolters / sniper rifles and a heavy weapon). Also ordered one of the veterans to use as my force captain, the one with a plasma pistol and power sword (right foot placed on a rock). Bit disappointed, as his head looks like it's been squashed (it's about 20% thinner than my plastic guys helmets). Not sure if this is a common feature on this model or a casting flaw? The right eyepiece is kind of disfigured as well. I'll post a pic later, but think I'll look at returning him? Link to comment https://bolterandchainsword.com/topic/176370-slipping-back-down-the-slope/page/4/#findComment-2219056 Share on other sites More sharing options...
Nikolakhs Posted December 18, 2009 Share Posted December 18, 2009 These are nice and crisp man, I like the red and how you pulled it off. Now you just gotta drill out the barrels mate, it'll make em that much better. -Nikolakhs- Link to comment https://bolterandchainsword.com/topic/176370-slipping-back-down-the-slope/page/4/#findComment-2219122 Share on other sites More sharing options...
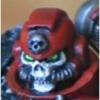
Rosco151 Posted December 19, 2009 Author Share Posted December 19, 2009 My hobby drill came with some other bits I ordered yeterday, I'm sat here drilling out barrels as I type this. Here's what I mean with my new veteran 'captain': http://i4.photobucket.com/albums/y106/Rosco151/IMG_5574.jpg Dunno if I'm being paranoid, but the head does seem kind of squashed to me. Anyone got this guy and noticed the same thing? Link to comment https://bolterandchainsword.com/topic/176370-slipping-back-down-the-slope/page/4/#findComment-2220082 Share on other sites More sharing options...
Rosco151 Posted December 24, 2009 Author Share Posted December 24, 2009 An update! I'm either getting busier, or lazier... So, what I'm working on atm: Razorback/Rhino for my Tactical Squad, Scout Snipers and my Captain http://i4.photobucket.com/albums/y106/Rosco151/IMG_5643.jpg Note the twin-linked assault cannons from the Crusader Upgrade Sprue, yet to try that out in a game, but hoping they'll prove worth the points. My Captain - not totally impressed with the quality of the mould. I clipped off the plasma pistol to replace it with a spare plastic one I had, will look much better when I pin it on. I'm holding off on this guy as I want to get the sword arm from the Emperors Champion to use as a Relic Blade. http://i4.photobucket.com/albums/y106/Rosco151/IMG_5645.jpg My Scout Snipers so far. I'm using a sergeant head from the tactical squad so make him a little more grizzled: http://i4.photobucket.com/albums/y106/Rosco151/IMG_5647.jpg http://i4.photobucket.com/albums/y106/Rosco151/IMG_5648.jpg Link to comment https://bolterandchainsword.com/topic/176370-slipping-back-down-the-slope/page/4/#findComment-2225550 Share on other sites More sharing options...
Rosco151 Posted December 24, 2009 Author Share Posted December 24, 2009 Oh yeah, been working on their fortress-monastery as well, behold! http://i4.photobucket.com/albums/y106/Rosco151/IMG_5642.jpg It's a bit seasonal I know, but those sheets of gingerbread could probably stop anything short of a volcano cannon Link to comment https://bolterandchainsword.com/topic/176370-slipping-back-down-the-slope/page/4/#findComment-2225640 Share on other sites More sharing options...
zenfarr Posted December 25, 2009 Share Posted December 25, 2009 My hobby drill came with some other bits I ordered yeterday, I'm sat here drilling out barrels as I type this. Here's what I mean with my new veteran 'captain': http://i4.photobucket.com/albums/y106/Rosco151/IMG_5574.jpg Dunno if I'm being paranoid, but the head does seem kind of squashed to me. Anyone got this guy and noticed the same thing? I have that marine, and yeah his head was messed up on mine too. When I got the MKII veteran box, all the models had horrible mould lines and the sergeant had a whole chunk of pewter attached to his eye. Took me hours to get all the mould lines off of them. Link to comment https://bolterandchainsword.com/topic/176370-slipping-back-down-the-slope/page/4/#findComment-2225684 Share on other sites More sharing options...
Rosco151 Posted December 25, 2009 Author Share Posted December 25, 2009 Ah, not just me then Zenfarr! It's funny how you get some miniatures that have problems like this. Going from memory, I can recall a couple of other metal ones with similar poses (heads turned to side, etc) that had issues with the head dimensions and casting quality... Funny story, when I ordered my last batch of scouts and the veteran to use as my captain, I also ordered a Librarian. That one was out of stock, so got my order minus that. Opened a present from my parents, and in amongst the jeans and a hooded jacket was the exact same librarian I had tried to order. Bless 'em, my folks always get me what I want, whether they know it or not! The Emperor moves in mysterious ways... Link to comment https://bolterandchainsword.com/topic/176370-slipping-back-down-the-slope/page/4/#findComment-2226260 Share on other sites More sharing options...
Slyfox1990 Posted December 26, 2009 Share Posted December 26, 2009 ""Am very sorry if this has already been asked before and I ve just missed it but what was your exact technique for the colour scheme? Colours used, steps used etc etc. As people mentioned before they do look quite Blood Angels-y and thats what I m doing at the moment. So far I ve not been able to achieve anything as good as you have so would welcome tips."" -Apologies, looked over the last page and found it :P Will definately be giving it a try myself! Everything is looking great so far with your models - keep it up! My one question is in regards to the darker recesses, how did you do them? Was it just a matter of ensuring that you didnt apply paint over these areas or did you do any form of black lining? Link to comment https://bolterandchainsword.com/topic/176370-slipping-back-down-the-slope/page/4/#findComment-2226560 Share on other sites More sharing options...
Rosco151 Posted December 27, 2009 Author Share Posted December 27, 2009 Hey Slyfox, yeah as I stated earlier in the thread it's just black undercoat, Mechrite red, thin layer of thinned blood red, then about three heavy coats of Baal Red. It comes out a little bright and shiny at first, but the Purity Seal dulls the colour ever so slightly to give it a darker finish overall. As for the shading, the larger recesses I tried to avoid painting with any red, but for the most part using a fine detail brush to apply Badab Black worked really well. You do have to be careful at this step not to overpaint onto the armour surface, as it ends up looking dirty, but for the most part the GW washes work really well to avoid this. Took a look at your BA stuff, it's pretty good! I like the highlighting and the dirt on your rhino in particular. One thing I'm really not sure about is applying any weathering to my stuff, have tried it ages ago and never really pulled it off... Link to comment https://bolterandchainsword.com/topic/176370-slipping-back-down-the-slope/page/4/#findComment-2226945 Share on other sites More sharing options...
Grokkit Posted January 11, 2010 Share Posted January 11, 2010 Hey have any of you guys got the massage about the new blood angels? Also hers a bump. =] Link to comment https://bolterandchainsword.com/topic/176370-slipping-back-down-the-slope/page/4/#findComment-2243305 Share on other sites More sharing options...
Brother-Perfernicus Posted January 11, 2010 Share Posted January 11, 2010 The marines look pretty good, even though they don't have EXTREME highlights, they still look good basic. I wouldn't risk puting on highlights. Link to comment https://bolterandchainsword.com/topic/176370-slipping-back-down-the-slope/page/4/#findComment-2243328 Share on other sites More sharing options...
Rosco151 Posted January 13, 2010 Author Share Posted January 13, 2010 Argh, been ages since I did anything! Stupid work getting in my way... However, I have managed to get 2 games in against one of my workmates. He played Orks with his eldest son. 1st game was an outright loss for me, but second game was a clear win for the Reapers. 2nd game: Had twin-linked assault cannons on my Razorback for the second game, well worth the points when it broke the Warbosses mob (below 50% = headed for the hills)! My tactical squad did pretty well, the missile launcher immobilised the Ork Battlewagon and took out it's weaponry. The flamer wiped out half of the mob it was carrying, then the razorback sent them packing. My Captain hung around in case anything got close enough to assault, but in the end all he did was shoot a fleeing Ork in the back. My scouts weren't very lucky with their sniper rifle rolls, and the heavy bolter was a little unlucky with it's hellfire shots. One was perfectly on target but only killed 1 Ork, the other missed by miles! They did keep the Warboss' mob busy for 3 turns in all, and gave me a chance to reposition the rest of my force to deal with them afterwards. I'd rather not use my scouts as a sacrifice every game though, hopefully next time I can make effective use of them. Link to comment https://bolterandchainsword.com/topic/176370-slipping-back-down-the-slope/page/4/#findComment-2245389 Share on other sites More sharing options...
Capt. Lysander Posted January 13, 2010 Share Posted January 13, 2010 Nice and clean base colours. Link to comment https://bolterandchainsword.com/topic/176370-slipping-back-down-the-slope/page/4/#findComment-2245700 Share on other sites More sharing options...
Rosco151 Posted January 17, 2010 Author Share Posted January 17, 2010 Finally! A picture of my completed Sniper Scouts! See? So good you can't see 'em! Link to comment https://bolterandchainsword.com/topic/176370-slipping-back-down-the-slope/page/4/#findComment-2250607 Share on other sites More sharing options...
Rosco151 Posted January 17, 2010 Author Share Posted January 17, 2010 Yeah, it was a bad joke... Here they are, just need decals and varnishing. http://i4.photobucket.com/albums/y106/Rosco151/ScoutSquadBanesWIP.jpg Oh yeah, suppose I should finish the heads off and stick them off at some point as well... Close up of Sgt Banes, back and front: http://i4.photobucket.com/albums/y106/Rosco151/SgtBanesWIPFront.jpg http://i4.photobucket.com/albums/y106/Rosco151/SgtBanesWIPBack.jpg Link to comment https://bolterandchainsword.com/topic/176370-slipping-back-down-the-slope/page/4/#findComment-2251333 Share on other sites More sharing options...
Capt. Lysander Posted January 18, 2010 Share Posted January 18, 2010 Haha. Nice aiming tubes. Reflects light well. Link to comment https://bolterandchainsword.com/topic/176370-slipping-back-down-the-slope/page/4/#findComment-2251952 Share on other sites More sharing options...
Rosco151 Posted January 18, 2010 Author Share Posted January 18, 2010 The lenses on the scopes you mean? I know, not very stealthy, but from a painting perspective there's very little else to brighten the model up if you know what I mean. I'm gonna explain it away and say they keep the lenses covered except when they make a shot... :) Bugger, just noticed, I painted the metal 'slats' on the inside of the Sgt's left gauntlet with boltgun metal, but completely forgot to do the same on his right gauntlet!!! Time for a quick retouch... Link to comment https://bolterandchainsword.com/topic/176370-slipping-back-down-the-slope/page/4/#findComment-2252324 Share on other sites More sharing options...
Vevic Posted January 19, 2010 Share Posted January 19, 2010 i wish i could my marines that good once i get around to starting them *looks on with wonder and amazment in my eyes* Link to comment https://bolterandchainsword.com/topic/176370-slipping-back-down-the-slope/page/4/#findComment-2253067 Share on other sites More sharing options...
Capt. Lysander Posted January 21, 2010 Share Posted January 21, 2010 The lenses on the scopes you mean? I know, not very stealthy, but from a painting perspective there's very little else to brighten the model up if you know what I mean. I'm gonna explain it away and say they keep the lenses covered except when they make a shot... ;) Bugger, just noticed, I painted the metal 'slats' on the inside of the Sgt's left gauntlet with boltgun metal, but completely forgot to do the same on his right gauntlet!!! Time for a quick retouch... It does indeed make the model stand out. You have really sharp eyes! I didn't notice the missing colour :) Link to comment https://bolterandchainsword.com/topic/176370-slipping-back-down-the-slope/page/4/#findComment-2256005 Share on other sites More sharing options...
Rosco151 Posted January 23, 2010 Author Share Posted January 23, 2010 The lenses on the scopes you mean? I know, not very stealthy, but from a painting perspective there's very little else to brighten the model up if you know what I mean. I'm gonna explain it away and say they keep the lenses covered except when they make a shot... :) Bugger, just noticed, I painted the metal 'slats' on the inside of the Sgt's left gauntlet with boltgun metal, but completely forgot to do the same on his right gauntlet!!! Time for a quick retouch... It does indeed make the model stand out. You have really sharp eyes! I didn't notice the missing colour -_- Yeah, sharp eyes after the event though! Started work on the Tactical Squads Razorback at last, here it is so far: http://i4.photobucket.com/albums/y106/Rosco151/IMG_6091.jpg Link to comment https://bolterandchainsword.com/topic/176370-slipping-back-down-the-slope/page/4/#findComment-2258890 Share on other sites More sharing options...
Capt. Lysander Posted January 29, 2010 Share Posted January 29, 2010 Looks good. Once again: very neat! Link to comment https://bolterandchainsword.com/topic/176370-slipping-back-down-the-slope/page/4/#findComment-2265648 Share on other sites More sharing options...
Rosco151 Posted June 8, 2010 Author Share Posted June 8, 2010 Throne, it's been a while since I've done anything with all this... Still haven't finished the Razorback, been busy with relocating back to the UK and preparing for an all expenses paid trip to Kandahar. Maybe I can get some painting done out there? Doubt it. Anyways, I had picked out a model to use for Captain Bryn Morr (the veteran with the power sword and plasma pistol), but wasn't too happy with the quality of the cast. The head was too narrow and some of the details were a bit screwed up. Between now and then GW released Gabriel Seth! Now that'll do nicely! Here's how he's looking so far, with the head from one of the LoTD Sgt's. http://i4.photobucket.com/albums/y106/Rosco151/IMG_7089.jpg Just got to remove the Flesh Tearer symbol from his right knee, then add a small skull to the tip of the wing on his left shoulder pad. Undecided whether to give him a jump pack or not, but I plan to give him a Storm Shield, probably slung on his back while he charges in to resolve some kind of disagreement with his Relic Blade. As Captain Morr says, "Not a problem in the galaxy that can't be solved with an 8-foot chainsword." Link to comment https://bolterandchainsword.com/topic/176370-slipping-back-down-the-slope/page/4/#findComment-2428153 Share on other sites More sharing options...
deadlift58 Posted June 8, 2010 Share Posted June 8, 2010 what method did you use to get those decals to look so good, mine are terrible Link to comment https://bolterandchainsword.com/topic/176370-slipping-back-down-the-slope/page/4/#findComment-2428595 Share on other sites More sharing options...
Rosco151 Posted June 9, 2010 Author Share Posted June 9, 2010 I use Microsol and Microset when I apply the transfers. It's the only way I've found to get them to sit on a curved surface like that. I wet the transfer and then lay it on the shoulder pad as normal, then brush over it with some of the Microsol/set. Leave it about ten or twenty seconds, then use a slightly damp bit of paper towel to position it and drain off the Microsol/set. Then I use a slightly damp brush to try and stroke out any creases. If there are still any creases where the transfer hasn't completely flattened onto the surface, I lightly brush it with some more Microsol/set, leave it for about ten seconds, then drain away the excess with a paper towel and use your brush to try and smooth out the creases again. Might take 2 or 3 applications to get the result you want. Then I just carefully paint round the edges of the transfer to conceal the see-through edge they always have. Just be careful, Microsol/set effectively softens the transfer, so if you're too rough it'll break into bits! I practiced on some spare shoulder pads til I was happy with the technique. As for the difference between Microsol and Microset, I think Sol is supposed to do the majority of the softening process, then Set is applied over the finished transfer to 'seal' it. To be honest, I think I only ever use Sol, then just varnish the model once it's done, seems to work fine... Link to comment https://bolterandchainsword.com/topic/176370-slipping-back-down-the-slope/page/4/#findComment-2429102 Share on other sites More sharing options...
Rosco151 Posted June 19, 2010 Author Share Posted June 19, 2010 Some progress on the Tactical Squads Razorback: http://i4.photobucket.com/albums/y106/Rosco151/IMG_7224.jpg http://i4.photobucket.com/albums/y106/Rosco151/IMG_7230.jpg http://i4.photobucket.com/albums/y106/Rosco151/IMG_7229.jpg http://i4.photobucket.com/albums/y106/Rosco151/IMG_7227.jpg Just got to paint the tracks, scrollwork and eagle, then some shading and detailing to do. Hoping to finish this one off sometime in the next week (finally!). A little more work done on Captain Morr as well, removed the Flesh Tearer symbology from his left shoulderpad and replaced it with a skull as per my Reaper chapter symbol: http://i4.photobucket.com/albums/y106/Rosco151/IMG_7221.jpg Not quite happy with this, think I'll take it off and cut a half mil or two from the back of the skull, it just seems to sit too high compared to the wing. Link to comment https://bolterandchainsword.com/topic/176370-slipping-back-down-the-slope/page/4/#findComment-2439883 Share on other sites More sharing options...
Recommended Posts
Archived
This topic is now archived and is closed to further replies.