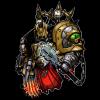
Dam13n Posted November 24, 2009 Share Posted November 24, 2009 Firstly the pics: http://i352.photobucket.com/albums/r358/MatthewDaunt/ActualScaleBloodRavenHoHFront.jpghttp://i352.photobucket.com/albums/r358/MatthewDaunt/ActualScaleBloodRavenHoHBack.jpg http://i352.photobucket.com/albums/r358/MatthewDaunt/ActualScaleBloodRavenHoHLeft.jpghttp://i352.photobucket.com/albums/r358/MatthewDaunt/ActualScaleBloodRavenHoHRight.jpg He is wearing Mk.3 Iron Armour with a slightly alternate torso. Parts list: - Dark Angel Terminator Legs (with sword detail and hip guards filed off and extensive green stuff reworking) - Torso entirely green stuff - Chaos Terminator Combi Flamer Arm (elbow resculped) - Space Marine Captain Storm Bolter (with strap and hand removed) - Dark Angel Terminator Power Sword (with cabling removed and elbow resculpted) - Dark Angel Bare Head - 1x Plain Terminator Shoulderpad (with green stuff detail and trim) - 1x Black Templar Terminator Shoulder Pad (with all detailed filed off except skull and green stuff detail and trim) - 1x Space Marine Jump Pack (with green stuff detail) - 1x Winged skull detail piece (from captain sprue attached to left kneepad) Base is just a terminator base with a single piece of slate and some green stuff ice with some sand and snow flock added Painting Formula: Red: Pre-basecoat - Scorched Brown 2:1 Water (2 Coats) Basecoat - Scab Red 2:1 Water (2 Coats) 1st Layer Highlight - Scab Red 3:1 Kommando Khaki (thinned as above) 2nd Layer Highlight - Scab Red 2:1 Kommando Khaki (") 3rd Layer Highlight - Scab Red 1:1 Kommando Khaki (") 1st Edge Highlight - Scab Red 2:3 Kommando Khaki (") 2nd Edge Highlight - Scab Red 1:2 Kommando Khaki (") 1st Glaze - Leviathan Purple 1:2 Water 2nd Glaze - Baal Red 2:1 Water (2 Coats) 1st Wash - Devlan Mud (into recesses) 2nd Wash - Badab Black (into deep recesses) Blending Glaze - Blood Red 1:10 Water (do not allow to pool) Edge and Battle Damage Highlight - Scab Red 1:2 Kommando Khaki Battle Damage Shading - Dark Flesh 2:1 Chaos Black Bone: Basecoat - Calthan Brown 2:1 Water 1st Layer Highlight - Calthan Brown 4:1 Bleached Bone (thinned as above) 2nd Layer Highlight - Calthan Brown 3:1 Bleached Bone (") 3rd Layer Highlight - Calthan Brown 2:1 Bleached Bone (") 1st Edge Highlight - Calthan Brown 1:1 Bleached Bone (") 2nd Edge Highlight - Calthan Brown 1:2 Blechaed Bone (") 3rd Edge Highlight - Bleached Bone (") Extreme/Dot Highlight - Skull White (") 1st Wash - Devlan Mud 1:2 Water (towards recesses) 2nd Wash - Devlan Mud 1:1 Water (into recesses) Reapply Skull White Extreme/Dot Highlight Black: Reapplied Chaos Black Basecoat Charadon Granite 2:1 Water 1st Layer Highlight - Charadon Granite 2:1 Codex Grey 2nd Layer Highlight - Charadon Granite 1:1 Codex Grey 1st Wash - Badab Black 1:1 Water 2nd Wash - Pure Badab Black into recesses 1st Edge Highlight - Codex Grey 2nd Edge Highlight - Codex Grey 1:1 Fortress Grey Extreme Edge Highlight - Fortress Grey For the Metal NMM I applied the above layers but teh highlights were broader Finished with Extreme/Dot highlights of Skull White Gold NMM: Basecoat - Calthan Brown 2:1 Water Layer Highlight - Snakebite Leather 2:1 Water 1st Wash - Devlan Mud 2nd Wash - Badab Black Relayer - Snakebite Leather 2:1 Water Layer Highlight - Bubonic Brown 2:1 Water Edge Highlight - Bleached Bone 2:1 Water Extreme/Dot Highlight - Skull White 2:1 Water Lightning Blade: Chaos Black Undercoat Stipple - Regal Blue Basic Lightning Aura - Enchanted Blue 1st Highlight - Ice Blue 2nd Highlight - Skull White Wash - Asurmen Blue Reapply Skull White Highlight For the head I followed the painting faces tutorial from White Dwarf... Base: Basecoat - Space Wolves Grey 1:1 Kommando Khaki Drybrush - Skull White (2 coats) Wash - Asurmen Blue 1:5 Water Drybrush - Skull White Wash - Asurmen Blue 1:2 Water (into recesses) Drybrush - Skull White Wash - Asurmen Blue (just the ice - 2 coats) 1st Layer - Ice Blue (ice only) 2nd Layer - Space Wolves Grey (") Edge Highlight - Skull White (") Gloss Varnish (") Rim - Shadow Grey That's everything I can remember WIP Topic Comments and Criticisms welcome... Dam13n Link to comment https://bolterandchainsword.com/topic/185579-actual-scale-blood-raven-captain/ Share on other sites More sharing options...
Brother Loring Posted November 24, 2009 Share Posted November 24, 2009 Very nice, he looks superbly battle-worn yet pristine as a marine should do! I really like the NMM on the storm bolter. Link to comment https://bolterandchainsword.com/topic/185579-actual-scale-blood-raven-captain/#findComment-2194593 Share on other sites More sharing options...
High Marshal Sigfeird Posted November 24, 2009 Share Posted November 24, 2009 Dude this is by far the most awesome thing i have ever seen, i doff my cap to you sir ! Link to comment https://bolterandchainsword.com/topic/185579-actual-scale-blood-raven-captain/#findComment-2194669 Share on other sites More sharing options...
Dark Sensei Posted November 24, 2009 Share Posted November 24, 2009 Impressive work ! Out of personnal experience, I think it'll be much easyer to work with Milliput (the Yellow / grey one, the package with the red writing) for all the armour work, easyer to file and t work with sandpaper than GS. It would give you sharper edges (thinking about the shoulderpads especially). Congrats for the tough job ! I would not have the patience ann even less the talent. DS Link to comment https://bolterandchainsword.com/topic/185579-actual-scale-blood-raven-captain/#findComment-2194691 Share on other sites More sharing options...
Doghouse Posted November 24, 2009 Share Posted November 24, 2009 He looks even better finished (just found this via the link in your WIP thread :P ). Love the face and the weathering especially and the Mk III legs are really nice. Brilliant stuff! :P Link to comment https://bolterandchainsword.com/topic/185579-actual-scale-blood-raven-captain/#findComment-2194929 Share on other sites More sharing options...
Twin .44 Posted November 24, 2009 Share Posted November 24, 2009 Awesome! It is quite an amazing model, I take my hat off to you! I have one concern, Are you sure that jump pack could lift him? :huh: Link to comment https://bolterandchainsword.com/topic/185579-actual-scale-blood-raven-captain/#findComment-2194978 Share on other sites More sharing options...
Dam13n Posted November 24, 2009 Author Share Posted November 24, 2009 Thanks all, especially the primoginator of actual scale... doffs metaphorical cap to doghouse... :lol: Responses: Dark Sensei - I have two boxes of the stuff, I find it too sticky and fiddly to manipulate so only use it very rarely if at all... but to each their own... Twin .44 - Could it really lift a normal sized space marine?? that is the question... :( Laterz all... Dam13n Link to comment https://bolterandchainsword.com/topic/185579-actual-scale-blood-raven-captain/#findComment-2195072 Share on other sites More sharing options...
FuriousFerret Posted November 25, 2009 Share Posted November 25, 2009 excellent! Link to comment https://bolterandchainsword.com/topic/185579-actual-scale-blood-raven-captain/#findComment-2196002 Share on other sites More sharing options...
Dark Sensei Posted November 25, 2009 Share Posted November 25, 2009 Did you try watering it a bit ? may sound like a weirdo's question but I know some GS practitionner that didn't even think that was possible when trying Y/G for the first time. http://i145.photobucket.com/albums/r226/Dark-Sensei/Sculpted%20stuff/ganteletdeathwatchwip005.jpg From Allan C, hmmm have to think about mailing that one to see what's next 8) Y/G makes smooth surfaces and sharp angles and that's a must for armour. DS Link to comment https://bolterandchainsword.com/topic/185579-actual-scale-blood-raven-captain/#findComment-2196053 Share on other sites More sharing options...
Luku Posted November 26, 2009 Share Posted November 26, 2009 To avoid the 'rounding off'of GS, use a 50/50 mix of GS and Milliput.....works a charm... Link to comment https://bolterandchainsword.com/topic/185579-actual-scale-blood-raven-captain/#findComment-2197111 Share on other sites More sharing options...
Terrible_Trygon Posted November 28, 2009 Share Posted November 28, 2009 Could just use Brown Stuff. It's like green stuff but is generally smoother and sharper to work with, and is no where near as sticky. Link to comment https://bolterandchainsword.com/topic/185579-actual-scale-blood-raven-captain/#findComment-2198675 Share on other sites More sharing options...
-Brother Sargent Tiberius- Posted November 29, 2009 Share Posted November 29, 2009 This is one of my favorite actual scale marine. Everything is in proportion! good job! Link to comment https://bolterandchainsword.com/topic/185579-actual-scale-blood-raven-captain/#findComment-2199432 Share on other sites More sharing options...
Recommended Posts
Archived
This topic is now archived and is closed to further replies.