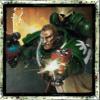
EPK Posted December 4, 2009 Share Posted December 4, 2009 Updates posted normally to the most recent bottom post as I realized there is a limit to how many photos can be in a post. Original Dec. Post - Sorry if these images aren't great. Not bad for a camera phone though. (Mods - if you want me to merge this with my objective marker thread, just let me know. That's become mostly about the resupply pod though, so I figured I would start this separate) Most of the regular power armor marines have been based since this photo. As for the rhino, I was going to try adding some inscription type lettering to the right panel (it's left). Can't see this on the photo, but the top also has bone doors with the red double headed arrow on them. I've since learned that the emblem on his shoulder should be as if made from stone. Going forward I'll try to depict that (like on some of the dreads icons), rather than metallic. I've also completed the basing and his sword (blueish electric looking scheme) since this photo. Link to comment https://bolterandchainsword.com/topic/186456-epks-wip-da-army-pic-heavy/ Share on other sites More sharing options...
Brother Loring Posted December 4, 2009 Share Posted December 4, 2009 The dread looks a bit fuzzy in the first pic and hidden in the 2nd, but the sergeant in the 2nd pic loks superb! The rhino looks neat too! I look forward to seeing some nice pics. Link to comment https://bolterandchainsword.com/topic/186456-epks-wip-da-army-pic-heavy/#findComment-2205013 Share on other sites More sharing options...
EPK Posted December 4, 2009 Author Share Posted December 4, 2009 The dread looks a bit fuzzy in the first pic and hidden in the 2nd, but the sergeant in the 2nd pic loks superb! The rhino looks neat too! I look forward to seeing some nice pics. Thanks! Yea, that photo was taking a bit impromptu when I first started painting these fellas. Since then, I almost always set up at least a proper white background. I'll get some updates up when I get more photos. I like the sarge myself. He hasn't gotten match play though lately, I've been leaning towards Deathwing heavy and only one tactical squad in which my other robbed sergeant usually takes the lead. Link to comment https://bolterandchainsword.com/topic/186456-epks-wip-da-army-pic-heavy/#findComment-2205015 Share on other sites More sharing options...
MainlyPainting Posted December 5, 2009 Share Posted December 5, 2009 in you're second pic the space marine at the front looks awesome, what did you use to make it? Link to comment https://bolterandchainsword.com/topic/186456-epks-wip-da-army-pic-heavy/#findComment-2205796 Share on other sites More sharing options...
EPK Posted December 7, 2009 Author Share Posted December 7, 2009 in you're second pic the space marine at the front looks awesome, what did you use to make it? That's just your standard sergeant from a tactical sprue with a added Dark Angel back back symbol. Painting-wise, all my Power armored troops were done the same way, which was also fairly easy (it's been a while since I did these, but I think this was the basic recipe)... Armor Black Prime Orkhide shade basecoat ("overbrushed" to retain black shadowing) Dark Angel Green lightly dry brushed to give it a bit more sheen (Orkhide shade is fairly dull) Mix Snot green/dark angel green highlights (not have been equal parts. Probably more DA green) Snot green extreme highlight where needed Bone areas - Black Prime Khermi Brown base (leave black showing in deep recesses) Bleached bone highlight, leave some brown edges towards recesses Bleached bone/skull white highlight Maybe straight skull white extreme highlight Skin Black Prime Tallarn Flesh basecoat Elf flesh drybrush (may have been a fairly light wash of sepia in there) Weapons Black prime of course Drybrush metal areas with boltgun metal (gives a tarnished dark look) Wash of black of metal parts, bit of highlight again with boltgun (mithril silver will probably work well if you have it for a brigther highlight) Mechrite Red base for red areas Blazing orange highlight on the red Damaged area of the chainsword was simply done with laying down black first where you want the damage then going over that with boltgun silver, leaving some black edges Link to comment https://bolterandchainsword.com/topic/186456-epks-wip-da-army-pic-heavy/#findComment-2207711 Share on other sites More sharing options...
EPK Posted December 7, 2009 Author Share Posted December 7, 2009 Here are some better shots of the Dread (I lightened them a tad in photoshop, hopefully it brought out some of the color a bit). I actually did try my hand at some subtle blending with this as the large flat surfaces made it easier. Not sure if they come out so well in the photos though. - Link to comment https://bolterandchainsword.com/topic/186456-epks-wip-da-army-pic-heavy/#findComment-2207713 Share on other sites More sharing options...
sword brethren Posted December 7, 2009 Share Posted December 7, 2009 nice dread! but the thing i really like is the shield idea for the termy, i may have to steal that ;) nice work Link to comment https://bolterandchainsword.com/topic/186456-epks-wip-da-army-pic-heavy/#findComment-2207861 Share on other sites More sharing options...
EPK Posted December 7, 2009 Author Share Posted December 7, 2009 nice dread! but the thing i really like is the shield idea for the termy, i may have to steal that :P nice work That's a stock shield for an old school metal terminator sergeant - you may be able to pick them up off ebay if you want to use one for the newer terminator models. Or just make them out of plastic-card. Pretty basic shape which you could make anyway you wanted. With painting in mind, I thought it needed something (rather than just painting a flat color) so I did the line which stood for him being part of the 3rd company prior to being inducted into the 1st Co./inner circle than I just added an additional "heraldry" type sword with some scrawling. Link to comment https://bolterandchainsword.com/topic/186456-epks-wip-da-army-pic-heavy/#findComment-2207983 Share on other sites More sharing options...
EPK Posted December 8, 2009 Author Share Posted December 8, 2009 Did a bit more to the old metal terminator sergeant, namely the finished the power sword. Still need to paint he base for this fella. Link to comment https://bolterandchainsword.com/topic/186456-epks-wip-da-army-pic-heavy/#findComment-2209049 Share on other sites More sharing options...
EPK Posted December 24, 2009 Author Share Posted December 24, 2009 I don' t know how some of you guys do the crazy detailed optics. Do you use a magnifying glass, lol? Did my best, here are some updates. Link to comment https://bolterandchainsword.com/topic/186456-epks-wip-da-army-pic-heavy/#findComment-2225280 Share on other sites More sharing options...
EPK Posted December 28, 2009 Author Share Posted December 28, 2009 Link to comment https://bolterandchainsword.com/topic/186456-epks-wip-da-army-pic-heavy/#findComment-2228127 Share on other sites More sharing options...
EPK Posted January 4, 2010 Author Share Posted January 4, 2010 Was a little heavy handed on the Power sword compared to the other old metal terminator sergeant And here's a shot of all ten I have finished thus far (have another 10 or so to go). I finished painting the bases yesterday. Link to comment https://bolterandchainsword.com/topic/186456-epks-wip-da-army-pic-heavy/#findComment-2234284 Share on other sites More sharing options...
EPK Posted January 26, 2010 Author Share Posted January 26, 2010 The dread is basically done, though I haven't filled in the scrolls yet as I don't know what I should put in them. Any suggestions? Obviously a name should go in one, but not both. I also decided I would put former company icons on heraldry shields and try my hand at some battle damage. This chap is formerly of the 5th company. Do you think I should add something, maybe in red, to those bone areas? Now, I noticed that this battle damage really only works when viewed from the side or back. If you view it straight on from the front, it just looks flat. I assume, as it is actually flat, this may be hard to avoid. Any pointers? And next on the list - Link to comment https://bolterandchainsword.com/topic/186456-epks-wip-da-army-pic-heavy/#findComment-2261856 Share on other sites More sharing options...
Capt. Lysander Posted January 31, 2010 Share Posted January 31, 2010 I like the plain bone: I think that's probably enough. Your Raven Wing bikes also look really good: very nice highlighting. Link to comment https://bolterandchainsword.com/topic/186456-epks-wip-da-army-pic-heavy/#findComment-2267889 Share on other sites More sharing options...
EPK Posted February 4, 2010 Author Share Posted February 4, 2010 Thanks Lysander. Made a little progress on the Ravenwing. Need to do the final highlight in white on those "feathered" areas, but was going to do it all after I have the actual highlights on the black bike parts. Also started to kitbash this hold Terminator Chaplain. Any suggestions on developing him further are most welcome. What do you think about the long scroll on his right shoulder? Too long? I sort of wanted it to be like the current terminator chaplain model but did not want to cover any of this models details (like the skull located on the pelvic armor), so I didn't place it dangling from his belt. I thought about adding a blast guard to that shoulder, but why would a terminator need that? Also, perhaps he needs some purity seals on his left shoulder to balance him out a bit? Link to comment https://bolterandchainsword.com/topic/186456-epks-wip-da-army-pic-heavy/#findComment-2273597 Share on other sites More sharing options...
EPK Posted February 16, 2010 Author Share Posted February 16, 2010 Finished a couple more heraldry shields Also finished a few more highlights on the bikes (winged parts and black highlights) I feel like the black highlighting may be a tad thick and the transition of the feathers on the banner post a bit abrupt. For the second problem, does anyone think a white wash of sort would help blend it? Link to comment https://bolterandchainsword.com/topic/186456-epks-wip-da-army-pic-heavy/#findComment-2288083 Share on other sites More sharing options...
EPK Posted March 25, 2010 Author Share Posted March 25, 2010 Wow, it's been over a month since I last updated. And this is really as far as I got (along with basecoating another 5 terminators) I know, didn't drill the barrels - but I don't actually own anything to drill them with. When the time comes that I do, I'll probably just do as many mini's as possible in one sitting... and then touch up the barrels. : ( Link to comment https://bolterandchainsword.com/topic/186456-epks-wip-da-army-pic-heavy/#findComment-2333369 Share on other sites More sharing options...
EPK Posted March 30, 2010 Author Share Posted March 30, 2010 Well, I actually used this fella in a game over the weekend, and I was sad he wasn't properly painted up. So, the last few paintin sessions, I've been giving him some love. Attempted a little freehand, though I'm not so good at such thin lines. I also tried a little embellishment of the turrets bone color, with a highlight color, but sadly didn't like it (so I painted back over with the normal bone). Do you think the frames of the vents being the bone color is too much - as in too busy? I was also contemplating changing them back to simply green. Link to comment https://bolterandchainsword.com/topic/186456-epks-wip-da-army-pic-heavy/#findComment-2339648 Share on other sites More sharing options...
Recommended Posts
Archived
This topic is now archived and is closed to further replies.