Pig Of Sparta Posted July 18, 2010 Share Posted July 18, 2010 Thought I'd throw some pics up of my second unit I'm painting for the CotI VI. I couldn't get hold of the parts I needed to complete the Land Speeder I was going to paint so I asked The Angelus Sanctus if it's be ok to substitute a unit so I wouldn't automatically fail my vow. Thankfully he said yes so here's what I've done so far (they started today as bare undercoated mini's): http://i347.photobucket.com/albums/p456/pigofsparta/Space%20Wolves%20Army/WG3.jpg http://i347.photobucket.com/albums/p456/pigofsparta/Space%20Wolves%20Army/WG2.jpg http://i347.photobucket.com/albums/p456/pigofsparta/Space%20Wolves%20Army/WG1.jpg the armour plates are pretty much done now, so it's on to the detailing :) any comments or criticism appreciated thanks James Link to comment https://bolterandchainsword.com/topic/206710-tda-wolf-guard-pack-leaders/ Share on other sites More sharing options...
Emperor's Scourge Posted July 19, 2010 Share Posted July 19, 2010 I like what I see man g/j. Link to comment https://bolterandchainsword.com/topic/206710-tda-wolf-guard-pack-leaders/#findComment-2466130 Share on other sites More sharing options...
Pig Of Sparta Posted July 19, 2010 Author Share Posted July 19, 2010 Thanks Emperor's Scourge hope to have more done soon. I really need to get on and paint the packs these guys are leading as well... James Link to comment https://bolterandchainsword.com/topic/206710-tda-wolf-guard-pack-leaders/#findComment-2466317 Share on other sites More sharing options...
deadlift58 Posted July 19, 2010 Share Posted July 19, 2010 looking good so far...is that shadow grey with a mud wash? because if it is, it looks wayyyy better than when i tried that Link to comment https://bolterandchainsword.com/topic/206710-tda-wolf-guard-pack-leaders/#findComment-2466414 Share on other sites More sharing options...
Pig Of Sparta Posted July 19, 2010 Author Share Posted July 19, 2010 Thanks deadlift58. The recipe I use is this: undercoat Chaos Black Basecoat Shadow Grey light drybrush of Space Wolves Grey wash whole mini with Badab Black drybrush downwards with Space Wolves Grey lighter drybrush downwards with Skull White wash recesess with watered down Dark Flesh wash 'inside' the previous wash with watered down Scorched Brown wash the whole mini with watered down Scorched Brown it's a bastardised version of Kapturowski's techinique for painting 13th company wolves. But it's nice and quick for doing a large area of power armour allowing you to spend more time on the detailing. thanks James Link to comment https://bolterandchainsword.com/topic/206710-tda-wolf-guard-pack-leaders/#findComment-2466415 Share on other sites More sharing options...
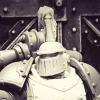
Pig Of Sparta Posted July 21, 2010 Author Share Posted July 21, 2010 More photos of how these are progressing: http://i347.photobucket.com/albums/p456/pigofsparta/Space%20Wolves%20Army/DSCF8649.jpghttp://i347.photobucket.com/albums/p456/pigofsparta/Space%20Wolves%20Army/DSCF8650.jpg http://i347.photobucket.com/albums/p456/pigofsparta/Space%20Wolves%20Army/DSCF8651.jpghttp://i347.photobucket.com/albums/p456/pigofsparta/Space%20Wolves%20Army/DSCF8652.jpg http://i347.photobucket.com/albums/p456/pigofsparta/Space%20Wolves%20Army/DSCF8653.jpghttp://i347.photobucket.com/albums/p456/pigofsparta/Space%20Wolves%20Army/DSCF8654.jpg I'm particularly pleased with the skull on the third one's belt as I tink it looks nice and dry and old. I'm gonna hit it with a glaze or two just to tie the layers tother a little more. Faces and hair should hopefully be finished tomorrow then it's finishing up the details and basing... any comments or criticism are appreciated as usual :) thanks James Link to comment https://bolterandchainsword.com/topic/206710-tda-wolf-guard-pack-leaders/#findComment-2468743 Share on other sites More sharing options...
deadlift58 Posted July 22, 2010 Share Posted July 22, 2010 they are progressing awesome. i may have to give it a whirl...gotta figure out all that drybrushing stuff and how to properly just wash a recess...always makes a disaster for me. thanks for the answer, that seems like alot of work, but you say it isnt. you sir, are a better painter than i. I just basecoated mine fenris grey, black wash, now im stuck what to do...any reason for the particular types of drybrushing, its a technique im not too shabby at. Link to comment https://bolterandchainsword.com/topic/206710-tda-wolf-guard-pack-leaders/#findComment-2468837 Share on other sites More sharing options...
Pig Of Sparta Posted July 22, 2010 Author Share Posted July 22, 2010 Thanks deadlift58. The reason for the direction of the drybrush is that it catches areas that would naturally catch the light. So by drybrushing downwards you create a nice fade from light to dark. Washing the recesses is actually easier than it sounds. If you water down some paint (any paint it doesn't matter) and give it a try on someting you'll find that the surface tension of the water actually controls the flow of the wash quite well. So all you need to do is run your bush along the lines of the mini and the wash will flow into them :wub:. I wish you luck with trying this, but don't be afraid to experiment :no: James Link to comment https://bolterandchainsword.com/topic/206710-tda-wolf-guard-pack-leaders/#findComment-2468982 Share on other sites More sharing options...
Recommended Posts
Archived
This topic is now archived and is closed to further replies.