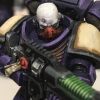
Slyen Posted September 1, 2010 Share Posted September 1, 2010 So I began a test model today for a new color scheme. I swear this is like the hundredth marine that I've painted a different way. I'm not totally worried about mold lines on the test mini nor how think it is thanks to me hobbling together pieces where I could find them, some of which were already primed... Anyway I've got some of the new Forgeworld mini's coming and wanted to test out my color scheme before they got here. So without further ado, here are some pictures! http://i42.photobucket.com/albums/e348/Slyen/40k%20Stuff/SDC11163.jpg http://i42.photobucket.com/albums/e348/Slyen/40k%20Stuff/SDC11164.jpg http://i42.photobucket.com/albums/e348/Slyen/40k%20Stuff/SDC11165.jpg On the last picture I took it just after putting down a wash of Ogryn Flesh. I was following a paint guide for yellow I found on site. It can be seen here. It does not seem to work out so well on a flattened out shoulder pad however. Very happy about results of it on the chest eagle. Quite pleased with the blue though, Got the right color down relatively easily. Next thing I will be doing are the eyes I think. So I know its not a proper test mini... what with the weapons and back pack and the like not down yet and all.... but C&C in the meantime? Link to comment https://bolterandchainsword.com/topic/209777-an-almost-ultramarine/ Share on other sites More sharing options...
winterdyne Posted September 2, 2010 Share Posted September 2, 2010 When washing on flat areas, generally what's meant is a directed wash - you just apply the wash into the recess, don't slosh it all over, and then blend it out to smooth the shade in whatever direction. Link to comment https://bolterandchainsword.com/topic/209777-an-almost-ultramarine/#findComment-2502770 Share on other sites More sharing options...
Slyen Posted September 2, 2010 Author Share Posted September 2, 2010 When washing on flat areas, generally what's meant is a directed wash - you just apply the wash into the recess, don't slosh it all over, and then blend it out to smooth the shade in whatever direction. What if there is no recesses though? I filed the pad down in an effort to simulate what I will be working with and with it being an older pad there was no little indent lines along the inner pad. Link to comment https://bolterandchainsword.com/topic/209777-an-almost-ultramarine/#findComment-2503014 Share on other sites More sharing options...
blackbabyjesus Posted September 2, 2010 Share Posted September 2, 2010 if there's no recesses a wash won't work, end of, on the up side though, if there's no recesses, there's no shadows and so it shouldn't need shading! Link to comment https://bolterandchainsword.com/topic/209777-an-almost-ultramarine/#findComment-2503093 Share on other sites More sharing options...
Hemal Posted September 3, 2010 Share Posted September 3, 2010 if there's no recesses a wash won't work, end of, on the up side though, if there's no recesses, there's no shadows and so it shouldn't need shading! It most certainly does need shading although at the edges of teh pad rather than all over... and a wash applied over an area is really a tint or glaze - the Ogryn will dry to make the modle look dirty and dusty rather than provide clear shading on the flat area, you have to retouch up the base colour upto almost the edge of the pad, such that you get shading of ogryn in area closest to the pad trim. If you apply thin coats of yellow, gradually building up towards the centre with yellow + white (I mean really thin such that you are just swashing the area with paint, then letting it dry) it will look exceptional... One comment is MOLD LINES - I see a fair few on your model - try to scrape them away with a knife or file them away if you can.... Also don't glue the packs on bedfore painting, I can see yellow on the pad vents (actually could be used to have NMM on the vents, implying a reflection of the bare metal - might use that myself!!! :-) ) Link to comment https://bolterandchainsword.com/topic/209777-an-almost-ultramarine/#findComment-2503534 Share on other sites More sharing options...
Obliterator Posted September 3, 2010 Share Posted September 3, 2010 When washing on flat areas, generally what's meant is a directed wash - you just apply the wash into the recess, don't slosh it all over, and then blend it out to smooth the shade in whatever direction. What if there is no recesses though? I filed the pad down in an effort to simulate what I will be working with and with it being an older pad there was no little indent lines along the inner pad. Same thing basically, but I'd thin down the Ogryn Flesh wash as you need a more subtle approach for a 'flat' area. Just apply a thin glaze of the wash instead of soaking it, and pull the wash towards the bottom of the shoulderpad, towards the corners. if there's no recesses a wash won't work, end of, on the up side though, if there's no recesses, there's no shadows and so it shouldn't need shading! A ball also hasn't got recesses, but it's got a ton of shadows. Because of the curves of the power armour, the light won't be equally strong on all parts of the armour, thus shades and highlights will still be necessary. Link to comment https://bolterandchainsword.com/topic/209777-an-almost-ultramarine/#findComment-2503624 Share on other sites More sharing options...
Slyen Posted September 4, 2010 Author Share Posted September 4, 2010 Thanks for all of the advice regarding the Yellow. I think, judging off of the results on the chainsword that maybe my best bet is to just do a coat of Iyanden Darkson then follow up with a coat of Sunburst. I'm wanting to try out Hemal's yellow recommendation, though I don't know when I'll be painting any more Assault Marines. So yeah a bit about why the pad is yellow. I planning on doing this army up as an all, or at least mostly all Beakie army. I want to take advantage of the new models from Forgeworld, and what better thing to do than to do a new army for them especially when I don't really have an established one. So I'm working out the ideas on how to make them more fluffy and have it work with a paint scheme and the idea of the Blood Angels having different colored helmets came to mind. Well rather than helmet color, I decided that the mostly blank shoulder pad would be a good place to mark it out and I would also be designating them differently than the blood angels. So Yellow is for an assault squad, Red is for a devastator squad, and blue is designating a Tactical squad. Seeing as the army is going to be primarily shooty, I'm not expecting to paint any more assault troops or any devastators until after the main force is done. Anyway I ramble. I finished the test marine yesterday or the day before. Can't remember as my time keeping has been focused to time of day due to work and a new schedule. ~_~ Needed to find my Camera too and finnally did, its so bad I don't know how it even got where it did. Going to work on a test marine for a tactical squad next I think. I know about the mold lines too, wasn't totally concerned about them for this mini... not really going to be trying to show it off to much besides here. :blink: Though the following ones should have less, I promise! And now for some pictures. http://i42.photobucket.com/albums/e348/Slyen/40k%20Stuff/FinishedTestFront.jpg http://i42.photobucket.com/albums/e348/Slyen/40k%20Stuff/FinishedTestLeft.jpg http://i42.photobucket.com/albums/e348/Slyen/40k%20Stuff/FinishedTestRear.jpg http://i42.photobucket.com/albums/e348/Slyen/40k%20Stuff/FinishedTestRight.jpg Did one of a close up of the shoulder so you can see how it turned out. I followed the recipe but then ended up painting the bulk of in Sunburst Yellow and leaving think lines of where the wash was. Not totally clean but it will do. http://i42.photobucket.com/albums/e348/Slyen/40k%20Stuff/FinishedTestShoulderCloseUp.jpg Anyway... Thoughts? Link to comment https://bolterandchainsword.com/topic/209777-an-almost-ultramarine/#findComment-2504109 Share on other sites More sharing options...
Slyen Posted September 14, 2010 Author Share Posted September 14, 2010 So I hate Double posting but I have a update. Forgeworld kits came in yesterday and when I wasn't chopping up my fingers I ran into a little bit of an issue with a dread. Like the bases what can be described only as sprue bits are extremely annoying and getting rid of them cases damage to the model sometimes. Not only that but on their Mk 4 dreadnought body I seem to have reached a little bit of an issue. The power plant does not want to align right with the body. I tried leveling it down to accommodate it but the pipes go over the side regardless. Anyone else have this issue? I mean I could just assemble it so that it faces an angle, but that just does not sit right with me, as does removing the rest of the back bar that it seems to go into. Some pictures of what I mean: http://i42.photobucket.com/albums/e348/Slyen/40k%20Stuff/SDC11221.jpg http://i42.photobucket.com/albums/e348/Slyen/40k%20Stuff/SDC11219.jpg Just looks to me like they want me to remove detail to get the model together right :s Link to comment https://bolterandchainsword.com/topic/209777-an-almost-ultramarine/#findComment-2512074 Share on other sites More sharing options...
Hemal Posted September 15, 2010 Share Posted September 15, 2010 Thanks for all of the advice regarding the Yellow. I think, judging off of the results on the chainsword that maybe my best bet is to just do a coat of Iyanden Darkson then follow up with a coat of Sunburst. I'm wanting to try out Hemal's yellow recommendation, though I don't know when I'll be painting any more Assault Marines. So yeah a bit about why the pad is yellow. I planning on doing this army up as an all, or at least mostly all Beakie army. I want to take advantage of the new models from Forgeworld, and what better thing to do than to do a new army for them especially when I don't really have an established one. So I'm working out the ideas on how to make them more fluffy and have it work with a paint scheme and the idea of the Blood Angels having different colored helmets came to mind. Well rather than helmet color, I decided that the mostly blank shoulder pad would be a good place to mark it out and I would also be designating them differently than the blood angels. So Yellow is for an assault squad, Red is for a devastator squad, and blue is designating a Tactical squad. Seeing as the army is going to be primarily shooty, I'm not expecting to paint any more assault troops or any devastators until after the main force is done. Anyway I ramble. I finished the test marine yesterday or the day before. Can't remember as my time keeping has been focused to time of day due to work and a new schedule. ~_~ Needed to find my Camera too and finnally did, its so bad I don't know how it even got where it did. Going to work on a test marine for a tactical squad next I think. I know about the mold lines too, wasn't totally concerned about them for this mini... not really going to be trying to show it off to much besides here. :P Though the following ones should have less, I promise! And now for some pictures. http://i42.photobucket.com/albums/e348/Slyen/40k%20Stuff/FinishedTestFront.jpg http://i42.photobucket.com/albums/e348/Slyen/40k%20Stuff/FinishedTestLeft.jpg http://i42.photobucket.com/albums/e348/Slyen/40k%20Stuff/FinishedTestRear.jpg http://i42.photobucket.com/albums/e348/Slyen/40k%20Stuff/FinishedTestRight.jpg Did one of a close up of the shoulder so you can see how it turned out. I followed the recipe but then ended up painting the bulk of in Sunburst Yellow and leaving think lines of where the wash was. Not totally clean but it will do. http://i42.photobucket.com/albums/e348/Slyen/40k%20Stuff/FinishedTestShoulderCloseUp.jpg Anyway... Thoughts? The pad isn't that bead, can be rescued by adding a few really thin coats (again, only a brush damped with paint) of yellow + bleached bone or yellow + white.. Link to comment https://bolterandchainsword.com/topic/209777-an-almost-ultramarine/#findComment-2512575 Share on other sites More sharing options...
Recommended Posts
Archived
This topic is now archived and is closed to further replies.