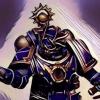
AlanofAngels Posted June 3, 2011 Share Posted June 3, 2011 Hey Guys. I've been kinda floatin around ideas in my head for a new army, from Grey Knights to simply continuing my Alpha Legion (for those of you that may remember them). In the end, I decided on Crimson Fists because of the fluff and the sinister-ly dark colour scheme. Anywho, it should be a pretty fun army to make and I'll be updating this log regularly (hopefully- I dropped off the face of the planet on my last one because of college- good ol' Summer). So here is my test mini for the army- should be a good indicator of standard/ scheme. He was suprisingly easy to paint, having to mix no colours and I found that the symbol was reasonably easy to freehand (Vendetta against all decals/ transfers). The base still needs a little bit of work and I plan on picking up some snow flock at my local GW tomorrow. Anyway, hope ya'll like him. Again, since he is the test mini for the army, I am still open to painting changes before I get real deep in the project. C&C is, as always, welcome! :) Link to comment https://bolterandchainsword.com/topic/231206-crimson-fist-wip-log/ Share on other sites More sharing options...
BrotherCaptainArkhan Posted June 3, 2011 Share Posted June 3, 2011 Awesome. I think that freehand on the fist is one of the best freehanded 'fists' I've ever seen. Could you possibly give a brief tutorial? Awesome job again dude! Link to comment https://bolterandchainsword.com/topic/231206-crimson-fist-wip-log/#findComment-2780481 Share on other sites More sharing options...
thedarklordobsidian Posted June 3, 2011 Share Posted June 3, 2011 Really nice job, as arkhan said, the fist is excellent, and I second the request for a brief tutorial. Link to comment https://bolterandchainsword.com/topic/231206-crimson-fist-wip-log/#findComment-2780526 Share on other sites More sharing options...
Master Ciaphas Posted June 3, 2011 Share Posted June 3, 2011 Hail frater Good job. I second the notion of a tutorial :-D Kind regards, Master Ciaphas Link to comment https://bolterandchainsword.com/topic/231206-crimson-fist-wip-log/#findComment-2780545 Share on other sites More sharing options...
Natanael Posted June 3, 2011 Share Posted June 3, 2011 As do I. Looks like a great way to start a new army. - Natanael Link to comment https://bolterandchainsword.com/topic/231206-crimson-fist-wip-log/#findComment-2780548 Share on other sites More sharing options...
d@n Posted June 3, 2011 Share Posted June 3, 2011 love it! how did you paint it? Link to comment https://bolterandchainsword.com/topic/231206-crimson-fist-wip-log/#findComment-2780553 Share on other sites More sharing options...
deathnid Posted June 3, 2011 Share Posted June 3, 2011 very nice an EPIC job painting that test marine im starting a crimson fist army but its not going to mimic the colour scheme, i'll have a lot mor red and my veterens will have a red torso Link to comment https://bolterandchainsword.com/topic/231206-crimson-fist-wip-log/#findComment-2780555 Share on other sites More sharing options...
Doghouse Posted June 3, 2011 Share Posted June 3, 2011 Very nice stuff, the blue is really nice and like the others say the fist is very nicely done. Link to comment https://bolterandchainsword.com/topic/231206-crimson-fist-wip-log/#findComment-2780647 Share on other sites More sharing options...
Valkyrion Posted June 3, 2011 Share Posted June 3, 2011 Forgive me if I speak out of turn, but it looks as simple as necron abyss leaving the black showing with mordian blue highlights. I use the same scheme, except I drybrush rather than block paint. It looks mint. Link to comment https://bolterandchainsword.com/topic/231206-crimson-fist-wip-log/#findComment-2780709 Share on other sites More sharing options...
Tyrannicide Posted June 3, 2011 Share Posted June 3, 2011 A stunning model, the deep blue looks particularly nice. Looks like quite a good indication of what we've all got to look forward too! :) Link to comment https://bolterandchainsword.com/topic/231206-crimson-fist-wip-log/#findComment-2781027 Share on other sites More sharing options...
AlanofAngels Posted June 3, 2011 Author Share Posted June 3, 2011 Thanks for all the comments guys! I see several of ya'll requesting a tutorial for the fist so I will work on that. I'm running over to my local GW today to pick up a few things and I actually dont have any marines left at the moment, so that's obviously on the agenda to pick up, along with some snow flock for the bases to give them a little bit o' character. Assuming I get them today, I MIGHT start on them tonight but I dunno. If not tonight, then certainly tomorrow, which is when you guys can expect the fist tutorial (if not then I'll put it up the next day on penitence). Thanks Again! Link to comment https://bolterandchainsword.com/topic/231206-crimson-fist-wip-log/#findComment-2781117 Share on other sites More sharing options...
thedarklordobsidian Posted June 3, 2011 Share Posted June 3, 2011 Excellent stuff alanofangels, please bear in mind that I may have to use aforementioned tutorial on the rest of my fists. I shall be patiently waiting! (really don't feel pressured, I've got lots of work to do on my stuff, but I still want it now!!!) Link to comment https://bolterandchainsword.com/topic/231206-crimson-fist-wip-log/#findComment-2781153 Share on other sites More sharing options...
Grizzly_bear Posted June 3, 2011 Share Posted June 3, 2011 Very nice CF fella...keep it coming Link to comment https://bolterandchainsword.com/topic/231206-crimson-fist-wip-log/#findComment-2781343 Share on other sites More sharing options...
AlanofAngels Posted June 4, 2011 Author Share Posted June 4, 2011 Well, I managed to get to GW today and I pick up a couple o' thangs. Beyond that, one of the emplyees kindly reminded (and put the pressure on) me that the Armies on Parade competition is on June 25th; giving me just 22 days to try and do this army if I wish to enter it (which I'm pretty sure I do :D ). Anyways, the 2 things I got were the snow flock for the bases and a tactical squad. I do like the ease of the flock because the old baking powder and glue/paint recipe got pretty tiredsome. Some gorgeous flock: A nice little tactical squad (as I'm sure no one has seen this before :P): And my test marine enjoying his newly climated base: Like I mentioned before, I am hoping to knock another couple of minis out tomorrow, along with the fist/ iconography tutorial. Thanks again guys! Link to comment https://bolterandchainsword.com/topic/231206-crimson-fist-wip-log/#findComment-2781471 Share on other sites More sharing options...
Chapter Master Kanithon Posted June 4, 2011 Share Posted June 4, 2011 Really nice Crimson fists, I've been looking for a good way to paint the armour for ages, mind sharing how you did the blue? Link to comment https://bolterandchainsword.com/topic/231206-crimson-fist-wip-log/#findComment-2781592 Share on other sites More sharing options...
AlanofAngels Posted June 4, 2011 Author Share Posted June 4, 2011 So the next 2 guys are coming along nicely: I ended up doing more last night than I expected; they should be finished by the end of the day and the tutorial for the shoulder pads/ iconography oughta be up later as well. Also, regarding how I paint the blue on the armour, it's actually real simple. I panel/ block in Necron Abyss as the main colour. This is followed by a broad highlight of Regal Blue (which I think I am going to cut out because I truely cannot see it; I think its the exact same colour as Necron Abyss). Then I just give it a nice fine highlight of Ultramarines Blue. I can put up WIP pics of the next marines I paint if it would help ya'll. Anyways, Thanks! :( Link to comment https://bolterandchainsword.com/topic/231206-crimson-fist-wip-log/#findComment-2782143 Share on other sites More sharing options...
Pork Chop Express Posted June 4, 2011 Share Posted June 4, 2011 Hello, you're scheme seems simple but is very effective. I like it very much! What do you mean when you say "panel/block" though? Thanks, Esponjabob Link to comment https://bolterandchainsword.com/topic/231206-crimson-fist-wip-log/#findComment-2782188 Share on other sites More sharing options...
AlanofAngels Posted June 4, 2011 Author Share Posted June 4, 2011 @Esponjabob: Thanks man! When I said "panel/ block", I just meant paint the armour panels and block in the colour, leaving the black in the recesses. I probably said it in a more complicated way; just paint it blue and leave black in the recesses :huh: Link to comment https://bolterandchainsword.com/topic/231206-crimson-fist-wip-log/#findComment-2782243 Share on other sites More sharing options...
chaplainmikey Posted June 4, 2011 Share Posted June 4, 2011 Hi, Love the test model, the blue armour is gorgeous and I'm sure the scheme will look brilliant applied across a whole army. Any plans for painting a Kantor model? Cheers, Mike. Link to comment https://bolterandchainsword.com/topic/231206-crimson-fist-wip-log/#findComment-2782253 Share on other sites More sharing options...
AlanofAngels Posted June 5, 2011 Author Share Posted June 5, 2011 Ok guys, I have the fist icon tutorial. It's my first time making a tutorial so hopefully this goes smoothly :P . The Paints I used: Scorched Brown, Scab Red, and Blood Red. Try to keep all of these paints thin as you apply them as you want a nice smooth icon and it will help blend the colours in to the previous layers. 1) So we have a nice shoulder pad that has already been painted in Necron Abyss (I like to highlight and do the trim after I paint the icon because I find the paint rubs off the edges as I hold it) 2) Now I break out the Scorched Brown. I paint a reasonably broad line down the very middle of the shoulder pad, leaving space at the bottom and the top. This will end up helping to make sure the fist is centered in the pad and the top will end up becoming the middle knuckle. 3) Continuing with SB, you should start bulking out the rough outline of the fist. Add a broad stroke to the left and 2 to the right of the middle "guide stroke" to help form the knuckles/ fingers of the fist. This does'nt have to be perfect by any means, but would make the cleanup a bit easier later on, as well as make the shading of the fist look a little more realistic. 4) Again, with SB begin building out the bottom of the gauntlet on the fist. This is fairly easy and straightforward; just feather is from the fist into a trapezoid type shape at the bottom. 5) One more time with SB (I promise ;)). Now you can add the thumb. Again, this is pretty simple; it is essentially just a triangle jutting out of the side of the hand. 6) Now we can uncap that Scab Red. This colour blends pretty well with the SB. You should begin painting in the fingers/ knuckles, the thumb, palm, and bottom of the gauntlet. Try to keep some scorched brown lining seperating all of the latter mentioned parts as this will add definition and shading. 7) The final step is to break out that Blood Red. This colour blends even better in to Scab Red. You should thin it a little more than the other paints and blend/ paint it into the Scab Red painted areas, making it a little brighter around the "top of the palm" and towards the finger tips. Well, I hope that helped some of you guys. The icon is actually quite easy to paint once you practice it a bit. Thanks for Looking! :P Link to comment https://bolterandchainsword.com/topic/231206-crimson-fist-wip-log/#findComment-2782339 Share on other sites More sharing options...
AlanofAngels Posted June 5, 2011 Author Share Posted June 5, 2011 Alright, managed to finish up the next couple o' fellas. I honestly surprised myself, having finished these 2 guys reasonably quickly (by my standards anyways ;)): Family Photo: I'll start on the next 2 tomorrow, but don't hold your breath on them getting completed :P. Thanks Guys! Link to comment https://bolterandchainsword.com/topic/231206-crimson-fist-wip-log/#findComment-2782519 Share on other sites More sharing options...
Vulkan454 Posted June 5, 2011 Share Posted June 5, 2011 Great tutorial and some more great work. What are you using for the basing? Keep up the good work. Vulkan Link to comment https://bolterandchainsword.com/topic/231206-crimson-fist-wip-log/#findComment-2782544 Share on other sites More sharing options...
Alarik Posted June 5, 2011 Share Posted June 5, 2011 Great work, having myself a CF army I'm looking with interest the wip. Link to comment https://bolterandchainsword.com/topic/231206-crimson-fist-wip-log/#findComment-2782548 Share on other sites More sharing options...
Slyfox1990 Posted June 5, 2011 Share Posted June 5, 2011 Someone earlier commented with the negative of how simple your scheme was. Although it certainly is, I have to commend you on how good it ends up looking. With a bit of weather on the armour I think it would look even better. Link to comment https://bolterandchainsword.com/topic/231206-crimson-fist-wip-log/#findComment-2782616 Share on other sites More sharing options...
AlanofAngels Posted June 5, 2011 Author Share Posted June 5, 2011 Thanks guys! @Vulkan454: The basing is cork board, cut out into rough shapes and slapped onto the bases (then painted codex grey, badab black washed, drybrushed, etc.). Then you just sprinkle some of that snow flock on and voila. @Slyfox.uk: Thanks man! I have thought about weathering, and I do like the look of it. However, I am always hesistant to weather darker models (like black and this blue) because of the weatherings ability to end up looking goofy. I dunno why, but it seems to do that (at least with me). I have been thinking about it though :tu:. Link to comment https://bolterandchainsword.com/topic/231206-crimson-fist-wip-log/#findComment-2782964 Share on other sites More sharing options...
Recommended Posts
Archived
This topic is now archived and is closed to further replies.