Surfing Raziel Posted October 11, 2011 Share Posted October 11, 2011 I've recently got the 6 inch Space Marine and now I've started to get a picture in my head. I've cleaned it and started to make up the basic stance which he'll eventually end in. I've included a few pictures, for people to view my progress. Please tell me what you think Link to comment https://bolterandchainsword.com/topic/240139-6-inch-imperial-space-marine/ Share on other sites More sharing options...
Grotsmasha Posted October 11, 2011 Share Posted October 11, 2011 Ahhhhh.....there doesn't seem to be any pictures..... Link to comment https://bolterandchainsword.com/topic/240139-6-inch-imperial-space-marine/#findComment-2898024 Share on other sites More sharing options...
Surfing Raziel Posted October 11, 2011 Author Share Posted October 11, 2011 Sorry about the problems, but they are up now and working. PLus there are some more in my album. Link to comment https://bolterandchainsword.com/topic/240139-6-inch-imperial-space-marine/#findComment-2898030 Share on other sites More sharing options...
Brother Melice Posted October 11, 2011 Share Posted October 11, 2011 better to systematically post your pics here, hardly any one looks in albums bro... any ways, i love the banner idea! Link to comment https://bolterandchainsword.com/topic/240139-6-inch-imperial-space-marine/#findComment-2898036 Share on other sites More sharing options...
Grimdarkness Posted October 11, 2011 Share Posted October 11, 2011 That pose is very umhh well if you have a mind that bends that way it looks like his stroking something near his mid section. Try posing the fingers more firmly wrapped around the banner pole. Link to comment https://bolterandchainsword.com/topic/240139-6-inch-imperial-space-marine/#findComment-2898037 Share on other sites More sharing options...
Surfing Raziel Posted October 11, 2011 Author Share Posted October 11, 2011 This is no way finished and yes his arm will be higher up and actually holding the banner. He's not even pinned yet, just held up to give a rough visual guide to it's final look. Link to comment https://bolterandchainsword.com/topic/240139-6-inch-imperial-space-marine/#findComment-2898044 Share on other sites More sharing options...
arizonajirt Posted October 11, 2011 Share Posted October 11, 2011 So you have a 6 inch Marine.... is that what it is called these days.... :P Seriously, the model is going to look good. I have liked that model since I have first seen it. The banner idea is a good one. any idea of what chapter you want to paint it? Link to comment https://bolterandchainsword.com/topic/240139-6-inch-imperial-space-marine/#findComment-2898049 Share on other sites More sharing options...
Surfing Raziel Posted October 11, 2011 Author Share Posted October 11, 2011 Dark Angels, I've ordered the brass Dark Angel icon set. I'm going to place various icons on the body (shoulders, knees, backpack and so on). But I've tested the banner idea out on the off cuts, cut a slot on both poles and then glued them together. If the two angels with swords brass icons are big enough, both are going on either side of the crossbeam and then I'll fill them in with green stuff. Then add a cloth banner to finish it off. So first you'll see a lot of banner pics, before I even get moving onto the main event. Link to comment https://bolterandchainsword.com/topic/240139-6-inch-imperial-space-marine/#findComment-2898056 Share on other sites More sharing options...
hendrik Posted October 12, 2011 Share Posted October 12, 2011 as soon as i saw the banner this image popped up in my mind: http://1.bp.blogspot.com/-PDUlPNClJEg/Tm6gbA5gQ7I/AAAAAAAACi8/xF1GuPGFWoI/s1600/Space_Marine_Motivational.jpg i'm really looking forward to what you'll make of your pose Link to comment https://bolterandchainsword.com/topic/240139-6-inch-imperial-space-marine/#findComment-2898257 Share on other sites More sharing options...
Surfing Raziel Posted October 12, 2011 Author Share Posted October 12, 2011 I really love that picture, very close to what I have in mind. As you guys can see I'm still very much in the early days of working him out. But Almost exactly the same as the picture, just put the Bolt pistol in his right hand and the Banner in his left. I'll also let you guys know that there won't be any more pictures until I've recieved the brass icons. Link to comment https://bolterandchainsword.com/topic/240139-6-inch-imperial-space-marine/#findComment-2898291 Share on other sites More sharing options...
Surfing Raziel Posted October 12, 2011 Author Share Posted October 12, 2011 Well the Dark Angel etched brass icons came today, they're a little smaller than I expected. So I'm going to have to rejig some of my ideas. So as you can see, I've put a picture of the etched brass up and some of the bits they'll finally end up on. I'm also a little disappionted that one of the names on the brass, is Rakiel and not Raziel like I thought. But we can't have everything go my way, or else it wouldn't be a challenge. Link to comment https://bolterandchainsword.com/topic/240139-6-inch-imperial-space-marine/#findComment-2898365 Share on other sites More sharing options...
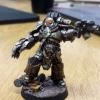
Surfing Raziel Posted October 12, 2011 Author Share Posted October 12, 2011 Since we had some confusion with how I wanted the model to look like when finish. I've uploaded three pics of him put together with some pinning to support the joints and some bluetack to keep the other bits in place. Hope you all enjoy and please keep the question or advise flowing, it helps me out a lot. Link to comment https://bolterandchainsword.com/topic/240139-6-inch-imperial-space-marine/#findComment-2898677 Share on other sites More sharing options...
cassar Posted October 12, 2011 Share Posted October 12, 2011 Looks like a complicated project, getting the pose the way you want it is going to be tricky to say the least. Im not so sure that the way you have it at the moment works its a shame that foegeworld didnt supply left handed bolter hands so the pose could be swapped about a little. I have altered one of these for a customer of mine my advice would be to try and sculpt your own left hand around the spare bolter, if that turns out the way you want then go for adapting the other hand to hold the banner in his/as his right. http://i660.photobucket.com/albums/uu323/cassar1photos/Picture187.jpg http://i660.photobucket.com/albums/uu323/cassar1photos/Picture186.jpg http://i660.photobucket.com/albums/uu323/cassar1photos/Picture185.jpg the angle of the wrists and the fingers were altered by cutting then filling in with milliput Link to comment https://bolterandchainsword.com/topic/240139-6-inch-imperial-space-marine/#findComment-2898708 Share on other sites More sharing options...
ShinyRhino Posted October 12, 2011 Share Posted October 12, 2011 Such an awesome model. I've wanted one for years. Did you buy direct from Forgeworld, or from a third party? I'm curious as to the quality of the casting on your model, as the FW website warns of limited runs and mould fatigue. Did yours arrive relatively clean of mould lines, or did it take a lot of sanding? Link to comment https://bolterandchainsword.com/topic/240139-6-inch-imperial-space-marine/#findComment-2898712 Share on other sites More sharing options...
Redfinger Posted October 13, 2011 Share Posted October 13, 2011 I am not quite digging the pose either, and I agree with trying to switch hands. Right now the pose looks forced, and by forced and mean, trying to make it look like something other than what it was intended for...hope that makes sense. Ashton Link to comment https://bolterandchainsword.com/topic/240139-6-inch-imperial-space-marine/#findComment-2898962 Share on other sites More sharing options...
Surfing Raziel Posted October 13, 2011 Author Share Posted October 13, 2011 I love that Heavy Bolter, any chance you show the converted Backpack. Also is it plastic card and modeling putty? Because I had thought about attempting a Power Sword, made in that way, to be placed on his belt. My model was Forgeworld direct, it was £120 and that's with postage. Not much flesh but two big chucks, attaching the knees to the legs. The scope was mismatched and a few areas that need some putty. All have fixable solutions, but are a pain to implement, especially the scope. I'm also not entirely happy with the pose, but it's still not been altered yet. I've been toying with the idea of chopping his right arm off and moving it 45 degrees to his right (above the elbow pad). I'd also remove some of the chest to arm bumps to better move the arms into the right position. Link to comment https://bolterandchainsword.com/topic/240139-6-inch-imperial-space-marine/#findComment-2899191 Share on other sites More sharing options...
cassar Posted October 13, 2011 Share Posted October 13, 2011 Hi yep the conversion is done in milliput i have pictures of the backpack too will post em for you when i have a chance. i apologise for the quality too they were taken on the hop with a camera phone. Link to comment https://bolterandchainsword.com/topic/240139-6-inch-imperial-space-marine/#findComment-2899218 Share on other sites More sharing options...
Surfing Raziel Posted October 13, 2011 Author Share Posted October 13, 2011 Have you seen state of mine, :cussing iPhone for you. Link to comment https://bolterandchainsword.com/topic/240139-6-inch-imperial-space-marine/#findComment-2899232 Share on other sites More sharing options...
cassar Posted October 13, 2011 Share Posted October 13, 2011 Heres those pictures as promised http://i660.photobucket.com/albums/uu323/cassar1photos/Picture183.jpg http://i660.photobucket.com/albums/uu323/cassar1photos/Picture190.jpg http://i660.photobucket.com/albums/uu323/cassar1photos/Picture191.jpg http://i660.photobucket.com/albums/uu323/cassar1photos/Picture197.jpg http://i660.photobucket.com/albums/uu323/cassar1photos/Picture200.jpg the plastic bits at the bottom of the pack are from a dreadnaught arm, I am interested to see what way this build developes . Oh i used a fine dremmell saw blade cutting wheel to do the adjustments on the hands and wrists theres probably a modelling saw that would do the same job. Redfinger "Ashton" is a bit of a dab hand at converting these types of figure he's currently got one on the boil over at coolminiornot might be worth your while having a look. :devil: good luck with this should be a doosey when done. Link to comment https://bolterandchainsword.com/topic/240139-6-inch-imperial-space-marine/#findComment-2899235 Share on other sites More sharing options...
Retributis Posted October 13, 2011 Share Posted October 13, 2011 With the pose of the OP's marine, personally I would have him aiming the bolt pistol to his right, and looking that way also, rather than oddly aiming under the banner pole. It would open the model up a lot more and de-clutter the central area. Link to comment https://bolterandchainsword.com/topic/240139-6-inch-imperial-space-marine/#findComment-2899254 Share on other sites More sharing options...
Redfinger Posted October 13, 2011 Share Posted October 13, 2011 Since it was brought up here is a pic of the latest state that my SM is in; http://www.coolminiornot.com/forums/attachment.php?attachmentid=8062&d=1315592092 As you can see I repostioned him quite extensively, if you are going to do any chopping on the arms I would suggest preserving the elbow pad, I know it sounds funny, but the curves and angles are unquie and would be a paint to replicate. Also, to save on filler, start rebuilding the joint with plastic tube, then put a layer of putty on top. As far as the scope goes, mine too was quite messed up, as was the bolter, so I just re-built both out of plasticard; And then the powerfist as well; Cassar is a very talented sculptor, and has been very helpful to me, dont hesitate to ask him for some advice. Ashton Link to comment https://bolterandchainsword.com/topic/240139-6-inch-imperial-space-marine/#findComment-2899263 Share on other sites More sharing options...
Surfing Raziel Posted October 13, 2011 Author Share Posted October 13, 2011 You two are amazing, I'm so glad you both have been there before me, makes it feel less like an up hill struggle. As for the Powerfist, you've blown me away. I kind of what to have a squad all different marching up the side of a hill now. Link to comment https://bolterandchainsword.com/topic/240139-6-inch-imperial-space-marine/#findComment-2899357 Share on other sites More sharing options...
cassar Posted October 13, 2011 Share Posted October 13, 2011 here is a link to that thing i mentioned in my pm to you :lol: http://www.coolminiornot.com/forums/showth...gels-Terminator Link to comment https://bolterandchainsword.com/topic/240139-6-inch-imperial-space-marine/#findComment-2899380 Share on other sites More sharing options...
onipunk Posted October 13, 2011 Share Posted October 13, 2011 My question is why is he using a bolt pistol when there's a loaded bolter at his feet? Link to comment https://bolterandchainsword.com/topic/240139-6-inch-imperial-space-marine/#findComment-2899384 Share on other sites More sharing options...
ShinyRhino Posted October 13, 2011 Share Posted October 13, 2011 My question is why is he using a bolt pistol when there's a loaded bolter at his feet? Feed jam. Link to comment https://bolterandchainsword.com/topic/240139-6-inch-imperial-space-marine/#findComment-2899441 Share on other sites More sharing options...
Recommended Posts
Archived
This topic is now archived and is closed to further replies.