Greyall Posted March 5, 2012 Share Posted March 5, 2012 Again, I must say these some of the best Grey Knights I've seen, certainly the most appealing. The armour is so clean and pristine my dark thoughts are burning at the back of my mind. Link to comment https://bolterandchainsword.com/topic/246737-valtens-wips/page/2/#findComment-3007843 Share on other sites More sharing options...
_Valten_ Posted March 12, 2012 Author Share Posted March 12, 2012 Another week, another update. No pic this week, because I had a bit of a disaster on Saturday while painting the current Contemptor. I had completed most of the chassis, and just needed to highlight it to finish. Whilst the model was drying, I started creating some objective markers - super gluing slate to 40mm bases to start with. The Contemptor fell over - it was only blu-tac'd to the base. It fell on the open tube of super glue.... There was glue all over the torso, the Imperial Eagle was simply covered. So, I've now had to sand, file, and cut down the torso; rebuild it with green stuff, and add new etched brass and purity seals. I've also had to start repainting the front of the torso.... Current pics will follow when I can.... Link to comment https://bolterandchainsword.com/topic/246737-valtens-wips/page/2/#findComment-3013639 Share on other sites More sharing options...
Lachdannan Posted March 12, 2012 Share Posted March 12, 2012 These are some really beautiful models. Sorry to hear about your mishap, but I'm sure you will overcome. Link to comment https://bolterandchainsword.com/topic/246737-valtens-wips/page/2/#findComment-3013701 Share on other sites More sharing options...
_Valten_ Posted March 14, 2012 Author Share Posted March 14, 2012 Right then, well here is the current WIP of Contemptor 2. Sorry for the pics being a bit dark, I had to leave for work early this morning. http://i46.servimg.com/u/f46/16/26/17/42/img_0810.jpg http://i46.servimg.com/u/f46/16/26/17/42/img_0811.jpg http://i46.servimg.com/u/f46/16/26/17/42/img_0812.jpg I'm not completely happy with the silver on the torso area, but the problem with the glue has shaken me a little, and I've decided just to leave it alone. I think that if I try to do anything else to it (apart from highlight of course!) then I'll probably end up doing more harm than good. It looks OK using the '3 foot rule' for tabletop, and I suppose now all 3 of my Contemptors will look very different. The pic below shows roughly what I had to contend with. http://i46.servimg.com/u/f46/16/26/17/42/img_0813.jpg As you can see there was a lot of glue covering the torso area. I've had to sand the entire model down, and then rebuild the shape slightly with green stuff. The slight blemishes on the torso - especially the silver area under the 3 purity seals, is basically because I didn't spend enough time sanding and shaping the green stuff properly before I started painting. Ah well, a lesson learnt in the end. What do you guys think? Link to comment https://bolterandchainsword.com/topic/246737-valtens-wips/page/2/#findComment-3015502 Share on other sites More sharing options...
Coryphaus 101 Posted March 14, 2012 Share Posted March 14, 2012 Very cool army! Keep up the good work! ;) Link to comment https://bolterandchainsword.com/topic/246737-valtens-wips/page/2/#findComment-3015589 Share on other sites More sharing options...
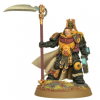
_Valten_ Posted March 19, 2012 Author Share Posted March 19, 2012 Morning all. Another week, another update. I've finished working on Brother Mormont: http://i46.servimg.com/u/f46/16/26/17/42/img_0814.jpg http://i46.servimg.com/u/f46/16/26/17/42/img_0815.jpg http://i46.servimg.com/u/f46/16/26/17/42/img_0816.jpg And the two Contemptors together: http://i46.servimg.com/u/f46/16/26/17/42/img_0817.jpg The issues on the chest area aren't too noticeable, especially when the model is on the tabletop - so overall I'm happy. The wording on the chest is 'Google Latin' - I've just typed in what I wanted and Google gave it back to me in pseudo-Latin. It reads "Etiam in morte adhuc servire" which is a nod to Dreadnoughts in the game Dawn of War. The translation is "Even in death I still serve" - makes me smile. I've also started working on the Relic Contemptor, but I've not got any pics of that one yet. I've decided that part of the Doomfist is going to be the same blue (wash & gloss) that I've done on the force weapons throughout the rest of the force. I'll have pics over the course of this week. C&C is always welcome as usual. Link to comment https://bolterandchainsword.com/topic/246737-valtens-wips/page/2/#findComment-3019297 Share on other sites More sharing options...
_Valten_ Posted March 26, 2012 Author Share Posted March 26, 2012 Been painting like a daemon these past few days. The nice weather here in the UK means that I can sit there in the conservatory and paint and paint and paint... Which has lead to Brother Arynn being completed. http://i46.servimg.com/u/f46/16/26/17/42/arynn10.jpg http://i46.servimg.com/u/f46/16/26/17/42/arynn210.jpg http://i46.servimg.com/u/f46/16/26/17/42/arynn310.jpg http://i46.servimg.com/u/f46/16/26/17/42/arynn410.jpg Really pleased with the overall result of this Contemptor - it has been a joy to paint. I feel like I've learnt so much from painting silver over larger areas from the first two, that I've been able to do the Relic Contemptor justice. I kind of wish I had gotten 3 Relic Contemptors now that I've finished - it's just a beautiful model. Here are all three of my Contemptors ready for battle. http://i46.servimg.com/u/f46/16/26/17/42/contem12.jpg Link to comment https://bolterandchainsword.com/topic/246737-valtens-wips/page/2/#findComment-3024453 Share on other sites More sharing options...
_Valten_ Posted March 27, 2012 Author Share Posted March 27, 2012 Second update of the week - I'm on a roll! So I've decided to not paint silver for a few weeks, and have decided to paint both of my Assassins next. The Vindicare will stay as is, but the Callidus is being heavily converted a combination of the Lelith Hesperax model, and a Callidus model as a base. I posted a picture of a very early WIP a few months ago. I've now glued the metal torso to the Finecast legs, and found that the Assassin is actually a couple of mm wider than Lelith. To counter this I've given my Callidus a belt made of Green Stuff, and used some Liquid Green Stuff (a god send) to fill some of the gaps. I've then raided my bits box to make a =][= belt buckle (after all, if you've got an Assassin trailing you, you're going to know it's the Inquisition anyway!) out of etched brass, and added a few grenades and a small sack. I've also filled down the Nemesis Force Falcon to make it more 'rapier-like' and added another etched brass =][= logo. You'll also notice that I've sanded down all of the armour plates on Lelith's legs, and I think the result does look more like a bodyglove. I've also used some more Liquid Green Stuff over the feet to hide the toes and Lelith is pretty much bare foot. Anyway, enough typing... onto the pictures! http://i46.servimg.com/u/f46/16/26/17/42/img_0818.jpg http://i46.servimg.com/u/f46/16/26/17/42/img_0819.jpg I've managed to put a small pin in one foot so that it will secure onto the new base. Although the base from Lelith is pretty sweet, it doesn't match the rest of the force - so onto some slate she goes! http://i46.servimg.com/u/f46/16/26/17/42/img_0820.jpg I'm really happy with how this has turned out now, she just needs a little tidying up and then she's ready for painting! C&C as usual please. Link to comment https://bolterandchainsword.com/topic/246737-valtens-wips/page/2/#findComment-3025263 Share on other sites More sharing options...
S'jet Posted March 27, 2012 Share Posted March 27, 2012 Great looking army. Request - A pic of all 3 Contemptors together! /nod! Link to comment https://bolterandchainsword.com/topic/246737-valtens-wips/page/2/#findComment-3025338 Share on other sites More sharing options...
_Valten_ Posted March 27, 2012 Author Share Posted March 27, 2012 Thought I'd put that up, but obviously not! Here are all three of my Contemptors. http://i46.servimg.com/u/f46/16/26/17/42/contem12.jpg Enjoy. Link to comment https://bolterandchainsword.com/topic/246737-valtens-wips/page/2/#findComment-3025356 Share on other sites More sharing options...
alejandrinus Posted March 27, 2012 Share Posted March 27, 2012 Impressive army Brother Valten, the three Contemptors Dread are very cool, and the overall painting on the army is simply fantastic. Really liking this army and waiting for more, specially some painting in the callidus assasin :) Link to comment https://bolterandchainsword.com/topic/246737-valtens-wips/page/2/#findComment-3025544 Share on other sites More sharing options...
_Valten_ Posted April 2, 2012 Author Share Posted April 2, 2012 I've made some progress with the Callidus Assassin. The main problem with the right arm was due to the shoulder sitting a lot higher than the left, which made the arm look really thick. I've simply filed the shoulder down to bring it more in line with the left shoulder, and added some liquid green stuff to smooth everything out. After doing this I noticed something - her boobs were lob-sided! Obviously this was because the actual Callidus model I used for the torso has the right arm in the air, and is leaning slightly. The pose I've used has the torso fairly level, so the difference on the chest was really noticeable. So, I decided that I was going to re sculpt her chest area. I got my files out and filed down the entire front of the torso, and then used some green stuff and liquid green stuff to re define the model. http://i46.servimg.com/u/f46/16/26/17/42/callid10.jpg http://i46.servimg.com/u/f46/16/26/17/42/callid11.jpg The abs are literally about 7 layers of liquid green stuff. Just enough to give the definition that the paint job will (hopefully) expand upon to give the model a realistic figure. C&C as always is welcome. Link to comment https://bolterandchainsword.com/topic/246737-valtens-wips/page/2/#findComment-3030522 Share on other sites More sharing options...
_Valten_ Posted April 11, 2012 Author Share Posted April 11, 2012 I've been working on my 5 remaining Purifiers this week. I've done most of the silver armour and have started on the white. As with my last lot of Purifiers I've started with two thin coats of Dheneb Stone, then a Asurman Blue wash, and a Badab Black wash. The results from this are below: http://i46.servimg.com/u/f46/16/26/17/42/img_0824.jpg Now, previously I went from this dark blue/grey and added two more thin coats of Dheneb Stone, then about 10-15 coats of white for coverage. I bought the new Ceremite White base colour last week. It covers really well. So well in fact that I added two thin coats straight over the dark blue/grey, and then added two thin coats of Skull White (it's already thinner than the base colour so I might as well use it!) and the results are below: http://i46.servimg.com/u/f46/16/26/17/42/img_0822.jpg The two Purifiers on the left were done using the old method (12-17 coats of paint over the dark blue/grey), whereas the two on the right have been done using the new method (4 coats of paint over the dark blue/grey). No contest really. And in the flesh, the new method actually looks a little whiter! Finally, it was my Birthday last week. I received some e-vouchers which I immediately turned into these beauties which arrived this morning! http://i46.servimg.com/u/f46/16/26/17/42/img_0821.jpg I've been a little sick of the GW brushes, and the fact that after a little use they start to lose their point. These babies are pure Kolinsky Sable hair, which naturally forms a point (apparently). I can't wait to use these (sad I know...)! Link to comment https://bolterandchainsword.com/topic/246737-valtens-wips/page/2/#findComment-3036881 Share on other sites More sharing options...
painkiller Posted April 11, 2012 Share Posted April 11, 2012 I really dig your use of the Contemptor Dreadnoughts. Two questions though: 1. What did you use for the iron halos on the dreadnoughts? 2. What is your secret for the dark red? It's absolutely gorgeous! Thanks in advance. Brgds, Painkiller Link to comment https://bolterandchainsword.com/topic/246737-valtens-wips/page/2/#findComment-3037024 Share on other sites More sharing options...
_Valten_ Posted April 11, 2012 Author Share Posted April 11, 2012 Painkiller - the iron halos are the tops of Nemesis Warding Staves in the Grey Knight plastics. Also, the dark red is the following: 2 thin coats of Red Gore Blood Red, not in the recesses. Wash with Badab Black. Blood Red again, moving further away from the recesses. Re-wash with Badab Black. Edge highlight with Blood Red again. Link to comment https://bolterandchainsword.com/topic/246737-valtens-wips/page/2/#findComment-3037037 Share on other sites More sharing options...
Recommended Posts
Archived
This topic is now archived and is closed to further replies.