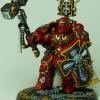
DexC Posted May 30, 2012 Share Posted May 30, 2012 So, I just finished painting my first mini for about ten years. I started playing in 2nd edition, but never really did much painting. I've got a bunch of my old minis soaking in Dettol to strip and a couple of RAS squads waiting, but I thought I'd start by painting some snap fit minis so as not to wreck anything important with my first experiments. Having finished it, I was fairly happy with it. Then I took pictures, and noticed loads of stuff that looked really bad. So, if anyone has any pointers, I'd really appreciate it. I'm obviously not an especially good or steady-handed painter, but I'd like to improve where I can. I went with white undercoat, mechrite red, blood red, badab black wash, another layer of blood red, and a few blazing orange highlights. Mould lines need doing and barrels need drilling. Just need to pick up a small drill. Shading from the black is really uneven Highlighting didn't really work at all. Tried some grey on black, and orange on red, but I found that I either put way too much on it, or not enough to see. Guess I need to mix colours to get closer to the base. My brushes (Citadel) don't seem to hold a point that well. Any ideas for better brushes for fine detail stuff? Squad markings, decals, basing etc isn't done, obviously. I am quite happy with the skull on the backpack. Appreciate any feedback/tips anyones got. Cheers, Dex Link to comment https://bolterandchainsword.com/topic/253316-first-painted-mini-in-a-decade/ Share on other sites More sharing options...
Imperial Deceit Posted May 30, 2012 Share Posted May 30, 2012 It looks pretty good honestly, I only have 2 small suggestions: Firstly I noticed that you are using the old outline method to shade on the shoulders and pack, a wash might be quicker and smoother, but that is really just personal preference. Second, I know this was basically just a test model but it does have rather pronounced mold lines, diamond files and some fine grit sandpaper can really help there. (Unless you already do that) Link to comment https://bolterandchainsword.com/topic/253316-first-painted-mini-in-a-decade/#findComment-3073622 Share on other sites More sharing options...
Talnox Posted May 30, 2012 Share Posted May 30, 2012 loooks great. My only suggestion would be scrape or file off the mold lines. other than that its really good. Link to comment https://bolterandchainsword.com/topic/253316-first-painted-mini-in-a-decade/#findComment-3073626 Share on other sites More sharing options...
Brightguy Posted May 30, 2012 Share Posted May 30, 2012 Good work overall. My only criticism is that the shading is a little blotchy and the highlights don't really show up that well. I paint to roughly that shade, but I basecoat with Red Gore and shade more carefully only in the recesses. Gives a smoother finished look. I also think that highlighting up Blood Red on the Red Gore works well. Lower contrast than Orange on Red so you can be more generous with the highlight color. I then use a little Blazing Orange only on the extreme upper edges as a final highlight. What I always have to remind myself is to keep the highlight color really thin so it blends into the base. Link to comment https://bolterandchainsword.com/topic/253316-first-painted-mini-in-a-decade/#findComment-3073719 Share on other sites More sharing options...
Morticon Posted May 30, 2012 Share Posted May 30, 2012 I prefer working with black base coat and mechrite on that. From there I prefer a darker BA, so I usually work with scab/gore and highlight with blood red. Yours DEFINITELY pop though- looks great. Very Blood Angelsy Link to comment https://bolterandchainsword.com/topic/253316-first-painted-mini-in-a-decade/#findComment-3073755 Share on other sites More sharing options...
Recommended Posts
Archived
This topic is now archived and is closed to further replies.