captain_shrike Posted July 22, 2012 Share Posted July 22, 2012 When it comes to making each marine look individual, I keep to a rule that the whole squad should look like they are operating together, making the squad look more dynamic. So for example I wouldn't have one runninng and one kneeling down. Or if one is pointing in a certain direction, the others would be looking/firing in that direction. If you look at it from the point of view of how the squad is operating together, you can come up with some great individual looking marines that form a cohesive, dynamic looking unit. Kit bashing is your friend, I've seen quite a few great examples in the WIP section recently, have a poke around. Great minis though, the paintjob is just awesome. The backpack banner and apothecary's shoulder pads are just beautiful. Was that literally just done with a thin paintbrush? Kudos to you on your brush control if so. Link to comment https://bolterandchainsword.com/topic/254414-first-company-command-squad/page/2/#findComment-3128938 Share on other sites More sharing options...
Febelcrofas Posted August 9, 2012 Author Share Posted August 9, 2012 @ captain shrike, thanks for the nice comments and the stuff on the banner is freehand. I've got a really sweet brush with a super fine point but it's nice and fat. I couldn't use another brush again! It's a Raphael no 3 in case you're interested. So anyway it's been ages since I posted anything as life keeps getting in the way of my beautiful hobby but I've managed to make som more progress on the squad. Guy number 4 is approaching completion. All armour highlights finished, just the gun and some backpack work to go. (plus the base) and here is a shot of the team as it stands: Obviously a couple of things left to do like the aquilla on the backpack banner and the top of the standard but I'm very nearly there. The only problem is I'm not sure about the last guy in the squad. This is where I think I should have prepared them all first but hey ho. I think the advice that having one running while others kneel is correct and it would look weird but it leaves me wondering what to do with my last guy. Also there is the slight problem that plasma guns don't like shoulder pads as I have discovered trying to fit the guns on to my models. It takes some playing around to get any non static poses and I'm running out of arms! Any advice on this would be greatly appreciated. C and C actively sought and/or encouraged ^_^ Link to comment https://bolterandchainsword.com/topic/254414-first-company-command-squad/page/2/#findComment-3145003 Share on other sites More sharing options...
Nym468 Posted August 9, 2012 Share Posted August 9, 2012 They look great. Those banners are incredible. Nice work. My only suggestion is drill out the barrels on the plasma guns. Link to comment https://bolterandchainsword.com/topic/254414-first-company-command-squad/page/2/#findComment-3145035 Share on other sites More sharing options...
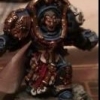
Febelcrofas Posted September 5, 2012 Author Share Posted September 5, 2012 So again not much done in a long time, rubbish life getting in the way. However I now have my last squad member assembled and primed! I decided to use some grey knight bits for a bit of kit-bashing and I'm hoping he doesn't stand out too much from the rest cos I think he looks mint! There are some really great bits on the grey knight sprue, I love their helmets and I'm going to be using them a bit more on the rest of my army for example when I re-make my sergeants in light of 6th ed. Anyway I digress!!! Here is the crouching guy almost done with just touches to go, I'm going to finish of the whole squad at the same time. And here is the last member of the squad: this last photo is a bit shonky but you get the idea. So there it is, the final stretch. Now all I need to do is keep focussed and push on home to victory. In a side note, I was unsure after first picking up the 6th rulebook how these guys would perform but in all my games so far they haven't let me down!! I have to say the 5+ feel no pain is not that much a hinderance. They deserve to be fully painted, with a dedicated transport. Maybe I'll post their razorback on here too when they're done. C and C welcome, nay actively sought! Link to comment https://bolterandchainsword.com/topic/254414-first-company-command-squad/page/2/#findComment-3167031 Share on other sites More sharing options...
Xenith Posted September 5, 2012 Share Posted September 5, 2012 Although the I representing the first company seems a bit off, can't quite put my finger on it. Any thoughts? I'll start by saying you've done an amzing white on the Apoth, and I'd look forward to seeing a white marine army from you. As to the I on the banner: The banner is folded, crumpled and sagging down in the middle. The 'I', however, is just smacked straight on there ignoring the folds of the fabric, which isn't likely. Some slight bending downward on the top left bar on the i to follow the folds of the material may work. The top right bar is also slightly longer than the bottom right. Keep up the good work. Link to comment https://bolterandchainsword.com/topic/254414-first-company-command-squad/page/2/#findComment-3167113 Share on other sites More sharing options...
Febelcrofas Posted September 13, 2012 Author Share Posted September 13, 2012 I've been managing to get a bit of painting time in this week and I've made some progress on the last member of the unit. Part way through this guy I picked up some Vallejo thinning medium and I cannot sing it's praises enough!! Maybe because I live in a very hard water area but the smooth finish you can achieve with the thinner medium is amazing, especially with white. I don't know if you can see but the helmet on this guy was done with the thinner and the cloth wasn't. As I'm coming to the end of my command squad I've decided to add a couple of multi-melta attack bikes to my 1750 list so I may do a wip for them, but I think the transport has to come first. I must! I get too carried away by new toys and need to finish off what I've got first!! @ Xenith, thanks for the comments. I get what you mean about the I on the banner, it's one of the things I'm going to try and tidy up once the squad is 99% done. c and c welcome Link to comment https://bolterandchainsword.com/topic/254414-first-company-command-squad/page/2/#findComment-3174770 Share on other sites More sharing options...
Blindhamster Posted September 13, 2012 Share Posted September 13, 2012 Thats an extremely nice looking squad you have there :rolleyes: you should be proud! the final member is very cool, though I'd have suggested modelling him up as a company champion considering how he looks! Link to comment https://bolterandchainsword.com/topic/254414-first-company-command-squad/page/2/#findComment-3174779 Share on other sites More sharing options...
Adeptus-Alaska Posted September 13, 2012 Share Posted September 13, 2012 these guys are awesome! I love the white, very crisp. the only thing I noticed is the cooling coil OSL on the plasma guns. everybody emphizes the glow way to much. remeber that light travels in a linear path, It cannot travel around corners! other than that, perfect! Link to comment https://bolterandchainsword.com/topic/254414-first-company-command-squad/page/2/#findComment-3174925 Share on other sites More sharing options...
Adeptus-Alaska Posted September 13, 2012 Share Posted September 13, 2012 oooooooh, lookin good! I love the pose. Link to comment https://bolterandchainsword.com/topic/254414-first-company-command-squad/page/2/#findComment-3174928 Share on other sites More sharing options...
batu Posted September 13, 2012 Share Posted September 13, 2012 Nicely done ! I hate to say it but these smurfs look fantastic :D Im looking forward to see them finished and the promised transort vehicle ! Cheers Link to comment https://bolterandchainsword.com/topic/254414-first-company-command-squad/page/2/#findComment-3174935 Share on other sites More sharing options...
alejandrinus Posted September 13, 2012 Share Posted September 13, 2012 Top work on this Ultras, really like your white, and the freehands in the legs, shoulderpads and banners are impressive, this is something ive to practice, im always feared to do that and ruin all the previous work, how do you start the small lettering? do you practice first in paper or something or do you paint it directly? Also the OSL are very nice. Link to comment https://bolterandchainsword.com/topic/254414-first-company-command-squad/page/2/#findComment-3175007 Share on other sites More sharing options...
Febelcrofas Posted September 14, 2012 Author Share Posted September 14, 2012 Top work on this Ultras, really like your white, and the freehands in the legs, shoulderpads and banners are impressive, this is something ive to practice, im always feared to do that and ruin all the previous work, how do you start the small lettering? do you practice first in paper or something or do you paint it directly? Also the OSL are very nice. Thanks dude, I really appreciate that. With regards to the freehand I don't plan it or anything, I just go for the thin line blocks of white but when they go on top of each other I try and make sure the lengths of the lines are all different so it doesn't just look like a grid if you catch my meaning. Then I just throw in the odd U or a little cross or something. Having a great paintbrush really helps!! Link to comment https://bolterandchainsword.com/topic/254414-first-company-command-squad/page/2/#findComment-3175607 Share on other sites More sharing options...
Febelcrofas Posted October 1, 2012 Author Share Posted October 1, 2012 So her it is, at roughly 99% completion which is about as far as I ever take my squads as I get itchy fingers and have to do something else. I've been more disciplined than I usually am. Anyway without further ado: Link to comment https://bolterandchainsword.com/topic/254414-first-company-command-squad/page/2/#findComment-3192523 Share on other sites More sharing options...
DarkAngelDelight Posted October 1, 2012 Share Posted October 1, 2012 How do you do you OSL? if you don't mind me asking? it looks really good Link to comment https://bolterandchainsword.com/topic/254414-first-company-command-squad/page/2/#findComment-3192645 Share on other sites More sharing options...
Febelcrofas Posted October 1, 2012 Author Share Posted October 1, 2012 It's all dry brushing dude just real gentle. Start with dark green as base. Then apply really watered down dark green up to the limit of the glow area. Then dry brush the next lighter shade showing more love for the middle of the coils. Then its white, really gentle, focusing on the middle of the coils but making sure you get the edges of the gun for the nice defined boundary. I could do a step by step if you like. Link to comment https://bolterandchainsword.com/topic/254414-first-company-command-squad/page/2/#findComment-3192664 Share on other sites More sharing options...
DarkAngelDelight Posted October 1, 2012 Share Posted October 1, 2012 It's all dry brushing dude just real gentle. Start with dark green as base. Then apply really watered down dark green up to the limit of the glow area. Then dry brush the next lighter shade showing more love for the middle of the coils. Then its white, really gentle, focusing on the middle of the coils but making sure you get the edges of the gun for the nice defined boundary. I could do a step by step if you like. If you don't mind mate. :) It'd be nice to have some OSL just like yours to kind of set my army out from the rest. I'll be using blues instead of greens but i can just replace the colours you use with blue ones. Link to comment https://bolterandchainsword.com/topic/254414-first-company-command-squad/page/2/#findComment-3192684 Share on other sites More sharing options...
Biohazard Posted October 1, 2012 Share Posted October 1, 2012 These guys look great, can I ask how you built up your white as it looks a lot smoother than I can ever achieve. Link to comment https://bolterandchainsword.com/topic/254414-first-company-command-squad/page/2/#findComment-3192694 Share on other sites More sharing options...
Febelcrofas Posted October 1, 2012 Author Share Posted October 1, 2012 The white thing, it's weird I got better at painting white as I learned to paint properly. I've tried to explain it before and I'm not too great at articulating how I do it but here goes. Obviously the paints you use help. I find the new gw whites are excellent. I believe the base is celestra grey then wash with nuln oil, then build up celestra grey again leaving the recesses. then ulthuan grey which is efectively a more muted white leaving the bright white for highlights. The main thing is the watering down of the paint, it gets said a lot but it really makes the difference. When I paint I usually water all my paints 50/50 but with white I sometimes go 70/30. In watering down the white it lets you apply the paint evenly. If you think of the brush as just a paint holding device and the tip as a pen then when you apply the paint( don't put too much on the brush) you can effectively colour in the area you're painting, instead of relying on brush strokes. Obviously it helps to have a good brush. I find when you're layering up the white it does look patchy when it dries but HOLD YOUR NERVE. That's normal, after you've don enough coats it'll look uber trust me! Does this help? Link to comment https://bolterandchainsword.com/topic/254414-first-company-command-squad/page/2/#findComment-3192712 Share on other sites More sharing options...
Biohazard Posted October 1, 2012 Share Posted October 1, 2012 Helps loads, thanks buddy ;) Link to comment https://bolterandchainsword.com/topic/254414-first-company-command-squad/page/2/#findComment-3192730 Share on other sites More sharing options...
Recommended Posts
Archived
This topic is now archived and is closed to further replies.