khurdur Posted August 1, 2012 Share Posted August 1, 2012 Any tips for painting a solid gold? I use shining gold, what is the best colour to go underneath? I usually use tin bitz, but it doesn't seem to cut it. Perhaps a more matte brown like dark flesh? I need to paint my new Dante ! Link to comment https://bolterandchainsword.com/topic/257975-painting-gold/ Share on other sites More sharing options...
Leonaides Posted August 1, 2012 Share Posted August 1, 2012 I have used black as an undercoat before, seems to work ok but you'll probably want to do a couple of thin coats to stop in showing thru. I've heard fairly good things about what was Iyanden darksun basecoat but I couldn't tell you its new name. Link to comment https://bolterandchainsword.com/topic/257975-painting-gold/#findComment-3138401 Share on other sites More sharing options...
Nicodemus Doloroso Posted August 1, 2012 Share Posted August 1, 2012 My technique is undercoat black, then a base coat of Dwarf Bronze, then Shining Gold, then a final highlight of Burnished Gold. Here's the Inquisitor I did for my Imperial Guard army using the technique for an idea of what it looks like. I am pretty happy with how it looks. http://2.bp.blogspot.com/-sW_snlUtCoE/TuwP1y1ID0I/AAAAAAAAAZM/ee0K-HP5fRg/s1600/Inquisitor%20Soulis.JPG Link to comment https://bolterandchainsword.com/topic/257975-painting-gold/#findComment-3138411 Share on other sites More sharing options...
Xenith Posted August 1, 2012 Share Posted August 1, 2012 Undercoat black, add a layer of 1:1 scorched brown:shining gold, or use the new gold base coat which is essentially the same. layer shining gold, sepia wash, highlight gold, then I personally do a very watered down purple wash. Highlight with silver. Link to comment https://bolterandchainsword.com/topic/257975-painting-gold/#findComment-3138413 Share on other sites More sharing options...
Morollan Posted August 1, 2012 Share Posted August 1, 2012 I have used black as an undercoat before, seems to work ok but you'll probably want to do a couple of thin coats to stop in showing thru. I've heard fairly good things about what was Iyanden darksun basecoat but I couldn't tell you its new name. I use Iyanden Darksun and it works pretty well. Iyanden Darksun base with a couple of thin layers of Shining Gold and a wash of Devlan Mud and it looks great. I don't even bother with highlights. Link to comment https://bolterandchainsword.com/topic/257975-painting-gold/#findComment-3138423 Share on other sites More sharing options...
Jarakin Posted August 1, 2012 Share Posted August 1, 2012 I do something a little unconventional, basecoat white, mithril silver, layer on progressive washes of gryphonne sepia. Looks stunning. :rolleyes: Link to comment https://bolterandchainsword.com/topic/257975-painting-gold/#findComment-3138484 Share on other sites More sharing options...
SevenExxes Posted August 1, 2012 Share Posted August 1, 2012 I cheat. I use enamel spray paint. Undercoat matte white and then spray it gold. When dry I rub the gold back on the edges so the white shows through. This is for the highlighting. I then give the entire model a liberal coat of Badab Black wash. (Actually, I give all my models a liberal coat of Badab Black wash. It's my style) Link to comment https://bolterandchainsword.com/topic/257975-painting-gold/#findComment-3138495 Share on other sites More sharing options...
thade Posted August 1, 2012 Share Posted August 1, 2012 I've tried all of the methods here, except for Jarakin's which I find appealing. Recently I painted up an Adeptus Custodes and I primed him in Krylon silver spray paint, using the darker of the two 'old' GW gold colors (burnished, I think?) for much of him, then using shining for highlights and dwarve bronze for low points. I hit the deeper recesses with a generous amount of Babad wash as well. Here's a pic: Link to full image (it's a big one). Jarakin, could you share a pic, please? :) EDIT: the image was huuuuuuge and too big to post in here, haha...so I changed it to a link. Link to comment https://bolterandchainsword.com/topic/257975-painting-gold/#findComment-3138516 Share on other sites More sharing options...
SnorriSnorrison Posted August 1, 2012 Share Posted August 1, 2012 Here's mine: http://i946.photobucket.com/albums/ad309/Snorrinorrison/BILD0577.jpg Chaos Black Spray foundation, after that a 1:1 mix Scorched Brown Shining Gold mix, and then layered Shining Gold. Shadings with 1:1 SB SG, after that some washes in thinned down Gryphonne Sepia. Highlights were applied with 3:1 Shining Gold Mithril Silver, 2:1 and 1:1 for the most extreme highlights. Nice and warm gold, good coverage and has quite some depth I feel. :) Snorri Link to comment https://bolterandchainsword.com/topic/257975-painting-gold/#findComment-3138525 Share on other sites More sharing options...
Nicodemus Doloroso Posted August 1, 2012 Share Posted August 1, 2012 VERY nice, Snorri. It does, indeed, have good depth and a realistic look to it as well. Have you done any tutorials on B&C for painting? If so, I'd really appreciate a link. If not, I'd LOVE to see a step-by-step for the whole model you pictured. I'm especially interested in how you did the skin. Link to comment https://bolterandchainsword.com/topic/257975-painting-gold/#findComment-3138552 Share on other sites More sharing options...
TrentL Posted August 1, 2012 Share Posted August 1, 2012 Undercoat black, add a layer of 1:1 scorched brown:shining gold, or use the new gold base coat which is essentially the same. layer shining gold, sepia wash, highlight gold, then I personally do a very watered down purple wash. Highlight with silver. That's what i use as well it works very well and you get a solid gold look very good. http://i291.photobucket.com/albums/ll310/LanthierFamily/b9e3611d.jpg (Focus on the gold not the rest of my crappy paint job :)) Link to comment https://bolterandchainsword.com/topic/257975-painting-gold/#findComment-3138565 Share on other sites More sharing options...
Judaz Posted August 1, 2012 Share Posted August 1, 2012 I do something a little unconventional, basecoat white, mithril silver, layer on progressive washes of gryphonne sepia. Looks stunning. :lol: This is how I do it also. But I basecoat black, silver is such a strong color that I don't think the basecoat make any real difference. Very easy, fast and looks good. Link to comment https://bolterandchainsword.com/topic/257975-painting-gold/#findComment-3138580 Share on other sites More sharing options...
Chaplain Admetus Posted August 1, 2012 Share Posted August 1, 2012 Mine's very simple but quite effective, only 4 stages. Basecoat black, then paint on shining gold. Wash it with Devlan Mud (or whatever the new equivalent is), then pick out the details and highlights in shining gold. Jarakin, I second the call for pics, that method sounds intriguing. That said, I've just spotted that apparently you're also in Aberdeen, so I might get the chance to see them in person :lol: Link to comment https://bolterandchainsword.com/topic/257975-painting-gold/#findComment-3138613 Share on other sites More sharing options...
Grotsmasha Posted August 1, 2012 Share Posted August 1, 2012 Check out this thread http://www.bolterandchainsword.com/index.p...=250045&hl= It has step by step photos for the gold I used for my Rogal Dorn. Cheers, Jono Link to comment https://bolterandchainsword.com/topic/257975-painting-gold/#findComment-3138690 Share on other sites More sharing options...
Emperor's Instrument Posted August 1, 2012 Share Posted August 1, 2012 Calthan Brown followed by two thin coats of shining gold. I did my whole Sang Guard army this way then gave it a single wash of brown ink for depth and detail. Done. No mixing or blending required. Link to comment https://bolterandchainsword.com/topic/257975-painting-gold/#findComment-3138713 Share on other sites More sharing options...
Sol Invictus Posted August 1, 2012 Share Posted August 1, 2012 I use tin bitz with a black wash as my base, then I begin from tin bitz and work my way up to shining gold. It takes awhile but I like the results. here's an example: http://www.bolterandchainsword.com/index.p...howtopic=255904 Link to comment https://bolterandchainsword.com/topic/257975-painting-gold/#findComment-3138811 Share on other sites More sharing options...
Ushtarador Posted August 1, 2012 Share Posted August 1, 2012 Here's mine: http://s14.directupload.net/images/120619/kntdrheq.png Undercoat with P3's Blighted Gold (the new GW basecoat gold should work as well). Then thin layer of Shining Gold and liberally wash with Gryphonne Sepia. Paint lighter areas again with Shining Gold and highlight with Golden Griffon, tone it down again with Gryphonne Sepia for the finish. Sounds tedious but is actually very fast and gives a really good coverage, which often is the main problem with gold :D Link to comment https://bolterandchainsword.com/topic/257975-painting-gold/#findComment-3138871 Share on other sites More sharing options...
Jarakin Posted August 1, 2012 Share Posted August 1, 2012 I've only done an unfinished test mini with the method that I described, I saw it on a blog a while ago, but never got around to finishing off my wee project. Here're the pics: This was done with ~3 layers of sepia, and as I said it's unfinished and was relatively slapdash. I was really happy with the result though, and was planning on going ahead with it for my full squad - as it happened though I've not used my SG at all, so I shelved them. @Chaplain Admetus - Nice to see another face from Aberdeen! I pretty much play exclusively with a few mates that brought me into the game a few years ago, we play pretty casually and only ever play over at my mate's house. Although saying that, I did step foot into the local GW shop for the very first time this weekend past though! :) Link to comment https://bolterandchainsword.com/topic/257975-painting-gold/#findComment-3138930 Share on other sites More sharing options...
Chaplain Admetus Posted August 2, 2012 Share Posted August 2, 2012 For being unfinished, those look pretty good! The gold really works, very bright and crisp. Link to comment https://bolterandchainsword.com/topic/257975-painting-gold/#findComment-3139312 Share on other sites More sharing options...
SnorriSnorrison Posted August 4, 2012 Share Posted August 4, 2012 VERY nice, Snorri. It does, indeed, have good depth and a realistic look to it as well. Have you done any tutorials on B&C for painting? If so, I'd really appreciate a link. If not, I'd LOVE to see a step-by-step for the whole model you pictured. I'm especially interested in how you did the skin. Thanks man! Alas, there are no step-by-step pictures of this squad, I'm afraid. When I painted these(two years ago! :) ) I just enjoyed the painting(not of the wings, however) and took no other pictures than those in my painting thread. The recipe for the skin is not too difficult, here's what I remember: - base the whole facial region with Bestial Brown(or whatever it's called now). - now, the first highlight consists of a 1:2 mix of Bestial Brown and Dwarf Flesh. Notice that if you wish to achieve a 'angelic' skin tone, meaning quite pale with strong features, you don't want the Bestial Brown to shine through other than in the recesses. That means with each layer, you paint over the last highlight almost completely in this step. Don't forget to add a good amount of water! - next highlight with almost pure Dwarf Flesh. Only half-way through at this point! - Mix Dwarf Flesh and Bleached Bone 2:1 and layer it on, leaving the pure dwarf flesh in the recesses...note that recesses are here the cheek parts and the stuff around the mouth and the eyes. Next highlight; Dwarf Flesh and Bleached Bone 1:1. Same procedure as last step. Add Skull white to the previous mix. only a little bit, and outline the cheeks, jawline, eyes as the final highlight. the Last three steps take the longest time since you're switching from a base paint to very fine highlighting while you paint. You can add a pure Skull white highlight as a last step to finish it off. I hope you're finding this helpful and sense-making! ;) Snorri Link to comment https://bolterandchainsword.com/topic/257975-painting-gold/#findComment-3140987 Share on other sites More sharing options...
JamesI Posted August 4, 2012 Share Posted August 4, 2012 The method I was taught that I thought looked good was to base in Tin Bitz then paint over with Shinning gold. Link to comment https://bolterandchainsword.com/topic/257975-painting-gold/#findComment-3141012 Share on other sites More sharing options...
Nicodemus Doloroso Posted August 4, 2012 Share Posted August 4, 2012 I hope you're finding this helpful and sense-making! :( Yes, makes sense, thanks. It's actually not too different from my current procedure, just with more steps. I can see how taking the time to more gradually layer the colours works wonders (my current procedure is base of 1:1 bestial brown and dwarf flesh, then dwarf flesh, then elf flesh). What do you mix your colors on/with? I find mine dry out awfully fast. Link to comment https://bolterandchainsword.com/topic/257975-painting-gold/#findComment-3141110 Share on other sites More sharing options...
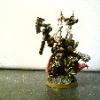
Chairman_woo Posted August 4, 2012 Share Posted August 4, 2012 Guess i'll chime in as my techneque is a bit different to whats already been posted. http://i897.photobucket.com/albums/ac172/chairman_woo/Blood%20angels%204th/Sanguinary%20Guard/003.jpg Basecoat in shining gold (try to do a couple of layers at least to get a solid coverage, we dont want/need any of the colour underneath to show) Wash with Ogryn flesh followed by a half arsed burnished gold drybrush (optional). This deepens the gold a bit but will be very very subtle due to the next layer so you can comforatbley skip this to save time... Wash with Devalan mud (or whatever its called now). Fairly thick you want to make sure all the rescesses are nicely shaded. Devlan mud is amazing here and completely liberates us from needing to mess around avoiing the edges or even bother with a brown undercoat in the 1st place. Nothing wrong with the old school way of creating shade (brown undercoat & painstakingly avoiding all the edges) but its unecessarily time consuming imho unless your trying to pull off something really special (like golden deamon special). Then its simply a matter of drybrushing the raised surfaces with burnished gold. As with all drybrushing it pays to have as tiny an ammount of paint on the brush as you can, so the colour builds gradually. That said it shouldn't take more than 5-10 mins to do this layer so its far from arduous. Finnaly do a edge highlight with burnished gold. Link to comment https://bolterandchainsword.com/topic/257975-painting-gold/#findComment-3141209 Share on other sites More sharing options...
Res Ipsa Loquitur Posted August 4, 2012 Share Posted August 4, 2012 I'm lazy and rushed for time so I spray a black undercoat, drybrush Burnished Gold (or whatever it's called now) and wash with very watered-down Liche Purple (OWICN). I wanted a 'statuesque' look to my guys and I'm happy with how it came out, though again my primary concern is speed. The pics aren't the best, sorry about that. http://i1202.photobucket.com/albums/bb368/res_ipsa1/P1100062.jpg http://i1202.photobucket.com/albums/bb368/res_ipsa1/P1100063.jpg Link to comment https://bolterandchainsword.com/topic/257975-painting-gold/#findComment-3141217 Share on other sites More sharing options...
SnorriSnorrison Posted August 5, 2012 Share Posted August 5, 2012 I hope you're finding this helpful and sense-making! ;) Yes, makes sense, thanks. It's actually not too different from my current procedure, just with more steps. I can see how taking the time to more gradually layer the colours works wonders (my current procedure is base of 1:1 bestial brown and dwarf flesh, then dwarf flesh, then elf flesh). What do you mix your colors on/with? I find mine dry out awfully fast. Yep, investing time is the essence for the best results. It will really annoy ya, but in the end, you'll be glad you did it. It makes a great difference. I use a wetpallet to mix my colours. It's very very easy to build one, I suggest you check out youtube for short tutorials and how-tos and stuff. There should be a lot of footage on how to build one. You can keep colour fluid on there for about a day, two if you're lucky! Snorri Link to comment https://bolterandchainsword.com/topic/257975-painting-gold/#findComment-3141470 Share on other sites More sharing options...
Recommended Posts
Archived
This topic is now archived and is closed to further replies.