nurgling6688 Posted January 4, 2013 Share Posted January 4, 2013 Hey everyone, its been awhile since I posted anything on here since I usually just stick to my blog now but I thought I would throw this guy up here. I decided that the sculpt for Typhus needed some improving to bring him more in line with the artwork so here is my interpretation. http://i75.photobucket.com/albums/i317/tylerrox6688/typhuswip16.jpg http://i75.photobucket.com/albums/i317/tylerrox6688/typhuswip15.jpg http://i75.photobucket.com/albums/i317/tylerrox6688/typhuswip18.jpg http://i75.photobucket.com/albums/i317/tylerrox6688/typhuswip17.jpg http://i75.photobucket.com/albums/i317/tylerrox6688/typhuswip20.jpg For a more in depth look at the process follow the link to my blog that is in my signature. Link to comment https://bolterandchainsword.com/topic/269163-the-herald-of-nurgle/ Share on other sites More sharing options...
AL13N Posted January 4, 2013 Share Posted January 4, 2013 Very nice start! Link to comment https://bolterandchainsword.com/topic/269163-the-herald-of-nurgle/#findComment-3278598 Share on other sites More sharing options...
nurgling6688 Posted February 1, 2013 Author Share Posted February 1, 2013 Looks like this topic is very popular, lol. Well I have some PIP shots for you today regardless. http://i75.photobucket.com/albums/i317/tylerrox6688/typhuspip_zps9ce8bd21.jpg http://i75.photobucket.com/albums/i317/tylerrox6688/typhuspip2_zps70b1a70d.jpg http://i75.photobucket.com/albums/i317/tylerrox6688/typhuspip3_zps9c3fa9e4.jpg All I have done so far is some shading on the armor. After looking at the pictures I can already see a few areas I need to smooth out a bit. Soon I will add the highlights followed by some chipping. The rust and such wont get added on until I have finished some other areas of the model. Link to comment https://bolterandchainsword.com/topic/269163-the-herald-of-nurgle/#findComment-3296476 Share on other sites More sharing options...
nzz Posted February 1, 2013 Share Posted February 1, 2013 More Pictures please :) it looks great Link to comment https://bolterandchainsword.com/topic/269163-the-herald-of-nurgle/#findComment-3296687 Share on other sites More sharing options...
revvokan Posted February 1, 2013 Share Posted February 1, 2013 That looks amazing. Where did you get hte heads he's holding in his hand? They look great and add a nice efect to the miniature. revvokan Link to comment https://bolterandchainsword.com/topic/269163-the-herald-of-nurgle/#findComment-3296766 Share on other sites More sharing options...
Ada Posted February 2, 2013 Share Posted February 2, 2013 Looking great so far. Link to comment https://bolterandchainsword.com/topic/269163-the-herald-of-nurgle/#findComment-3297004 Share on other sites More sharing options...
nurgling6688 Posted February 2, 2013 Author Share Posted February 2, 2013 Thanks guys! The heads are from the Plaguebearer box. Link to comment https://bolterandchainsword.com/topic/269163-the-herald-of-nurgle/#findComment-3297062 Share on other sites More sharing options...
batu Posted February 2, 2013 Share Posted February 2, 2013 He looks wonderful so far. Looking forward to see him finished ! Link to comment https://bolterandchainsword.com/topic/269163-the-herald-of-nurgle/#findComment-3297282 Share on other sites More sharing options...
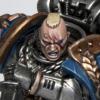
nurgling6688 Posted February 28, 2013 Author Share Posted February 28, 2013 He's done! http://i75.photobucket.com/albums/i317/tylerrox6688/typhusfront_zpsbbe0691d.jpg http://i75.photobucket.com/albums/i317/tylerrox6688/typhusside_zpse9c1cf15.jpg http://i75.photobucket.com/albums/i317/tylerrox6688/typhusback_zps265ed38c.jpg http://i75.photobucket.com/albums/i317/tylerrox6688/typhusside2_zpsbb8d0e04.jpg and a more dramatic pic of him. http://i75.photobucket.com/albums/i317/tylerrox6688/typhusdramatic_zps62c8e187.jpg Check out the full article on him here: http://mengelminiatures.blogspot.com/2013/02/building-better-typhus-part-6-done.html and vote for him here: http://www.coolminiornot.com/326746 Link to comment https://bolterandchainsword.com/topic/269163-the-herald-of-nurgle/#findComment-3317043 Share on other sites More sharing options...
lokkorex Posted February 28, 2013 Share Posted February 28, 2013 now if that isn't an awesome model, then i'm a loyalist! love the shoulder pad, so true to the artwork. Link to comment https://bolterandchainsword.com/topic/269163-the-herald-of-nurgle/#findComment-3317099 Share on other sites More sharing options...
Urauloth Posted February 28, 2013 Share Posted February 28, 2013 Fantastic work. You have a really nice (if that's the word) putrid shade of green there. Amazing rust effect too, is that paints or powders? Link to comment https://bolterandchainsword.com/topic/269163-the-herald-of-nurgle/#findComment-3317132 Share on other sites More sharing options...
Captain_Quirk Posted February 28, 2013 Share Posted February 28, 2013 Disgusting. Papa Nurgle would be proud. Link to comment https://bolterandchainsword.com/topic/269163-the-herald-of-nurgle/#findComment-3317185 Share on other sites More sharing options...
KBA Posted March 1, 2013 Share Posted March 1, 2013 This is full blast amazing. Great job! Link to comment https://bolterandchainsword.com/topic/269163-the-herald-of-nurgle/#findComment-3317431 Share on other sites More sharing options...
reckoning Posted March 1, 2013 Share Posted March 1, 2013 Best Typhus Ive ever seen. Solid 10 from me. Link to comment https://bolterandchainsword.com/topic/269163-the-herald-of-nurgle/#findComment-3317929 Share on other sites More sharing options...
nurgling6688 Posted March 1, 2013 Author Share Posted March 1, 2013 Hey everyone thanks for all the kind words! Fantastic work. You have a really nice (if that's the word) putrid shade of green there. Amazing rust effect too, is that paints or powders? Both. I paint the rust on first with Vermin Brown, heavily watered down. This is more restrained and deliberate. Its usually painted around the bolts and spikes and any dripping patterns. Then once the whole model is done I carefully use the FW Rust Weathering Powder to intensify the effect in areas. You just have to make sure you don't go overboard with the powders and control where you want it to go. Best Typhus Ive ever seen. Solid 10 from me. Thanks! You live in Austin? Game at Dragon's Lair? I teach a painting class there. Link to comment https://bolterandchainsword.com/topic/269163-the-herald-of-nurgle/#findComment-3317944 Share on other sites More sharing options...
reckoning Posted March 1, 2013 Share Posted March 1, 2013 Hey everyone thanks for all the kind words! Fantastic work. You have a really nice (if that's the word) putrid shade of green there. Amazing rust effect too, is that paints or powders? Both. I paint the rust on first with Vermin Brown, heavily watered down. This is more restrained and deliberate. Its usually painted around the bolts and spikes and any dripping patterns. Then once the whole model is done I carefully use the FW Rust Weathering Powder to intensify the effect in areas. You just have to make sure you don't go overboard with the powders and control where you want it to go. >Best Typhus Ive ever seen. Solid 10 from me. Thanks! You live in Austin? Game at Dragon's Lair? I teach a painting class there. No, but once I get my life in order (new moves are always fun...) and get time for this hobby again Ill look it up. I could definitely use a class or two (or several). Link to comment https://bolterandchainsword.com/topic/269163-the-herald-of-nurgle/#findComment-3317952 Share on other sites More sharing options...
Oojamaflip Posted March 1, 2013 Share Posted March 1, 2013 That's absolutely fantastic. Much better than my attempt at the same thing... Link to comment https://bolterandchainsword.com/topic/269163-the-herald-of-nurgle/#findComment-3318042 Share on other sites More sharing options...
Urauloth Posted March 2, 2013 Share Posted March 2, 2013 What did you use for the green, have you gone with citadel paints or something else (or a mix?) By the way, did you ever get around to painting any more of those plaguebearers? I seem to recall you were considering a step-by-step on them at one point. ;) Link to comment https://bolterandchainsword.com/topic/269163-the-herald-of-nurgle/#findComment-3318189 Share on other sites More sharing options...
nurgling6688 Posted March 3, 2013 Author Share Posted March 3, 2013 I have painted 2 more of the plaguebearers for a total of 3. I am actually working on another one right now. I meant to do a step by step with pictures but got distracted, I'll try and get one in. I was originally only going to paint 7 of the new Plaguebearers for the moment but now that my minimum squad size is 10 I guess I will have to 14 of them. Better get cracking. Link to comment https://bolterandchainsword.com/topic/269163-the-herald-of-nurgle/#findComment-3319426 Share on other sites More sharing options...
Recommended Posts
Archived
This topic is now archived and is closed to further replies.