chaplainmikey Posted January 15, 2013 Share Posted January 15, 2013 Hi, I've had the DA's from the FV set since it was released but have so far only really payed attention to the Traitor's included in the box (boo! Hiss!) but with the release of the new DA 'dex, I, like many others no doubt, have finally decided that the 1st Legion models in my collection deserve some love. So, here are my first 2 models for my new DA force: http://i155.photobucket.com/albums/s301/mikeymouatt/th_Photo1052.jpg http://i155.photobucket.com/albums/s301/mikeymouatt/th_Photo1053.jpg http://i155.photobucket.com/albums/s301/mikeymouatt/th_Photo1054.jpg http://i155.photobucket.com/albums/s301/mikeymouatt/th_Photo1055.jpg http://i155.photobucket.com/albums/s301/mikeymouatt/th_Photo1056.jpg They were a nice break from all those treacherous Emperor's Children i've been painting and i'm really pleased with how they have turned out. I'm unsure how my army will progress beyond the models I already have but I will likely try painting a Deathwing or Ravenwing test model next. Thanks for reading and any comments or criticism are welcome. Cheers, Mike. Link to comment https://bolterandchainsword.com/topic/269699-my-da-test-models/ Share on other sites More sharing options...
Avon Rekaes Posted January 16, 2013 Share Posted January 16, 2013 Wowza! Those are some really nice, crisp highlights! My initial thought was that these looked good enough for White Dwarf. Link to comment https://bolterandchainsword.com/topic/269699-my-da-test-models/#findComment-3285109 Share on other sites More sharing options...
Harleqvin Posted January 16, 2013 Share Posted January 16, 2013 Very nice, mate! Only thing I may say is either drilling out the barrel nozzle holes or painting holes on. I would vote for getting a pinvice and drilling them. I like the highlights. They aren't everywhere giving it a Tron feel. The bases are nice and clean, basic but a very nice. I think you would do well with more elaborate bases to paint. Beyond that have you decided if you will paint the Squad # or use a decal? Or just leave it blank? Very nice. Link to comment https://bolterandchainsword.com/topic/269699-my-da-test-models/#findComment-3285122 Share on other sites More sharing options...
Bunta Posted January 16, 2013 Share Posted January 16, 2013 Those are really nice! Exactly how I wanted mine to look. Might have to go back and see if I can get similar highlights! Thanks for the inspiration! Link to comment https://bolterandchainsword.com/topic/269699-my-da-test-models/#findComment-3285178 Share on other sites More sharing options...
chaplainmikey Posted January 18, 2013 Author Share Posted January 18, 2013 Thanks for the replies. :) Wowza! Those are some really nice, crisp highlights! My initial thought was that these looked good enough for White Dwarf Thanks, though I think i'm a fair bit away from matching the quality of some of the models shown in the recent WD issues. One day though hopefully. :) Very nice, mate! Only thing I may say is either drilling out the barrel nozzle holes or painting holes on. I would vote for getting a pinvice and drilling them. I like the highlights. They aren't everywhere giving it a Tron feel. The bases are nice and clean, basic but a very nice. I think you would do well with more elaborate bases to paint. Beyond that have you decided if you will paint the Squad # or use a decal? Or just leave it blank? Very nice. Thanks. I do agree about the Bolters and it completely slipped my mind. :P I'll likely go back and paint the holes on rather than drill because i'm really rubbish at drilling barrels. Especially when it comes to Termie's Storm Bolters! :( I also forgot about squad numbers. In a bit of a pickle here because i'm not overly fond of decals but a toddler has better freehand skills than I do. :P Those are really nice! Exactly how I wanted mine to look. Might have to go back and see if I can get similar highlights! Thanks for the inspiration! Cheers and i'm happy i've inspired you somewhat. If you need a list of the paints I used or anything similar i'd be happy to help. Once the snow and cold weather eases up i'll get a Terminator undercoated and give white armour a shot! Cheers, Mike. Link to comment https://bolterandchainsword.com/topic/269699-my-da-test-models/#findComment-3288078 Share on other sites More sharing options...
Krofna Posted January 18, 2013 Share Posted January 18, 2013 I would be really gratefull if you could write the painting process, especially for armor. I started paiting my DV force this week with the new paint range, Abbadon Black, Caliban Green etc. Link to comment https://bolterandchainsword.com/topic/269699-my-da-test-models/#findComment-3288190 Share on other sites More sharing options...
chaplainmikey Posted January 18, 2013 Author Share Posted January 18, 2013 I would be really gratefull if you could write the painting process, especially for armor. I started paiting my DV force this week with the new paint range, Abbadon Black, Caliban Green etc. Sure. I'm using a mix of the older paint range and the newer paints but nearly all the paints in the old range have a suitable replacement in the newer range. ;) I started with a black undercoat followed by an even layer of Dark Angels Green ( Caliban green). Next I painted Agrax Earthshade into the crevices and joints of the armour. Washing the whole model will also work but it sometimes darkens the tone of the green rather than just picking out the shadows which is why I used a small detail brush to paint it in to the crevices. I then edge highlighted most of the lines of the armour plates, such as the elbow, helmets, chest piece, shoulder pads and arm detail with Warpstone Glow. Finish the highlights with really fine lines of Moot Green on the most prominent edges of the armour such as the 'brow' of the helmet, the very edges of the shoulders and fingertips etc. Thats how I painted the green armour . I think the most important part is the placement of the final highlights which makes the model 'pop'. I hope this has been helpful and if you have any questions just give me a PM or post here and i'll see what I can do. :) Cheers, Mike. Link to comment https://bolterandchainsword.com/topic/269699-my-da-test-models/#findComment-3288211 Share on other sites More sharing options...
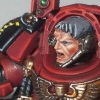
Bryan Blaire Posted January 18, 2013 Share Posted January 18, 2013 Chaplain Mike, you've done a great job! I really like the attention you paid to the eye lenses and you've managed to do a 3rd Company Marine with a red bolter that doesn't look like a Christmas Tree decoration. :D I don't usually like red bolter casings, but you've done those well, so chalk that up to personal taste. I think that your white Chapter icon could use a little color depth, but I'd you took the pic with a flash, that may just be being washed out in the photos. I agree with the need for a bore on those barrels, a painted dot looks okay (and if you give it a lower edge highlight it really adds some depth), but they always lack the actual 3D effect a drilled barrel bore will give you. The little icons on the bolters could use a touch of highlight, especially the skull one. I actually really like those bases, they are simple enough to blend for a lot of tables and aren't too complex where they are difficult to mass produce and overwhelm the model's detailing. Your models are nicely done and tie together well. Keep on going, let's see some more! On the freehand: practice makes perfect. A couple things I usually try to do are stick to simple shapes, straight lines are the best, if you try to paint a bunch of curves, it can start looking lopsided quick. Always plan out what you want to do, even if it just simple text, you can write text directly onto the model with a light color area using a thin lead (try to make your lines as light as possible so you can see them, but the paint covers them easily). Practice on a piece of paper a couple of times before you do it, this will hopefully give you a bit more confidence before you paint onto a prized model. Personally, I like the connect the dot method: if you can break down what you want to paint to a bunch of dots you can paint with straight lines, it becomes a lot easier, and you may not be as reluctant to paint it. This is where the planning and practice come in handy, because you can make a "map" for the dots. Finally, be okay with touching up/correcting "mess ups" because they are going to happen, but if you paint in thin layers, it is less obvious to everyone else than you think when you cover them back up. Also, if you (or Krofna) want any other painting ideas, check out the Laws of the Lion for a bunch of painting guides. Back in September of last year I tried to make a detailed step by step with three different painting methods for the new GW paint line for DAs so that people could see and get ideas, and there are quite a few paint methods for Deathwing, Ravenwing and even a couple of Successors on there. Looking forward to seeing some more, Chaplain Mike! I like your paint method, good show! Link to comment https://bolterandchainsword.com/topic/269699-my-da-test-models/#findComment-3288225 Share on other sites More sharing options...
chaplainmikey Posted January 18, 2013 Author Share Posted January 18, 2013 I think that your white Chapter icon could use a little color depth, but I'd you took the pic with a flash, that may just be being washed out in the photos. Yeah you're right. A quick grey shade should do the trick. The little icons on the bolters could use a touch of highlight, especially the skull one. I have highlighted them but they don't quite show on the pics. ;) I was actually thinking about trying a Spack Hulk esque theme for my future bases, especially if I go for a heavy focus on Deathwing.\\\ I'm not convinced just ( Ravenwing would look odd :P) yet but I do want to do something that gives the army some atmosphere without detracting from the models themselves. Thanks for your tips on freehanding. It's something i've always struggled with and dislike attempting but I will try using some of the methods you've suggested and hopefully I can take my painting to the next level. :) I'm also going to have a read through your link and i'm sure it will come in handy. Thanks again for the input! :) Link to comment https://bolterandchainsword.com/topic/269699-my-da-test-models/#findComment-3288261 Share on other sites More sharing options...
Krofna Posted January 18, 2013 Share Posted January 18, 2013 Thanks for replying, I got few more questions. How do you feel about Biel-Tan Green and especially glazes? I got Warpstone Glow, but never actually used any of them glazes in painting. My Wood Elfs are just layers and highlights. Agrax Earthshade is kinda like Devlan Mud? Cause I got 1/3 of that can laying around. Link to comment https://bolterandchainsword.com/topic/269699-my-da-test-models/#findComment-3288363 Share on other sites More sharing options...
Recommended Posts
Archived
This topic is now archived and is closed to further replies.