Captain_Quirk Posted February 25, 2013 Share Posted February 25, 2013 Hi all, I hope this is in the right board as the Crimson Slaughter fluff is all about Khorne. My friendly local Games Workshop is holding a painting competition which I have decided to enter. This one is for big models and I have decided to paint the Helbrute Dreadnought, Mortis Metalikus from the Dark Vengeance starter set. It will be the first model I've entered into a competition and I will be keeping a progress log on the my personal blog and maybe here if people are interested. I don't expect to do any good but I think it will be a challenge and I think that I will learn a lot from trying to paint to a good standard under a deadline. The competition ends on the 30th of April and so I have plenty of time, however I am going to get started right now. As for my Crimson Slaughter in general, I don't ever intend to play with them as an army but I do love the look of the models and so I am going to try and paint them to my highest standard (which is, admittedly, not very high! ) Here's the beast, ready for priming: http://images.dakkadakka.com/gallery/2013/2/25/467552_sm-Helbrute%21.jpg I will be going with the default Crimson Slaughter paint job and I'm looking for a nice, bright, arterial blood look. Firstly, I'll be painting up two of the Chosen that came with the kit so that I get a bit of practice on the overall colour scheme that I'll be going with. One will be primed black, the other white: http://images.dakkadakka.com/gallery/2013/2/25/467551_sm-CSM%20Test%20Models.jpg Here are the steps I'm going to use on my first test model: 1) Prime with Citadel Chaos Black spray paint 2) Base entire model in Mephiston Red 3) Heavy black wash 4) Paint all metallics 5) Block red back in with Mephiston Red 6) Highlight red with either Evil Sunz Scarlet or Wazdakka Red. I haven't yet decided how I am going to do the detail work such as the horns or the flesh tones on the Helbrute itself. I was thinking of a paler, deader looking skin to contrast the brighter armour. Any ideas? I have also made myself a wet palette using the tutorial I found on Dakka Dakka. It works great so far. http://images.dakkadakka.com/gallery/2013/2/25/467553_sm-Wet%20Pallet%20.jpg Got pretty carried away and excited last night and so the test models have been primed and the first one has been base coated Mephiston Red. Next step will be a heavy black wash. http://images.dakkadakka.com/gallery/2013/2/25/467713_sm-Crimson%20Slaughter%20Test%20Models%201.JPG Link to comment https://bolterandchainsword.com/topic/271886-crimson-slaughter-wip-local-comp-ent-updated-03032013/ Share on other sites More sharing options...
Captain_Quirk Posted February 26, 2013 Author Share Posted February 26, 2013 Got home tonight and got stuck into it. Based the white model in Mephiston. I really like the brightness of the white model. http://images.dakkadakka.com/gallery/2013/2/26/467956_sm-Crimson%20Slaughter%20Test%20Models.JPG I then gave them both a Nuln Oil wash: http://images.dakkadakka.com/gallery/2013/2/26/467957_sm-CS%20Test%20Models%20Washed.JPG http://images.dakkadakka.com/gallery/2013/2/26/467958_sm-CS%20Test%20Models%20Washed%202.JPG I'm not sure I'm happy with the results. I think my Nuln Oil may be a bit dodge as it looked kind of grey on the models and seemed to pool up really strangely. Didn't seem uniform, it was almost as if it were actually oil. Is that normal? Link to comment https://bolterandchainsword.com/topic/271886-crimson-slaughter-wip-local-comp-ent-updated-03032013/#findComment-3314816 Share on other sites More sharing options...
War Angel Posted February 26, 2013 Share Posted February 26, 2013 I think it looks really cool. Gives it a nice chaotic look. Maybe just go back and highlight it again and you should be set. Good luck Link to comment https://bolterandchainsword.com/topic/271886-crimson-slaughter-wip-local-comp-ent-updated-03032013/#findComment-3314874 Share on other sites More sharing options...
Captain_Quirk Posted February 26, 2013 Author Share Posted February 26, 2013 I did go back last night and do another very light wash where some of the black didn't fill in properly and I'm much happier. I also started blocking the red back in on the black primed model and I'm really happy with how that's looking as well. Got a day off today which means a full day of painting ahead (after I do some jobs and visit my FLGS for some paint) so expect to see an update or two later today! Link to comment https://bolterandchainsword.com/topic/271886-crimson-slaughter-wip-local-comp-ent-updated-03032013/#findComment-3315298 Share on other sites More sharing options...
Firepower Posted February 26, 2013 Share Posted February 26, 2013 I've always had trouble making the washes cooperate, too. I see people just go 'BAM! Depth!' just by slapping it on, but it fights me every step of the way Anyway, unless they look significantly different after touching up with another wash, I think the black basecoat is doing better at this point. Link to comment https://bolterandchainsword.com/topic/271886-crimson-slaughter-wip-local-comp-ent-updated-03032013/#findComment-3315303 Share on other sites More sharing options...
Captain_Quirk Posted February 27, 2013 Author Share Posted February 27, 2013 Cheers. I've moved onto the gold trim on the black model at the moment and it's coming up really nicely IMO. The red blocked back in really well and I'm reasonably happy with the shading now. Once I have the trim mostly done I'll post a few more pics. Link to comment https://bolterandchainsword.com/topic/271886-crimson-slaughter-wip-local-comp-ent-updated-03032013/#findComment-3315548 Share on other sites More sharing options...
Captain_Quirk Posted February 27, 2013 Author Share Posted February 27, 2013 First layer of trim done. Going to do the next layer in a lighter gold and also a thin layer of lighter red on the armor to make it pop a bit more and get that bright red blood look. Apologies for the pic quality. My lightbox should be here soon fingers crossed! I've started blocking the red on the white model and I have to say that so far I prefer it to this black primed one. The red seems to go on cleaner and easier over the white.http://images.dakkadakka.com/gallery/2013/2/27/468269_sm-CS%20Test%20Model%20Black%20w%252F%20Trim.JPGhttp://images.dakkadakka.com/gallery/2013/2/27/468270_sm-CS%20Test%20Model%20Black%20w%252F%20Trim.JPG Link to comment https://bolterandchainsword.com/topic/271886-crimson-slaughter-wip-local-comp-ent-updated-03032013/#findComment-3315628 Share on other sites More sharing options...
Firepower Posted February 27, 2013 Share Posted February 27, 2013 That's looking quite good. And all the blacklining of the red segments's edges is just by using washes? Link to comment https://bolterandchainsword.com/topic/271886-crimson-slaughter-wip-local-comp-ent-updated-03032013/#findComment-3315635 Share on other sites More sharing options...
Captain_Quirk Posted February 27, 2013 Author Share Posted February 27, 2013 Yeah, primed, based and then a wash. On another note I picked up a new toy to play with today:http://images.dakkadakka.com/gallery/2013/2/27/468346_sm-New%20toy.JPGGonna be mostly using it for basing large groups of models at first. Nothing fancy. :p Link to comment https://bolterandchainsword.com/topic/271886-crimson-slaughter-wip-local-comp-ent-updated-03032013/#findComment-3315777 Share on other sites More sharing options...
Rik Lightstar Posted February 27, 2013 Share Posted February 27, 2013 Get on Amazon and pick up a cheap compressor NOW, or you'll do what I did and spend as much on cans of propellant and then end up buying a compressor anyway. Rik http://www.amazon.co.uk/Airbrush-Compressor-Double-Action-Airbrushes/dp/B004XP7K9W/ref=sr_1_2?ie=UTF8&qid=1361984539&sr=8-2 or http://www.amazon.co.uk/Elephant-Airbrush-Compressor-Action-Cps-1001k/dp/B009LL6MRE/ref=sr_1_5?ie=UTF8&qid=1361984539&sr=8-5 are reasonable Link to comment https://bolterandchainsword.com/topic/271886-crimson-slaughter-wip-local-comp-ent-updated-03032013/#findComment-3316127 Share on other sites More sharing options...
Captain_Quirk Posted February 27, 2013 Author Share Posted February 27, 2013 Thanks Rik, I'll take a look. Not sure if I'll get one straight away as I don't know how often I'll be using it yet. Do you have any tips on how to mix the paints? I'm using the Citadel range at the moment and it seems like I'd need to use a fair bit out of the pot to get enough to spray with. Also not real sure on how to actually get it in the paint jar without making a godawful mess! :p Link to comment https://bolterandchainsword.com/topic/271886-crimson-slaughter-wip-local-comp-ent-updated-03032013/#findComment-3316338 Share on other sites More sharing options...
Captain_Quirk Posted February 28, 2013 Author Share Posted February 28, 2013 Okay so I worked on the black model a bit more tonight. I finished off the gold trim and started highlighting with silver, buffed up the red, painted the bolter and painted the eyes/breastplate eye. I really hope my lightbox comes soon because these photos are crap. http://images.dakkadakka.com/gallery/2013/2/28/468634_sm-CS%20Test%20Models%20Washed.JPGhttp://images.dakkadakka.com/gallery/2013/2/28/468632_sm-CS%20Test%20Model%20Black%20w%252F%20Trim.JPG http://images.dakkadakka.com/gallery/2013/2/28/468633_sm-CS%20Test%20Model%20Black%20w%252F%20Trim.JPG Link to comment https://bolterandchainsword.com/topic/271886-crimson-slaughter-wip-local-comp-ent-updated-03032013/#findComment-3316746 Share on other sites More sharing options...
War Angel Posted February 28, 2013 Share Posted February 28, 2013 Wicked! Link to comment https://bolterandchainsword.com/topic/271886-crimson-slaughter-wip-local-comp-ent-updated-03032013/#findComment-3316769 Share on other sites More sharing options...
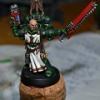
Captain_Quirk Posted March 3, 2013 Author Share Posted March 3, 2013 Okay I haven't been able to paint much the last few days but I managed to finish off the gold highlights and the bolter (although I see a bit I missed now, d'oh!) and also do the bone shoulder. It's my first attempt at a large piece of bone and also at blending, where the shoulder pad and the bone meet:http://images.dakkadakka.com/gallery/2013/3/3/469519_sm-Shoulder%20Pad%20Test.JPG Any thoughts? I think I've run the blend a little too high into the bone. Might try to tone it back a bit tomorrow. Link to comment https://bolterandchainsword.com/topic/271886-crimson-slaughter-wip-local-comp-ent-updated-03032013/#findComment-3319004 Share on other sites More sharing options...
Gratan Posted April 7, 2013 Share Posted April 7, 2013 As someone about to start a Crimson Slaughter army, I like it a lot. The bone looks really well done. Bolter looks kind of bland though. Link to comment https://bolterandchainsword.com/topic/271886-crimson-slaughter-wip-local-comp-ent-updated-03032013/#findComment-3344802 Share on other sites More sharing options...
Recommended Posts
Archived
This topic is now archived and is closed to further replies.