Kierdale Posted September 5, 2013 Author Share Posted September 5, 2013 Rednekkboss, thank you very much for the explanation. I think I get it. I'll see how these marines turn out, and change my technique for the next squad as necessary. I had a look through your thread: some very nice work there. Excellent camo, in particular. It did give me a different idea for my scouts: toning down the yellow on them to a dull yellow-brown, as camo cloaks and bright yellow armour would be quite a clash... Link to comment https://bolterandchainsword.com/topic/278403-bug-stompers-scythes-of-the-emperor-marines-based-228/page/2/#findComment-3447015 Share on other sites More sharing options...
Kierdale Posted September 24, 2013 Author Share Posted September 24, 2013 This project isn't dead, it's just been on hold while I was working on my Golden Demon entry. With GD Nippon out of the way now it's nice to relax and paint some power armour for pleasure again. Yellow is coming along nicely. Just a few more highlights then onto the black... Link to comment https://bolterandchainsword.com/topic/278403-bug-stompers-scythes-of-the-emperor-marines-based-228/page/2/#findComment-3473688 Share on other sites More sharing options...
WarriorFish Posted September 24, 2013 Share Posted September 24, 2013 Yes, more Scythes of the Emperor are needed! They're a great chapter that needs more representation :) That yellow is very nice, it's about time those conversions got some paint on them :D Link to comment https://bolterandchainsword.com/topic/278403-bug-stompers-scythes-of-the-emperor-marines-based-228/page/2/#findComment-3473695 Share on other sites More sharing options...
deathspectersgt7 Posted September 24, 2013 Share Posted September 24, 2013 Can't wait to see some more. Link to comment https://bolterandchainsword.com/topic/278403-bug-stompers-scythes-of-the-emperor-marines-based-228/page/2/#findComment-3473699 Share on other sites More sharing options...
Kierdale Posted October 7, 2013 Author Share Posted October 7, 2013 A bit more progress to show, on the rhino this time. The interior is done but for some weathering powders to further dirty it up. Some of the stains on the ground look a bit too red in these photos, they're actually brown...except for the blood trail leading into the rear-right of the APC (the ramp also has drops leading up it), and near the top of the left hatch: The top-middle monitor was, at one point, going to be replaced with an LED...that plan later changed to the current red-screen with an LED in the crew cabin... I'm not going to be bothering with an LED in the rhino after all (I'll save that project for something in the future. I want to get something in this army finished!). Should have something clad in power armour to show later this week. Link to comment https://bolterandchainsword.com/topic/278403-bug-stompers-scythes-of-the-emperor-marines-based-228/page/2/#findComment-3487968 Share on other sites More sharing options...
deathspectersgt7 Posted October 7, 2013 Share Posted October 7, 2013 Like the gritty feel on the inside of the rhino. Link to comment https://bolterandchainsword.com/topic/278403-bug-stompers-scythes-of-the-emperor-marines-based-228/page/2/#findComment-3488736 Share on other sites More sharing options...
Kierdale Posted October 10, 2013 Author Share Posted October 10, 2013 Thank you, deathspectersgt7. A few very WIP shots of one of the marines for you. Wash is still wet on his pouches. Helmet lenses have only been basecoated...decoration on his bolter likewise...grenades unpainted...and only a bit of weathering done. I intend to do a lot more with some Tamiya powders and I might experiment with some artist's pastels I recently got. Grind them down, perhaps. Photos quickly snapped at work. The Chapter symbol will hopefully improve with practice! Some squads will be yellow-on-black, others black-on-yellow. Need a bit of black touching up up his left arm there. Link to comment https://bolterandchainsword.com/topic/278403-bug-stompers-scythes-of-the-emperor-marines-based-228/page/2/#findComment-3491481 Share on other sites More sharing options...
Yosef Hausakluif Posted October 11, 2013 Share Posted October 11, 2013 give yourself credit.... I think that the chapter symbol looks great! Link to comment https://bolterandchainsword.com/topic/278403-bug-stompers-scythes-of-the-emperor-marines-based-228/page/2/#findComment-3492589 Share on other sites More sharing options...
NightHunters Posted October 11, 2013 Share Posted October 11, 2013 Yeah loving the rhino! And the marine is coming along nicely! And have to agree with yosef, I have attempted scythe heads, many, many times and they have never looked that good! Link to comment https://bolterandchainsword.com/topic/278403-bug-stompers-scythes-of-the-emperor-marines-based-228/page/2/#findComment-3492886 Share on other sites More sharing options...
Kierdale Posted October 26, 2013 Author Share Posted October 26, 2013 Thank you, Yosef and NightHunters. Progress is slow, but the first five marines are nearing completion... I'm sure some will balk at metallic weathering on ceramite armour, but I like how it looks. Still to do: purity seals perhaps repaint the tips of the spare missiles. I'm not happy with having that missile red as well as the other red parts on that marine brown wash on the flamer barrels detailing on the fuel dial on the side of the combi-flamer finish the knife one is wielding weathering powders basing! Sergeant still has to have his head done. I put checks on his combi-bolter in tribute to the early SotE images from Advanced Space Crusade. It's hidden by his helmet in this photo but I painted his right knee white with a black `S` on it to donate some heroic action during the Battle of Sotha. I decided to do his helmet red since the SotE are a codex chapter and it adds some more colour to the marine. Another image of the as-yet-unattached shoulder pads. Aaand I haven't yet bought the other five members of the squad, but have started work on one's bolter. He's be going into combat Gangnam Style, Jungle Boogie...ah, that's it: Jungle Style* Taking photos really shows you what more needs doing: like more filing on the back of that attached mag * http://en.wikipedia.org/wiki/Jungle_style Link to comment https://bolterandchainsword.com/topic/278403-bug-stompers-scythes-of-the-emperor-marines-based-228/page/2/#findComment-3504731 Share on other sites More sharing options...
NightHunters Posted October 26, 2013 Share Posted October 26, 2013 Love it! Also agree that the red tip could do with a repaint, maybe green? And if you could show me a gangnam style bolter that would be awesome! FTE Link to comment https://bolterandchainsword.com/topic/278403-bug-stompers-scythes-of-the-emperor-marines-based-228/page/2/#findComment-3505119 Share on other sites More sharing options...
Kierdale Posted October 27, 2013 Author Share Posted October 27, 2013 Thanks, NightHunters. Yes, I think I'll do one missile tip green, one blue and perhaps one silver. I can't even imagine what a Gangnam Style bolt gun would look like! One fired from horseback? I am going to try to give the squad as much variety as possible in their weapons: that jungle style one, one with a foregrip, an Umbra Ferrox, one with a chain bayonet, a Phobos. That should give them a bit of a scavengers-image. Link to comment https://bolterandchainsword.com/topic/278403-bug-stompers-scythes-of-the-emperor-marines-based-228/page/2/#findComment-3505212 Share on other sites More sharing options...
Kierdale Posted November 2, 2013 Author Share Posted November 2, 2013 I've almost finished the five marines (hopefully can post photos sometime this weekend), though for basing I'm going to wait until GW releases those six new technical paints. As I'm having the army fighting on a terrestrial world undergoing bioforming/harvesting by tyranids I figure the cracked-earth paint would be excellent. Some green grass as well as withered grass, some units on 'healthier' looking ground, some (those who close with the enemy) on ground which is more drained. Anyway, that's the plan. Link to comment https://bolterandchainsword.com/topic/278403-bug-stompers-scythes-of-the-emperor-marines-based-228/page/2/#findComment-3511051 Share on other sites More sharing options...
khakisuperbunny Posted November 2, 2013 Share Posted November 2, 2013 Hi Kierdale! Big fan of the Scythes so far, the free hand chapter badge is great and as said, you should give yourself more credit...I'm a particular fan of the bolter with the double mag, what did you use for tape may I ask? And your sergeant in general is great! Keep 'em coming, I'll be watching this thread closely Link to comment https://bolterandchainsword.com/topic/278403-bug-stompers-scythes-of-the-emperor-marines-based-228/page/2/#findComment-3511242 Share on other sites More sharing options...
deathspectersgt7 Posted November 2, 2013 Share Posted November 2, 2013 These look great ,ditto on the tape on the mags. Link to comment https://bolterandchainsword.com/topic/278403-bug-stompers-scythes-of-the-emperor-marines-based-228/page/2/#findComment-3511402 Share on other sites More sharing options...
Kierdale Posted November 2, 2013 Author Share Posted November 2, 2013 Thank you. The jungle style mags were easy really. The 'tape' is simply a thin strip of paper. After gluing the spare magazine to the sode of the one in the bolter I superglued one end of the paper to the fitted mag. I glued it to the left side of the mag, where it would be hidden against the marine's body (in case of any screw ups, though fortunately there weren't any) and simply wrapped it round a couple of times, not too neatly as I wanted you to be able to see a bit of two wrappings at least, then glued it down on the left side again. Once the glue dried I cut it off out of sight. I've been going over the bolter conversion thread again today, trawling it for ideas I can use in the future. Didn't get any painting done today, but hopefully will tomorrow. Link to comment https://bolterandchainsword.com/topic/278403-bug-stompers-scythes-of-the-emperor-marines-based-228/page/2/#findComment-3511419 Share on other sites More sharing options...
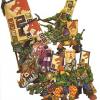
Kierdale Posted November 11, 2013 Author Share Posted November 11, 2013 Progress! In fact, aside from basing (hopefully I can get onto that after the new cracked-earth paint comes out) and weathering powders, they're essentially done. I may come back and add squad markings in the future if the whim takes me, once I have a squad or two completed. Here are the photos, taken brutally closely. I am rather happy with how fine my scribbletext came out on purity seals. Shortened flamer design inspired by Veteran Sergeant. Brother Flambe here has a spare tank on his belt kit, and has just dropped an empty by his foot. You've seen Brother Mainrandry enough already. And the sarge. Went with no gore on his scars to show they're old. From Sotha perhaps. Can see the flamer's gauge here. I always used to put banners on my sergeants, but I want my Scythes rougher, so there won't be anything to get in the way with these marines. Link to comment https://bolterandchainsword.com/topic/278403-bug-stompers-scythes-of-the-emperor-marines-based-228/page/2/#findComment-3518907 Share on other sites More sharing options...
WarriorFish Posted November 11, 2013 Share Posted November 11, 2013 Always a pleasure to see these models coming along Kier, have you thought about adding 'nid gibs/trophies? Link to comment https://bolterandchainsword.com/topic/278403-bug-stompers-scythes-of-the-emperor-marines-based-228/page/2/#findComment-3518922 Share on other sites More sharing options...
deathspectersgt7 Posted November 11, 2013 Share Posted November 11, 2013 Stellar work Link to comment https://bolterandchainsword.com/topic/278403-bug-stompers-scythes-of-the-emperor-marines-based-228/page/2/#findComment-3519154 Share on other sites More sharing options...
Kierdale Posted November 12, 2013 Author Share Posted November 12, 2013 Thanks, Deathspectersgt. Always a pleasure to see these models coming along Kier, have you thought about adding 'nid gibs/trophies? And thanks, WarriorFish. I don't think I'll be adding any trophies, at least not to this unit. Perhaps to Elites/veterans. I do however have a couple of sprues of 'stealers and might pick up some push-fit 'gants for basing purposes. Link to comment https://bolterandchainsword.com/topic/278403-bug-stompers-scythes-of-the-emperor-marines-based-228/page/2/#findComment-3519695 Share on other sites More sharing options...
Kierdale Posted November 24, 2013 Author Share Posted November 24, 2013 A bit of progress on the Rhino. Used masking tape (for the first time) to get smooth lines over the upper hull. The black areas have since been drybrushed and need to be washed black to tone them down now. The yellow on the hull is done but for the four bits where it comes over the side sections. Those have yet to be shaded. Tracks need to be heavily drybrushed Leadbelcher. Then do the vision blocks in the turret hatches. Once those are done I can get onto weathering and generally dirtying it up. Rear shot. Did the lights in the ramp with the green one brighter (accompanied by the squad sergeant screaming "Go! Go! Go!" no doubt). A blood trail from their last encounter hasn't been cleaned up yet. It leads in and onto one of the benches. Front shot. The windows were a bit of an experiment but I like how they came out. Will probably do the vision blocks in the top hatches the same. Oh, and I'm thinking about doing the `body` of the pintle stormbolter red for a bit of colour. Once painting is done, I have some small chain to hang between the two hooks on the front. Oh, any suggestions for what colour to paint the searchlight? Yellow wouldn't stand out against all that yellow hull... red? Green?? Link to comment https://bolterandchainsword.com/topic/278403-bug-stompers-scythes-of-the-emperor-marines-based-228/page/2/#findComment-3529912 Share on other sites More sharing options...
helterskelter Posted November 24, 2013 Share Posted November 24, 2013 Excellent looking models brother! Id say for the searchlight a white shaded with a bit of blue, would stand out ss a spotlight and notbget lost in the other colours Link to comment https://bolterandchainsword.com/topic/278403-bug-stompers-scythes-of-the-emperor-marines-based-228/page/2/#findComment-3529915 Share on other sites More sharing options...
Xenith Posted November 25, 2013 Share Posted November 25, 2013 Good conversions and you've got a great looking yellow going, but it makes the black just look like dark space, get some highlights on the black armour to break up the plates and these guys will look even better! Link to comment https://bolterandchainsword.com/topic/278403-bug-stompers-scythes-of-the-emperor-marines-based-228/page/2/#findComment-3530336 Share on other sites More sharing options...
WarriorFish Posted November 25, 2013 Share Posted November 25, 2013 This pleases the Omnissiah! More vehicles are required, so your Scythes can run down the xenos! :D Blue for the searchlight would work I reckon, wouldn't clash with or look too similar to the colours. Can't wait to see it finished :) Link to comment https://bolterandchainsword.com/topic/278403-bug-stompers-scythes-of-the-emperor-marines-based-228/page/2/#findComment-3530504 Share on other sites More sharing options...
chaplainmikey Posted November 25, 2013 Share Posted November 25, 2013 The freehand on your Marines and the rhino are top notch, the Sgts Combi- Flamer in particular is fantastic. I also agree with a light blue/white for head lights/Search lights. Link to comment https://bolterandchainsword.com/topic/278403-bug-stompers-scythes-of-the-emperor-marines-based-228/page/2/#findComment-3530539 Share on other sites More sharing options...
Recommended Posts
Archived
This topic is now archived and is closed to further replies.