Volfen Posted February 18, 2014 Share Posted February 18, 2014 My first Storm Talon was looking lonely on the shelf all by itself, so I started getting the itch to give him a wingman. I also wanted to do some thing differently from the first mod, and this also presented an opportunity to show a more in depth work in progress for anyone that might be interested. Right now the new Skyshark is about 1/2 complete. Here are pics of current progress. As always, suggestions, comments, and criticism are all welcome. First, the fuselage and cockpit are modified to be a bit longer and sleeker. I separated several components from the lower cockpit assembly for later adjustment The cockpit assembly is put together without the forward instrument panel Showing where the fuselage is cut for the extension. The central part of the under-fuselage is attached as normal. Next, the cockpit is added to the front of the fuselage, moving it slightly forward, making sure to keep it aligned. The components that were previously removed are then added to the under side of the cockpit I then added plasticard to make the new under side of the cockpit. Next, the Cockpit is fared into the fuselage. Next post, the Tail Assembly. Link to comment https://bolterandchainsword.com/topic/286990-new-storm-talon-mod-the-skyshark-mk-2/ Share on other sites More sharing options...
Volfen Posted February 18, 2014 Author Share Posted February 18, 2014 The tail assembly was modified from the original by cutting down the lower half and extending the upper half. This tail assembly hasn't been thinned down in cross section as the first Skyshark was, and the fuselage extension isn't as long, so I'm hoping it will appear stronger. First, the modified tail section - lower half. About a third of the lower tail has been removed. With this mod, the tail landing strut can be used normally. The section that was removed from the lower tail is now added to the upper tail section. This pic also shows how the lower tail section was cleaned up, and the entire assembly was added to the fuselage extension. The upper tail section cleaned up, making the rudder area a straight line. Speaking of the fuselage extension, here it is in progress Final Tail Assembly and Fuselage extension. You can see the gap-filling white putty at the seams. The fuselage assembly of the Skyshark Mk 2 compared to the original Skyshark Link to comment https://bolterandchainsword.com/topic/286990-new-storm-talon-mod-the-skyshark-mk-2/#findComment-3597497 Share on other sites More sharing options...
Honda Posted February 18, 2014 Share Posted February 18, 2014 I am extremely intrigued by what you are doing. I really dislike the base model and do think that extending the lines of the fuselage help tremendously. I really love what you did with the cockpit. I'm also digging what you did with the tail. The boom strikes me as a tad too long. I can see why you may have gone this route, looking at your original, but wonder what it would have looked like if the white extension was 1-2 cm shorter. Do play on, this is very interesting. Cheers, Link to comment https://bolterandchainsword.com/topic/286990-new-storm-talon-mod-the-skyshark-mk-2/#findComment-3597525 Share on other sites More sharing options...
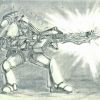
Volfen Posted March 2, 2014 Author Share Posted March 2, 2014 new additions This shows the beginnings of the wing construction I wanted the static display to show an extreme left turn, so the ailerons and engine were positioned to give that idea Front View showing Assault Cannons and Heavy Bolter / Missile pod orientation. The pods will be magnetized for different load outs, but I will still construct wingtip missile launchers for the air to air missiles. After all, if you can't guarantee complete air supremacy, you should never leave home without an air to air missile ;) I tried to simulate a double - hinged design on the ailerons. Also, I added side thrust fans on the tail and aft fuselage for that extra maneuverability. Finally, the mid fuselage stabilizers were moved forward a bit. I still need to do the final clean up, smoothing of seams, Magnetizing of options, and details like rivets, but this is the shape of the Skyshark Mk II. Criticisms and suggestions are welcome, as usual. Link to comment https://bolterandchainsword.com/topic/286990-new-storm-talon-mod-the-skyshark-mk-2/#findComment-3607071 Share on other sites More sharing options...
deathspectersgt7 Posted March 2, 2014 Share Posted March 2, 2014 Good looking conversion. Link to comment https://bolterandchainsword.com/topic/286990-new-storm-talon-mod-the-skyshark-mk-2/#findComment-3607308 Share on other sites More sharing options...
Recommended Posts
Archived
This topic is now archived and is closed to further replies.