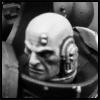
Rob451 Posted April 14, 2014 Share Posted April 14, 2014 I've been painting a Raptors army over the last few months and I'm currently sat at around 2k points of painted models. Now that I've started putting the finishing touches onto all of them I've decided I'll keep a journal and update it with pictures as I take them. Let's start with some Terminators. Link to comment https://bolterandchainsword.com/topic/289575-robs-raptors-new-pics-pg2-knight-thss-termies/ Share on other sites More sharing options...
Sanguine_Knight Posted April 14, 2014 Share Posted April 14, 2014 Nice termies... lets see more!! Link to comment https://bolterandchainsword.com/topic/289575-robs-raptors-new-pics-pg2-knight-thss-termies/#findComment-3652721 Share on other sites More sharing options...
Hyaenidae Posted April 14, 2014 Share Posted April 14, 2014 Gritty. I like them a lot. Well done, man. Link to comment https://bolterandchainsword.com/topic/289575-robs-raptors-new-pics-pg2-knight-thss-termies/#findComment-3652722 Share on other sites More sharing options...
jpwyrm Posted April 14, 2014 Share Posted April 14, 2014 Nice work there! I like the bases and subtle weathering, its a nice touch and adds a lot of character. What's next? ;) Link to comment https://bolterandchainsword.com/topic/289575-robs-raptors-new-pics-pg2-knight-thss-termies/#findComment-3652799 Share on other sites More sharing options...
Sothalor Posted April 15, 2014 Share Posted April 15, 2014 That OSL on the power sword is gorgeous. Link to comment https://bolterandchainsword.com/topic/289575-robs-raptors-new-pics-pg2-knight-thss-termies/#findComment-3653131 Share on other sites More sharing options...
Rob451 Posted April 15, 2014 Author Share Posted April 15, 2014 My other Elites choice: Sternguard Link to comment https://bolterandchainsword.com/topic/289575-robs-raptors-new-pics-pg2-knight-thss-termies/#findComment-3653764 Share on other sites More sharing options...
Rob451 Posted April 15, 2014 Author Share Posted April 15, 2014 My first ever troops choice: Bolter Scouts. The Veteran Sergeant was transferred from 2nd company to train the recruits so he kept his helmet for luck. Link to comment https://bolterandchainsword.com/topic/289575-robs-raptors-new-pics-pg2-knight-thss-termies/#findComment-3653780 Share on other sites More sharing options...
deathspectersgt7 Posted April 15, 2014 Share Posted April 15, 2014 Great looking Raptors. Link to comment https://bolterandchainsword.com/topic/289575-robs-raptors-new-pics-pg2-knight-thss-termies/#findComment-3653787 Share on other sites More sharing options...
Rob451 Posted April 15, 2014 Author Share Posted April 15, 2014 My Lias Issodon conversion is based on a FW Recon Marine with Sternguard and Sniper Scout bits. As Lias shuns the Iron Halo in favour of Stealth I gave him a Ghillie Cloak. Link to comment https://bolterandchainsword.com/topic/289575-robs-raptors-new-pics-pg2-knight-thss-termies/#findComment-3653822 Share on other sites More sharing options...
Rob451 Posted April 15, 2014 Author Share Posted April 15, 2014 Looking cleaner than their battle brothers my Devastators prefer to stick to high ground rather than wade through swamps. Link to comment https://bolterandchainsword.com/topic/289575-robs-raptors-new-pics-pg2-knight-thss-termies/#findComment-3653847 Share on other sites More sharing options...
Rob451 Posted April 15, 2014 Author Share Posted April 15, 2014 Last one for today: Stalker Link to comment https://bolterandchainsword.com/topic/289575-robs-raptors-new-pics-pg2-knight-thss-termies/#findComment-3653922 Share on other sites More sharing options...
jeremy1391 Posted April 15, 2014 Share Posted April 15, 2014 Wow great work! Link to comment https://bolterandchainsword.com/topic/289575-robs-raptors-new-pics-pg2-knight-thss-termies/#findComment-3653939 Share on other sites More sharing options...
Armond Posted April 17, 2014 Share Posted April 17, 2014 Ok, these are beautiful. The gritty look has been done right! That Stalker is so beautiful it makes me sick, and Lias Issodon is so inspiring, I may steal some ideas for my own Recon Squad when I build mine! Link to comment https://bolterandchainsword.com/topic/289575-robs-raptors-new-pics-pg2-knight-thss-termies/#findComment-3655440 Share on other sites More sharing options...
recon0321 Posted April 17, 2014 Share Posted April 17, 2014 I like the green color....how did you make those sternguard? I know one is fine cast how were the others built Link to comment https://bolterandchainsword.com/topic/289575-robs-raptors-new-pics-pg2-knight-thss-termies/#findComment-3656282 Share on other sites More sharing options...
W.A.Rorie Posted April 19, 2014 Share Posted April 19, 2014 very nice Link to comment https://bolterandchainsword.com/topic/289575-robs-raptors-new-pics-pg2-knight-thss-termies/#findComment-3657937 Share on other sites More sharing options...
Isiah Posted April 19, 2014 Share Posted April 19, 2014 Lovely models and really nicely photographed. Cheers I Link to comment https://bolterandchainsword.com/topic/289575-robs-raptors-new-pics-pg2-knight-thss-termies/#findComment-3658315 Share on other sites More sharing options...
Dumah Posted April 20, 2014 Share Posted April 20, 2014 Stunning! You've really captured the practical, subdued nature of the Raptors with that scheme. I wish I had the skill and/or patience for that kind of quality... Link to comment https://bolterandchainsword.com/topic/289575-robs-raptors-new-pics-pg2-knight-thss-termies/#findComment-3658358 Share on other sites More sharing options...
Rob451 Posted April 21, 2014 Author Share Posted April 21, 2014 I like the green color....how did you make those sternguard? I know one is fine cast how were the others built 2 are finecast. The Sergeant with the fist and the pointing guy. Just added some extra pouches to each of them. The others are made out of the new Tactical and Sternguard boxes. Just tactical squad legs with Sternguard bodies. The guy with no helmet is just a Tac marine but I did such a nice job on his face that he got a promotion. Link to comment https://bolterandchainsword.com/topic/289575-robs-raptors-new-pics-pg2-knight-thss-termies/#findComment-3659435 Share on other sites More sharing options...
Rob451 Posted April 21, 2014 Author Share Posted April 21, 2014 Stunning! You've really captured the practical, subdued nature of the Raptors with that scheme. I wish I had the skill and/or patience for that kind of quality... The irony being that it's actually really quick to paint these guys. Base coat with Castellan green, a quick highlight with Vallejo Dark Green. Paint the Aquilas with Pallid Wych Flesh as well as any skulls, scrolls, or purity seals. Wash the entire model with Agrax and wait for it to dry. Then paint Badger Minitaire Raven Black (It's amazing as it's not quite black so can take a shade) into the rubber joints, bolt gun, pouches etc. Wash black areas with Nuln Oil. Next paint the brass areas (laurels, shell casings, any "metal" details) with Vallejo Bright Brass. Wash Brass with Druchi Violet. You should now pretty much have a marine to tabletop standard. Get some Vallejo US Light Grey (which is secretly light green) on a bit of sponge. Weather the armour plates with the sponge paying attention to the edges of armour plates (fake edge highlighting). Next sponge some Vallejo Steel lightly onto the areas you just weathered. Paint Purity Seal "Seal" with Mephiston Red. Wash with Agrax. Then it's a case of dusting some weathering powders over their feet and basing them and applying decals. Coat of matte varnish and you're done. I can knock out a Tac squad in a night to tabletop standard (and with this army often had to for a weekly campaign) and then it's another night to finish them up. About an hour per model at most. Terminators took longer because they were a centrepiece unit but I essentially followed the method above for most of the army (only change for vehicles is to use Vallejo Hull Red for the first sponge stage). Link to comment https://bolterandchainsword.com/topic/289575-robs-raptors-new-pics-pg2-knight-thss-termies/#findComment-3659448 Share on other sites More sharing options...
Grizzly_bear Posted April 21, 2014 Share Posted April 21, 2014 Fantastic work brother Link to comment https://bolterandchainsword.com/topic/289575-robs-raptors-new-pics-pg2-knight-thss-termies/#findComment-3659839 Share on other sites More sharing options...
Cyrox Posted April 21, 2014 Share Posted April 21, 2014 What green did you use on the stalker? It looks a tad lighter than the marines Link to comment https://bolterandchainsword.com/topic/289575-robs-raptors-new-pics-pg2-knight-thss-termies/#findComment-3659840 Share on other sites More sharing options...
Rob451 Posted April 21, 2014 Author Share Posted April 21, 2014 What green did you use on the stalker? It looks a tad lighter than the marines It's the same but due to the larger surface area it photographs a bit lighter. Link to comment https://bolterandchainsword.com/topic/289575-robs-raptors-new-pics-pg2-knight-thss-termies/#findComment-3659917 Share on other sites More sharing options...
recon0321 Posted April 21, 2014 Share Posted April 21, 2014 What color green is that Link to comment https://bolterandchainsword.com/topic/289575-robs-raptors-new-pics-pg2-knight-thss-termies/#findComment-3659921 Share on other sites More sharing options...
Rob451 Posted May 4, 2014 Author Share Posted May 4, 2014 Sadly I was ill for a few weeks and not able to get the last of the pictures online. However I'm all better now so here they are... The Rhino can convert into a Razorback just by changing the top hatch. The Predator is also magnetized so it can be a Rhino or Razorback if needed. All of the storm bolters are interchangeable with normal hatches etc. There is a lot of flexibility in all the vehicles except for the Razorback which due to being quite old will forever be a Razorback. I also have a Heavy Bolter and 2 Lascannon turrets for the Razorbacks if needed. Link to comment https://bolterandchainsword.com/topic/289575-robs-raptors-new-pics-pg2-knight-thss-termies/#findComment-3674357 Share on other sites More sharing options...
Urael Posted May 4, 2014 Share Posted May 4, 2014 Awesome Raptors! Looking forward to seeing more of them! :) Link to comment https://bolterandchainsword.com/topic/289575-robs-raptors-new-pics-pg2-knight-thss-termies/#findComment-3674563 Share on other sites More sharing options...
Recommended Posts
Archived
This topic is now archived and is closed to further replies.