Genmotty Posted September 11, 2014 Share Posted September 11, 2014 1171st 'Reglands' Regiment – The Refounding Although a quick search back a few pages didn't reveal any Astra Militarum guard projects. This appears to be the most appropriate board. If not, please move this thread mods. After several years out of the hobby, one has decided it is time to rebuild my imperial guard back to its full splendour. I intend to document this 'refounding' with a build diary covering new acquisitions an build techniques, all for your constructive criticism. The Army Core Since I was last in the hobby a lot of my old model have been sold on, or damaged to a point of no return (never leave a squad on a radiator). Unfortunately, because my best assets were also the olds I could sell for the most, that has left my imperial army a bare shadow of its former self. http://i672.photobucket.com/albums/vv82/Haths/20140910_191409_zpse27b7f1f.jpg Thus to kick myself into action and fire up the engines with some passion I thought a small forge world order would be nice to ease me back into action. http://i672.photobucket.com/albums/vv82/Haths/20140910_191328_zps6e12b5a1.jpg Guess the model + + + I thought I would start with the heavy mortars to test my brush skills and bring my technique up to speed. My end goal here is to build a squad of three heavy mortars, although I currently lack a crew this is likely to be built from new Cadian model stock, with some unit conversions and eventual basing. In terms of bases I am currently leaning towards procuring a set of old blank CD/DVDs, and sticking two of those together to build a more solid base. I am however open to suggestions. The reason for this, as I would like reasonable room to be able to add in other features to build a mini diorama for each model. Plus I would like to leave space enough so that the crew can be positioned on the base without themselves being glued down, allowing some variability should I ever want to use these models with other units/armies. In terms of Cadian gunner crews, I am somewhat tempted by GW crew members, but I am also feeling a vibe for mixing normal Cadian squad bits with an actual heavy weapons team croached models representing a couple of the mortars in the state of firing, with the other being reloaded. If I am careful with the posing of the model, these should be applicable for other uses such as objective markers or for game board fluff. Back to the guns themselves. Colour Scheme The 1171st use a tan-gloss blue scheme. Obviously this highlights a carapace armour notion rather than full camo. That said army green is good for internal trim, while black and tan make up the base colours. In addition, I shall be looking towards creating a 'worn theme' for the army, given its historic reverence to me as this is an army that has survived many years, and now I am more established in life can spend some love, time and care on it... ...I have to also mention that it will also be seeing the table top! Conversions In this build I shall not be considering any major conversions. This is because I consider the base model beautiful and sufficiently detailed. Preparation & Undercoats After unboxing and trimming the major components from the sprue, I used a sharp pen knife and attachments to remove most of the plastic burrs and regions where the resin had not quite cast properly. I then attempted a test fit to check for warping. I discovered that two of the mortars were somewhat twisted to my minor annoyance. This can be solved by bringing a kettle of water to almost boiling, filling a bowl and letting it stand for a min or so before immersing the warped model piece for 30s. Pull the section out and gently test for flexibility, reshape as required conducting re-immersions if needs require. This way I was able to insure that the models will sit properly when fully assembled. With a rough sponge and nail file I smoothed down the remaining edges. I did not do this fully on the wheels however, this is because I want to leave a block to insure a good surface later to stick to the base. I left the pieces to dry. Followed with a spray coat black. I fear I may have been a little heavy on the undercoating in my excitement – but c'est la vie! The next step I took was to heavily dry brush with metallic silver. To achieve the following effect; http://i672.photobucket.com/albums/vv82/Haths/20140911_210426_zpsbd73928d.jpg http://i672.photobucket.com/albums/vv82/Haths/20140911_210535_zps6cce7784.jpg http://i672.photobucket.com/albums/vv82/Haths/20140911_210510_zps4fb43435.jpg This is by no means what the models will look like! Rather, this coat will be followed by a similar one of metallic bronze, and a heavy stabbing of brown and a rust red to give an overall rusted effect. Not that this will be the actual top coat or model detail ... Link to comment https://bolterandchainsword.com/topic/296614-1171st-reglands-regiment-%E2%80%93-the-refounding/ Share on other sites More sharing options...
Brother-Chaplain Kage Posted September 11, 2014 Share Posted September 11, 2014 Malcador Defender? Moar plz! Link to comment https://bolterandchainsword.com/topic/296614-1171st-reglands-regiment-%E2%80%93-the-refounding/#findComment-3806906 Share on other sites More sharing options...
Candleshoes Posted September 12, 2014 Share Posted September 12, 2014 Wonderful work so far! Link to comment https://bolterandchainsword.com/topic/296614-1171st-reglands-regiment-%E2%80%93-the-refounding/#findComment-3807049 Share on other sites More sharing options...
Daemon2027 Posted September 12, 2014 Share Posted September 12, 2014 Nice start. Looking forward to seeing this develop. Link to comment https://bolterandchainsword.com/topic/296614-1171st-reglands-regiment-%E2%80%93-the-refounding/#findComment-3807140 Share on other sites More sharing options...
Genmotty Posted September 13, 2014 Author Share Posted September 13, 2014 Rusty Wheels Having waited for the metallic silver undercoat to dry, the wheels were lightly drybrushed with metallic bronze to create a somwhat rusted effect, along with a line wash of brown to fill the recesses with what looks like rusted dust. I decided not to go with the rust red in the end, since I was satisfied with the overall look for the moment. This constitutes the 'main look' for the wheels. Later I will apply a dark wash and mud coating once the morters are assembled. This will pick out the rivet detail a little bit more, darken the shine to make it look more like pitted aluminium and create a new detail asthetic with the mud. http://i672.photobucket.com/albums/vv82/Haths/20140913_091840_zpsb9974120.jpg Moving forward I shall concentrate on the morter barrels themselves, since I have a colour scheme settled for it, but not the frame yet. Since I am unsure as to if I want to use a camo scheme on it or not... Link to comment https://bolterandchainsword.com/topic/296614-1171st-reglands-regiment-%E2%80%93-the-refounding/#findComment-3808063 Share on other sites More sharing options...
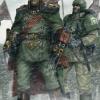
Genmotty Posted September 13, 2014 Author Share Posted September 13, 2014 Gun Barrel...Green!? In starting on the mortar barrels themselves, I am intending to emulate the picture below in general design. That is, the gun barrels will take a camo painted ethos with a dark green. The 1171st has a colour scheme simmilar to the standard Cadian one, but with a tan colouration for most of the background colouration. However, if one is going for a muddy base, that leaves little actual contrast since tan is effectively brown. This would leave the model looking rather 'flat' and mono-tone. Hence instead I am looking to mix this model colour scheme with a dark green background base. With this I shall use the royal gloss blue that I use for armour trim on the cradle, and possibly on the carrage too, although I've not fully decided on that one, and might use a paper test to see how that looks. http://i672.photobucket.com/albums/vv82/Haths/20140913_145531_zps00b90f6b.jpg With both the blue, and the green here I have thinned the paint out slightly with white spirit and applied quickly in both instances. With the blue, I used a hard fine brush, since I needed accuracy for insuring that I could get the paint into the recesses and around detailing I did not wish to spoil. The thinned blue when dry, gives a slight transluenct effect. This allows that silver dry brushing to slow through ever so slightly, this gives great depth to the colouration (not that you can see it in my poor quality phone camara) because the colour shades are different in the sections with silver. Futher later when I apply some iron wool to the model, I shal be able to scrape paint from 'worn surfaces' and get a very natural looking bare metal effect. A light wash of the metallic bronze or brown with a touch of rust will give that rusted effect seen on the wheels - she says hopefully! With the green, I used a soft medium brush, the goal here was to apply paint thinly, but without leaving a 'scratched look', again I wanted the silver to show through slightly, but unlike the gloss, there isn't a translusciece created, rather this just gives texture, an again while it is difficult to see on the camara, this gives a nice touch that you don't normally see with thickly applied paints. Paints I am personally using Humbrol Enamel paints (Other paints are avalible!) for this army, since I like the range of colours that I can use, and you can easliy create washs or thinner paints using a suitable solvent. Futher, they produce a 'hard finish'. On the downside, this paints take a while to dry, and not all painting techniques work with them, futher make sure to use in a well ventalated area due to the minor health hazard of vapours. I shall be using the following paints on these mortars; http://i672.photobucket.com/albums/vv82/Haths/20140913_145712_zpsb020b411.jpg Link to comment https://bolterandchainsword.com/topic/296614-1171st-reglands-regiment-%E2%80%93-the-refounding/#findComment-3808214 Share on other sites More sharing options...
Genmotty Posted September 20, 2014 Author Share Posted September 20, 2014 Malcador Base Coating Having had some time this weekend to continue on with my build projects. I thought it time to start on my Malcador Defender tank. I am leaving the mortars for now, in a state of 'playable paint job' sans base/diorama and mud effects. This is purely because I don't have a base to start work on that aspect. With regards to this, does anyone have any experience with using old CD/DVDs stuck together as a base for this kind of of model size (bearing in mind requirement of space for two (or more) crew members? Back to the Malcador After preparing the FW model parts and giving them a spray paint coat of black primer. I had a serious think about colour scheme. The two choices for the 1171st would have to be tan-brown or green. The big question would be as to which would be the primary base coat. After stewing on the decision for a bit while I prepared the other sections, I eventually decided on using a tan base. The overall effect I am going for is a somewhat weathered tank effect, thus a tan-brown base coat gives that 'muddy base' to be built upon, green on the other hand might be too harsh/well defined, and would need to be covered with various mud browns anyhow. The techniques I am going to apply is again a chipping effect on worn edges, grey dry brushing to bring out detail, and rusty washes to define weathering. I also wanted to bring some Great War iconography into the model. So taking inspiration from British tank markings, I applied a similar colour scheme to this model, but with a nod to 117st colours, adding in the blue that defines their detail, and a white strip to add contrast some extra colouration for the model. http://i672.photobucket.com/albums/vv82/Haths/3511699613_939f940495_zps7a8aadf0.jpg http://i672.photobucket.com/albums/vv82/Haths/20140920_161715_zpsd21abf3c.jpg http://i672.photobucket.com/albums/vv82/Haths/20140920_161401_zpse7177c8d.jpg You may note, that on this particular model, the side sponson inserts are rather loose fitting, hence I needed a way to try and break up the black line that it creates (and painting a light colour in the crack doesing quite work either .) So I've made the front markings overlap with this section, when camoflague is applied this too will help break up this line. The camouflage scheme will likely be using a dark green in alternating camouflage patterns. This will be applied below detail at a later stage. A question I put to the community – when it comes to tank treads, given the tan scheme a rusted track colouration might not give good contrast, so the question is whether to leave the treads as black with silver scratched metal, or give them a grey and rust effect? Any opinions? Link to comment https://bolterandchainsword.com/topic/296614-1171st-reglands-regiment-%E2%80%93-the-refounding/#findComment-3814204 Share on other sites More sharing options...
Recommended Posts
Archived
This topic is now archived and is closed to further replies.