Sohail187 Posted January 2, 2015 Share Posted January 2, 2015 Good evening all. Never really posted anything on this page but most of the time I get idea's and inspiration from the pics on here! so i thought it is about time i give back!. I have already painted a knight paladin and errant can share pics of those later however for my knight army i am currently working on the forgeworld knights. The Castigator just finished pics below! next will be the Lancer followed by Archeron. I have been in 2 minds if i want to add some rust pigments or use the gw method of typhus and ryza but not sure. Tempted to leave it as is! feedback welcome. http://i57.tinypic.com/2dumtye.jpg http://i57.tinypic.com/nyz4th.jpg http://i58.tinypic.com/j0fbmf.jpg http://i61.tinypic.com/5megxt.jpg Link to comment https://bolterandchainsword.com/topic/301332-fw-knight-castigator/ Share on other sites More sharing options...
helterskelter Posted January 2, 2015 Share Posted January 2, 2015 As is. I think theres plenty on there, just very difficult to remove my eyes from the gun/belt feed/ammo rack. I'm sure I should play a different legion. Really well done overall brother Link to comment https://bolterandchainsword.com/topic/301332-fw-knight-castigator/#findComment-3907128 Share on other sites More sharing options...
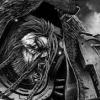
Dantay VI Posted January 4, 2015 Share Posted January 4, 2015 Looks absolutely amazing!! What colours did you use for the bone/cream/off white areas? I may need to borrow that colour! Link to comment https://bolterandchainsword.com/topic/301332-fw-knight-castigator/#findComment-3908965 Share on other sites More sharing options...
GrandMasterAralia Posted January 4, 2015 Share Posted January 4, 2015 Awesome! I think its looks perfect with the current amount of weathering. What did you use to make those super crisp straight lines? Masking tape, steady hands or something else? Link to comment https://bolterandchainsword.com/topic/301332-fw-knight-castigator/#findComment-3909025 Share on other sites More sharing options...
Sohail187 Posted January 4, 2015 Author Share Posted January 4, 2015 Looks absolutely amazing!! What colours did you use for the bone/cream/off white areas? I may need to borrow that colour! Cheers for the kind words guys :) The cream was a zandari dust base and then a 50 / 50 mix zandari dust + ushbanti bone. Once dried i covered the entire cream bit with AK interactive Streak and grime + rust effects (mixed together 50/50). Once it had dried i used oderless thinner (ak interactive product) on some cloth and rubbed the grime away!! leaving the tainted cream effect. Really easy to do and takes 5 min to get the darkened cream effect. Grandmasteraralia: The straight lines was with a tape called Tamiya 6mm masking tape. Can be picked up on most online stores ebay/amazon ect..ect. fairly cheap and i prefer it to masking tape due to the size. Link to comment https://bolterandchainsword.com/topic/301332-fw-knight-castigator/#findComment-3909195 Share on other sites More sharing options...
GrandMasterAralia Posted January 7, 2015 Share Posted January 7, 2015 Great. Thanks for the advice! I tried using regular masking tape to paint some sharpedged camo. Didn't really work that well. Had to correct the areas quite a bit, but the worst part was, that along the edges or the tap the paint had dried in a sort of ridge that had to be scraped of in order to keep the flat surface.. Well.. Flat.. It was a huge hassle and totally negated the usefulness of the masking tape.. Did you have any similar problems? I don't have access to an airbrush, so everything was brush-painted. Did you use an airbrush, and do you think that my problem was a direct result of using a brush to paint with? Hope you can help! Link to comment https://bolterandchainsword.com/topic/301332-fw-knight-castigator/#findComment-3912939 Share on other sites More sharing options...
Sohail187 Posted January 7, 2015 Author Share Posted January 7, 2015 Great. Thanks for the advice! I tried using regular masking tape to paint some sharpedged camo. Didn't really work that well. Had to correct the areas quite a bit, but the worst part was, that along the edges or the tap the paint had dried in a sort of ridge that had to be scraped of in order to keep the flat surface.. Well.. Flat.. It was a huge hassle and totally negated the usefulness of the masking tape.. Did you have any similar problems? I don't have access to an airbrush, so everything was brush-painted. Did you use an airbrush, and do you think that my problem was a direct result of using a brush to paint with? Hope you can help! This was all brush painted. I do have an airbrush but really did not need to use it for this project. I have had the problem before where you find a raised ridge, due to the several layers of paint u put down. I even had that issue with this model! as the cream neededed a few layers before i can do the dirty effect. However the raised lines was very very minor as i did really thin layers. You will defo not get this problem with an airbrush, thin the paint a bit more if the tip i gave my self specially when doing work with tape. Link to comment https://bolterandchainsword.com/topic/301332-fw-knight-castigator/#findComment-3913032 Share on other sites More sharing options...
ShinyRhino Posted January 7, 2015 Share Posted January 7, 2015 Beautiful model and artfully painted...until I reach the base. is it finished? The subtle lends and weathering of the Knight itself are a complete juxtaposition with the cartoon-bright slime and what looks like drybrushed Tyranid parts. Link to comment https://bolterandchainsword.com/topic/301332-fw-knight-castigator/#findComment-3913123 Share on other sites More sharing options...
GrandMasterAralia Posted January 8, 2015 Share Posted January 8, 2015 Great. Thanks for the advice! I tried using regular masking tape to paint some sharpedged camo. Didn't really work that well. Had to correct the areas quite a bit, but the worst part was, that along the edges or the tap the paint had dried in a sort of ridge that had to be scraped of in order to keep the flat surface.. Well.. Flat.. It was a huge hassle and totally negated the usefulness of the masking tape.. Did you have any similar problems? I don't have access to an airbrush, so everything was brush-painted. Did you use an airbrush, and do you think that my problem was a direct result of using a brush to paint with? Hope you can help! This was all brush painted. I do have an airbrush but really did not need to use it for this project. I have had the problem before where you find a raised ridge, due to the several layers of paint u put down. I even had that issue with this model! as the cream neededed a few layers before i can do the dirty effect. However the raised lines was very very minor as i did really thin layers. You will defo not get this problem with an airbrush, thin the paint a bit more if the tip i gave my self specially when doing work with tape.Perfect! I'll try to thin the paint even more next time I try masking tape - and arm myself with patience... Was trying to get light grey camo areas over dark grey base... NOT easy to get a thorough coverage ;) Link to comment https://bolterandchainsword.com/topic/301332-fw-knight-castigator/#findComment-3913592 Share on other sites More sharing options...
Reyner Posted January 8, 2015 Share Posted January 8, 2015 Ooft. I was looking at one of these the other day as a future purchase, awesome work. How was it to put together? Link to comment https://bolterandchainsword.com/topic/301332-fw-knight-castigator/#findComment-3913736 Share on other sites More sharing options...
Sohail187 Posted January 8, 2015 Author Share Posted January 8, 2015 Beautiful model and artfully painted...until I reach the base. is it finished? The subtle lends and weathering of the Knight itself are a complete juxtaposition with the cartoon-bright slime and what looks like drybrushed Tyranid parts. Thank you for the kind words dude!. Ye the base was a bit of an OVER OVER OVER try hard situation! not sure what happened there. Had an idea but couldn't execute! The model its self i found it easy doing it in 5 stages. 1) I put together the bottom half included the groin area 2) Upper Body 3) build left arm completely (did not attach to main body) 4) build right arm (did not attach to main body) 5) top carapace. Personally for me this i found was easy to manage! as a project and painting. Working on the knight lancer later this month! hopefully can achieve results like this!. Link to comment https://bolterandchainsword.com/topic/301332-fw-knight-castigator/#findComment-3914363 Share on other sites More sharing options...
Chapter Master Valrak Posted January 9, 2015 Share Posted January 9, 2015 Amazing work mate! Do the knee joints bend on these? Link to comment https://bolterandchainsword.com/topic/301332-fw-knight-castigator/#findComment-3914515 Share on other sites More sharing options...
Sohail187 Posted January 9, 2015 Author Share Posted January 9, 2015 The joints are made in a way so you can position them fairly easily!. Very versatile model! wish the regular ones were like this! Link to comment https://bolterandchainsword.com/topic/301332-fw-knight-castigator/#findComment-3914700 Share on other sites More sharing options...
depthcharge12 Posted January 9, 2015 Share Posted January 9, 2015 Again, great stuff, have you got a game in with it yet? :) Link to comment https://bolterandchainsword.com/topic/301332-fw-knight-castigator/#findComment-3914715 Share on other sites More sharing options...
Sohail187 Posted January 9, 2015 Author Share Posted January 9, 2015 Managed to play one game!! with it, ill be honest its not the most awsome in game unit!!! when compared to its brothers / sisters (archeron and lancer). However it has its uses! 8 shots twin linked str 7 ap 3? great for clearing some types of units! and if you face a horde unit great in CC!. Link to comment https://bolterandchainsword.com/topic/301332-fw-knight-castigator/#findComment-3915513 Share on other sites More sharing options...
Dantay VI Posted January 10, 2015 Share Posted January 10, 2015 What magnets did you use on the arms?? I want to magnetise, for ease of transport, but worried about what size I'd need to use.. Link to comment https://bolterandchainsword.com/topic/301332-fw-knight-castigator/#findComment-3915916 Share on other sites More sharing options...
Sohail187 Posted January 10, 2015 Author Share Posted January 10, 2015 I didn't magnetize the arms!! glued them in place!. However if you did want to magnetize these i think the best way would be to stick a HUGE magnet on the inside of the main body!!! and that way you only need to put a magnet in the arm join and it should connect to the body with out needing to drill more wholes. Link to comment https://bolterandchainsword.com/topic/301332-fw-knight-castigator/#findComment-3916260 Share on other sites More sharing options...
Augustus b'Raass Posted January 11, 2015 Share Posted January 11, 2015 Oh wow, i love him. Nice work mate, very nice work. The colour scheme is really 'knightly'. One unfortunately not so tiny nitpick is the base. The colours used to me look totally out of place. The knight's colours are soft, easy colours, while the base has almost neon red, green and yellow - all colours greatly at odds with the palette of the pretty much perfect colour sheme of the model itself, and thus are a huge distraction. If i were you I'd save myself the totally unnecessary trouble of weathering powders (as the knight looks stunningly regal) and redo the base (or at least greatly dull the colours of the spore and slime with several thick layerd of a dark wash).Just my two cents. Again, superb job on the knight Edit: sharpened my argument. Link to comment https://bolterandchainsword.com/topic/301332-fw-knight-castigator/#findComment-3916897 Share on other sites More sharing options...
Dantay VI Posted January 11, 2015 Share Posted January 11, 2015 Ah, my bad, mis-read the word manage for magnet... Can't wait to see the lancer, do you have any ot the regular knights? I read in the rules that if running as a Knight army you cant have more cerastus Knights than regular Knights.. Link to comment https://bolterandchainsword.com/topic/301332-fw-knight-castigator/#findComment-3916904 Share on other sites More sharing options...
Sohail187 Posted January 12, 2015 Author Share Posted January 12, 2015 Ye i got 2 paladins and 1 errant. One of each is painted!. Will redo the base for sure or cover the slime with sand!!! and i can easuly get the red thing off the base. Really appreciate the feed back!! i thought the base might be an issue. Link to comment https://bolterandchainsword.com/topic/301332-fw-knight-castigator/#findComment-3917818 Share on other sites More sharing options...
Recommended Posts
Archived
This topic is now archived and is closed to further replies.