nurgling6688 Posted June 22, 2015 Share Posted June 22, 2015 Hi everyone, I have been working on this Black Templar Marshall as a commission for the past 2 weeks. You can see WIP pictures of all the conversion work in the WIP board. It was a lot of fun to get to work on a Templar, and make him so dynamic. http://i75.photobucket.com/albums/i317/tylerrox6688/templar1alt_zpsjofvpwbf.jpg http://i75.photobucket.com/albums/i317/tylerrox6688/templar2alt_zpsnd1sp0i5.jpg http://i75.photobucket.com/albums/i317/tylerrox6688/templar3alt_zps7hyfvqeg.jpg http://i75.photobucket.com/albums/i317/tylerrox6688/templar4alt_zpsi5xcknpy.jpg http://i75.photobucket.com/albums/i317/tylerrox6688/templar5alt_zpsdodr73tx.jpg http://i75.photobucket.com/albums/i317/tylerrox6688/templar6alt_zpsixvdxeod.jpg You can read more about how I painted him and see a 360 degree video of the model at my site: http://www.mengelminiatures.com/2015/06/gallery-black-templar-marshall.html You can also vote for him on Cool Mini or Not: http://www.coolminiornot.com/381761 If you have any questions just let me know and I'll try to answer them here. Comments and criticism welcome, thanks! Link to comment https://bolterandchainsword.com/topic/309841-black-templar-marshall/ Share on other sites More sharing options...
Torvak Kyre Posted June 22, 2015 Share Posted June 22, 2015 The fact that cape is green stuff still amazes me. Link to comment https://bolterandchainsword.com/topic/309841-black-templar-marshall/#findComment-4097938 Share on other sites More sharing options...
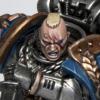
Firepower Posted June 22, 2015 Share Posted June 22, 2015 Pretty fine work in modelling and painting alike. There's one troubling area though: the sword grip/hilt. The shortness of the grip, ending just below the edge of the palm, looks awkward for a two handed sword in a two handed grip. It's not damning by any means, and overall a pretty damn small detail, but it sticks in my eye-craw all the same.* You managed the stylized text that GW uses, which is an absolute , so kudos on that too. But no fancy-fancy designs for the white void on his right pauldron? *Took a moment to think about it, and realized I should go look at the model you were converting in the first place. I don't know why I never noticed that problem on the original model, but now that I have, I cannot unsee it. Link to comment https://bolterandchainsword.com/topic/309841-black-templar-marshall/#findComment-4098026 Share on other sites More sharing options...
HenricusTyranicus Posted June 22, 2015 Share Posted June 22, 2015 Wow. Just wow. That's all I can say. One of the best Models I've seen. Link to comment https://bolterandchainsword.com/topic/309841-black-templar-marshall/#findComment-4098081 Share on other sites More sharing options...
nurgling6688 Posted June 22, 2015 Author Share Posted June 22, 2015 Thanks! Someone else mentioned the hilt to me on Twitter. Was going to see about adding something heftier on the end but I didn't have anything good. I wanted to do fancy freehand on the shoulder pad but this was a commission and I had already done more then I was being paid for with sculpting the laurels and the few bits of freehand I had already done. I had to restrain myself from putting more work into it, but it's a matter of cost vs time spent unfortunately. This client has 2 more potential Templar commissions for me (one of them based off the FW Sigismund model) so I'll have more time to try out different things. :) Link to comment https://bolterandchainsword.com/topic/309841-black-templar-marshall/#findComment-4098095 Share on other sites More sharing options...
Optimat_prime Posted June 22, 2015 Share Posted June 22, 2015 That model will look fantastic next to the stock Emperors Champion, for example. Really nice work. I especially like the hue of bronze you used which works really well with the black white and red, and in just the right amounts. Really pleasing to see. Link to comment https://bolterandchainsword.com/topic/309841-black-templar-marshall/#findComment-4098420 Share on other sites More sharing options...
Draakur Posted June 24, 2015 Share Posted June 24, 2015 Absolutely gorgeous :) Link to comment https://bolterandchainsword.com/topic/309841-black-templar-marshall/#findComment-4101424 Share on other sites More sharing options...
Marshal Reinhard Posted June 25, 2015 Share Posted June 25, 2015 Really really nice work. The only thing I could possibly chip in and say is that I think he feels more like an Emperor's Champion than a marshal. Regardless, that's one fine Templar Link to comment https://bolterandchainsword.com/topic/309841-black-templar-marshall/#findComment-4102290 Share on other sites More sharing options...
nurgling6688 Posted June 25, 2015 Author Share Posted June 25, 2015 Thanks everyone! The client wanted the option to use him as an Emperor's Champion if they wanted to, so he kind of straddles the champion/marshall line. Personally, I would keep the Emperor's Champion capeless to make him more austere looking. I'm pretty sure I am going to be making a Champion model for the same client sometime within the next few months, so I'll see what I can do to differentiate the two models. Link to comment https://bolterandchainsword.com/topic/309841-black-templar-marshall/#findComment-4102383 Share on other sites More sharing options...
GrandMagnus Posted June 25, 2015 Share Posted June 25, 2015 This is just an amazing miniature, when I saw your WIP I was a bit sceptic about the tabard but now that I see it painted it looks great. Do you have any tutorials on sculpting capes? Link to comment https://bolterandchainsword.com/topic/309841-black-templar-marshall/#findComment-4102416 Share on other sites More sharing options...
DimDim Posted June 25, 2015 Share Posted June 25, 2015 See now stuff like this is what drew me to the Black Templars and 40k in the first place! Excellent stuff mate! Link to comment https://bolterandchainsword.com/topic/309841-black-templar-marshall/#findComment-4102482 Share on other sites More sharing options...
nurgling6688 Posted June 25, 2015 Author Share Posted June 25, 2015 This is just an amazing miniature, when I saw your WIP I was a bit sceptic about the tabard but now that I see it painted it looks great. Do you have any tutorials on sculpting capes? Thanks! Unfortunately no. I didn't think to make a tutorial on it as I was working since it was my first time sculpting one. I didn't even know if it was going to turn out usable. My only tip is to use poster tac to hold up the cape while it's drying. I sculpted it in chunks, first just the basic flat shape which had all of the basic folds and flowiness to it. Then I sculpted the more intricate folds in the fabric in about 3-4 stages working from left to right. I had to leave plenty of time for it to dry between each stage. I finished the whole thing off with a very thin coat of Liquid Greenstuff to smooth out any rough transitions and to try and cover any remaining fingerprints as best as I could. Hope that helps! The next time I sculpt one I'll put a tutorial together on it. Link to comment https://bolterandchainsword.com/topic/309841-black-templar-marshall/#findComment-4102815 Share on other sites More sharing options...
deathspectersgt7 Posted June 25, 2015 Share Posted June 25, 2015 AWESOME!!!!!!!! Link to comment https://bolterandchainsword.com/topic/309841-black-templar-marshall/#findComment-4102871 Share on other sites More sharing options...
stinkenheim Posted June 28, 2015 Share Posted June 28, 2015 This is just an amazing miniature, when I saw your WIP I was a bit sceptic about the tabard but now that I see it painted it looks great. Do you have any tutorials on sculpting capes? Thanks! Unfortunately no. I didn't think to make a tutorial on it as I was working since it was my first time sculpting one. I didn't even know if it was going to turn out usable. My only tip is to use poster tac to hold up the cape while it's drying. I sculpted it in chunks, first just the basic flat shape which had all of the basic folds and flowiness to it. Then I sculpted the more intricate folds in the fabric in about 3-4 stages working from left to right. I had to leave plenty of time for it to dry between each stage. I finished the whole thing off with a very thin coat of Liquid Greenstuff to smooth out any rough transitions and to try and cover any remaining fingerprints as best as I could. Hope that helps! The next time I sculpt one I'll put a tutorial together on it. This is pretty much how I've sculpted cloaks in the past, two things I do differently is to use a mix of GS and miliput as it allows for crisper lines and sands/files smoother than straight GS. Additionally, instead of a liquid GS coat (because I had never purchased any at the time) I'd use a miliput slip (miliput and water) in pretty much the same way. Awesome model dude, love the look and feel of it. Link to comment https://bolterandchainsword.com/topic/309841-black-templar-marshall/#findComment-4106039 Share on other sites More sharing options...
hushrong Posted June 28, 2015 Share Posted June 28, 2015 Looks stunning! Link to comment https://bolterandchainsword.com/topic/309841-black-templar-marshall/#findComment-4106639 Share on other sites More sharing options...
ThatOneMarshal Posted June 28, 2015 Share Posted June 28, 2015 I...I am amazed at how awesome that model. What was the base model for it? Link to comment https://bolterandchainsword.com/topic/309841-black-templar-marshall/#findComment-4106734 Share on other sites More sharing options...
nurgling6688 Posted June 29, 2015 Author Share Posted June 29, 2015 I...I am amazed at how awesome that model. What was the base model for it? Thanks! The old metal Vanguard Veteran Sergeant with a plastic Grey Knight head, Emperor's Champion sword and a Templar shoulder pad and lots of greenstuff. Link to comment https://bolterandchainsword.com/topic/309841-black-templar-marshall/#findComment-4107445 Share on other sites More sharing options...
Recommended Posts
Archived
This topic is now archived and is closed to further replies.