appiah4 Posted November 6, 2015 Share Posted November 6, 2015 My 1,500pt army is painted, and I am starting on my expansion to 2,500 pts.. with one problem; none of my units have any markings yet because I hate working with decals and I'm scared :cussless of freehanding the BA markings in black on red (I can almost close my eyes and see the terrible mess I would make..). So I need a good tutorial on freehanding blood drops and BA markings on curved surfaces such as shoulderpads and kneepads. If anyone could point me towards one, I would be incredibly grateful. Link to comment https://bolterandchainsword.com/topic/315709-i-need-a-good-tutorial-on-freehanding-the-ba-markings/ Share on other sites More sharing options...
Lord Leonatos Posted November 6, 2015 Share Posted November 6, 2015 First you should train with brush on paper. For drops paint a upside down cross and connect the endings. When you paint some you will see progress to freehand better. Same for wings. But you have to be prepared to fix the underground! Dont be afrait, go on and you will get it ☺ Link to comment https://bolterandchainsword.com/topic/315709-i-need-a-good-tutorial-on-freehanding-the-ba-markings/#findComment-4217832 Share on other sites More sharing options...
Xenith Posted November 6, 2015 Share Posted November 6, 2015 Check my plog, I freehand all my chapter, squad and honour symbols. I'm travelling with work atm, but if you see summat you like, I can make a tutorial :) Link to comment https://bolterandchainsword.com/topic/315709-i-need-a-good-tutorial-on-freehanding-the-ba-markings/#findComment-4218121 Share on other sites More sharing options...
marine7312000 Posted November 6, 2015 Share Posted November 6, 2015 You could also create a stencil by carefully cutting a decal out of the sheet. Link to comment https://bolterandchainsword.com/topic/315709-i-need-a-good-tutorial-on-freehanding-the-ba-markings/#findComment-4218160 Share on other sites More sharing options...
SM1981 Posted November 27, 2015 Share Posted November 27, 2015 You could also create a stencil by carefully cutting a decal out of the sheet. That is an absolutely awesome idea. I will be doing this going forward. Link to comment https://bolterandchainsword.com/topic/315709-i-need-a-good-tutorial-on-freehanding-the-ba-markings/#findComment-4236864 Share on other sites More sharing options...
appiah4 Posted November 30, 2015 Author Share Posted November 30, 2015 You could also create a stencil by carefully cutting a decal out of the sheet. That is an absolutely awesome idea. I will be doing this going forward. My experience with stencils, especially on curved surfaces, is that it all gets messy. Link to comment https://bolterandchainsword.com/topic/315709-i-need-a-good-tutorial-on-freehanding-the-ba-markings/#findComment-4238986 Share on other sites More sharing options...
Xenith Posted December 1, 2015 Share Posted December 1, 2015 Practice on scrap paper first, then work up to models. What are you looking for? Tear drops http://i279.photobucket.com/albums/kk141/Mechxen/Blood%20Angels/PC220394.jpg Chapter Icons http://i279.photobucket.com/albums/kk141/Mechxen/Blood%20Angels/P8143322-1.jpg Squad icons http://i279.photobucket.com/albums/kk141/Mechxen/Blood%20Angels/10th%20Company%201st%20Squad/2015-05-17%2019.30.23_zps1b2adyxw.jpg Other? http://i279.photobucket.com/albums/kk141/Mechxen/Blood%20Angels/Death%20Company/DSCF0895_zps92bf717f.jpg http://i279.photobucket.com/albums/kk141/Mechxen/Blood%20Angels/Death%20Company/DSCF0885_zpsf8437542.jpg[/http://i279.photobucket.com/albums/kk141/Mechxen/Blood%20Angels/1st%20Company/Termie%20Icons_zpssakdh3mq.png I can't do the black winged drop, though. I can never get it symmetrical. I can probably work out a way to cheat it, though. http://i279.photobucket.com/albums/kk141/Mechxen/Blood%20Angels/DSC08700.jpg Link to comment https://bolterandchainsword.com/topic/315709-i-need-a-good-tutorial-on-freehanding-the-ba-markings/#findComment-4240273 Share on other sites More sharing options...
d@n Posted December 1, 2015 Share Posted December 1, 2015 get the transfers and some micro sol/set and sace yourself a ton of bother Link to comment https://bolterandchainsword.com/topic/315709-i-need-a-good-tutorial-on-freehanding-the-ba-markings/#findComment-4240276 Share on other sites More sharing options...
Spagunk Posted December 1, 2015 Share Posted December 1, 2015 And if you don't have micro sol/set, mix 4 (I only use 3 but applied sparingly) parts rubbing alcohol and 1 part acetone. Worked like just like micro sol. However to be safe, use micro sol/set. Home grown chemistry is the least successful venture. Link to comment https://bolterandchainsword.com/topic/315709-i-need-a-good-tutorial-on-freehanding-the-ba-markings/#findComment-4240418 Share on other sites More sharing options...
appiah4 Posted December 1, 2015 Author Share Posted December 1, 2015 Micro Sol/Set are not available to me, but this is: http://www.tamiya.com/english/products/87102mark_fit/index.htm http://www.tamiya.com/english/products/87102mark_fit/top.jpg I'm guessing using this, then sealing with varnish would work? Link to comment https://bolterandchainsword.com/topic/315709-i-need-a-good-tutorial-on-freehanding-the-ba-markings/#findComment-4240434 Share on other sites More sharing options...
Paikis Posted December 1, 2015 Share Posted December 1, 2015 Xenith, I'd be interested in any tutorials for how you did any of that. Those markings all look amazing. I imagine you used tape to get those nice edges? For me, I do my skulls as follows: 1. Draw a circle, this will be the forehead. 2. Under the circle, draw a triangle, point-up. This is the teeth and part of the face. 3. Draw a loop between the sides of the triangle and the bottom-sides of the circle. These are the eye-sockets. 4. Add a drop of white for a nose-hole and some black lines below the triangle as teeth. Consider skipping teeth if you're not confident, they can be tricky. http://i.imgur.com/HiUjsxb.png Link to comment https://bolterandchainsword.com/topic/315709-i-need-a-good-tutorial-on-freehanding-the-ba-markings/#findComment-4240439 Share on other sites More sharing options...
evildrcheese Posted December 1, 2015 Share Posted December 1, 2015 Xenith, I'd be interested in any tutorials for how you did any of that. Those markings all look amazing. I imagine you used tape to get those nice edges? For me, I do my skulls as follows: 1. Draw a circle, this will be the forehead. 2. Under the circle, draw a triangle, point-up. This is the teeth and part of the face. 3. Draw a loop between the sides of the triangle and the bottom-sides of the circle. These are the eye-sockets. 4. Add a drop of white for a nose-hole and some black lines below the triangle as teeth. Consider skipping teeth if you're not confident, they can be tricky. http://i.imgur.com/HiUjsxb.png Cool. I'll have to give this a try at some point. EDC Link to comment https://bolterandchainsword.com/topic/315709-i-need-a-good-tutorial-on-freehanding-the-ba-markings/#findComment-4240611 Share on other sites More sharing options...
Xenith Posted December 2, 2015 Share Posted December 2, 2015 Xenith, I'd be interested in any tutorials for how you did any of that. Those markings all look amazing. I imagine you used tape to get those nice edges? For me, I do my skulls as follows: 1. Draw a circle, this will be the forehead. 2. Under the circle, draw a triangle, point-up. This is the teeth and part of the face. 3. Draw a loop between the sides of the triangle and the bottom-sides of the circle. These are the eye-sockets. 4. Add a drop of white for a nose-hole and some black lines below the triangle as teeth. Consider skipping teeth if you're not confident, they can be tricky. http://i.imgur.com/HiUjsxb.png No tape, just me and a brush - this comes from a lot of hazard stripes on Iron Warriors... Nice tutorial! I do my skulls in the same way,although I usually start with the mouth/triangle to position it in the right place relative to the shoulder pad - so I don't draw the circle, then end up running the triangle off the bottom of the pad. Link to comment https://bolterandchainsword.com/topic/315709-i-need-a-good-tutorial-on-freehanding-the-ba-markings/#findComment-4241126 Share on other sites More sharing options...
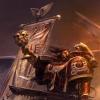
Ushtarador Posted December 2, 2015 Share Posted December 2, 2015 Really, the main thing about freehands is practice Pick a subject you like, study the basic shape (the skull tutorial of Paikis is an excellent example). Always draw the outline of your shape first, 2-3 simple geometrical elements, then fill in the details. Paint it at least 10 times on paper to get a feel for it, then proceed to your least-liked models. ^^ Avoid symmetrical things like our winged blood drop in the beginning, it's really hard to not get something odd-shaped, tear drops and skulls are a good beginning. I'd also recommend using a wet palette, I would never paint freehands without it! With some practice you can do amazing things, painting something like this shoulder pad now "only" takes about an hour for me http://fs5.directupload.net/images/151202/d7sz8b7w.jpg Link to comment https://bolterandchainsword.com/topic/315709-i-need-a-good-tutorial-on-freehanding-the-ba-markings/#findComment-4241217 Share on other sites More sharing options...
Jolemai Posted December 2, 2015 Share Posted December 2, 2015 Link to comment https://bolterandchainsword.com/topic/315709-i-need-a-good-tutorial-on-freehanding-the-ba-markings/#findComment-4241220 Share on other sites More sharing options...
LutherMax Posted December 2, 2015 Share Posted December 2, 2015 What a model! Aside from the obviously awesome freehand under discussion, I love the whole concept and composition! Can I ask which kit(s) the arms and hands came from? Link to comment https://bolterandchainsword.com/topic/315709-i-need-a-good-tutorial-on-freehanding-the-ba-markings/#findComment-4241281 Share on other sites More sharing options...
evildrcheese Posted December 2, 2015 Share Posted December 2, 2015 Wowser. That is truly spectacular. Great job. EDC Link to comment https://bolterandchainsword.com/topic/315709-i-need-a-good-tutorial-on-freehanding-the-ba-markings/#findComment-4241293 Share on other sites More sharing options...
appiah4 Posted December 2, 2015 Author Share Posted December 2, 2015 All this advice about not trying to freehand the BA chapter symbol is not really helping me much here guys :( Also, nobody uses Tamiya decal products? Like at all? Nobody cared to comment on it :/ Link to comment https://bolterandchainsword.com/topic/315709-i-need-a-good-tutorial-on-freehanding-the-ba-markings/#findComment-4241300 Share on other sites More sharing options...
Jolemai Posted December 2, 2015 Share Posted December 2, 2015 All this advice about not trying to freehand the BA chapter symbol is not really helping me much here guys Also, nobody uses Tamiya decal products? Like at all? Nobody cared to comment on it :/ It's only been 21 hours ... but no, I have never tried using them (or any for that matter. Can't remember the last time I applied a transfer). Link to comment https://bolterandchainsword.com/topic/315709-i-need-a-good-tutorial-on-freehanding-the-ba-markings/#findComment-4241307 Share on other sites More sharing options...
LutherMax Posted December 2, 2015 Share Posted December 2, 2015 Sorry, back on topic! It's a shame you can't get Microset / Microsol, for they are truly awesome for decals. Where in the world are you? I think Amazon sells them. I think Mig Productions and maybe Humbrol also do decal mediums, but Tamiya products are generally good so worth a try. Failing that, I think there was a painting tutorial on Blood Angels symbols in White Dwarf a while back. I'm away from home this week but will see if I still have it when I get back home... Link to comment https://bolterandchainsword.com/topic/315709-i-need-a-good-tutorial-on-freehanding-the-ba-markings/#findComment-4241315 Share on other sites More sharing options...
Ushtarador Posted December 2, 2015 Share Posted December 2, 2015 Heh, thanks for the comments^^ it's for a diorama I made for a competition in our LGS, I just realize I never put it here, I'll make a thread in the evening to prevent derailing this one @Luther The left arm is the tank gunner, the right arm is a bolt pistol if I remember correctly, and the right hand is from an arm supporting a bolter (I flattened the fingers). Yes, on topic: I have some decal softener (no idea which brand or where I got it from), and it is mandatory to get good-looking decals. I just apply a coat before and after applying the decal and it removes the shinyness. It works amazing on the newer decal sheets (IK for example), it's a bit more annoying for the ones in the marine boxes though. The small rounded surface of a shoulder pad makes it tricky to flatten the decal without tearing it. I'm sure the Tamyia stuff does the same thing, feel free to give it a try I'm not saying you shouldn't try to freehand our chapter symbol, I'm just advocating (from experience) that you should probably start with something simpler maybe only do the blood drop for the first squad, then add 1 wing for the second one and 2 for the third. Also try the skull example above, it's good practice. Another important thing: Always know exactly what the final result should look like - sounds a bit silly, but in the beginning I often didn't quite know which lines to place where, which makes it a lot harder. Tutorials will only get you that far though, the rest is practice and brush control. Ah, here's the way I do blood drops (still have to touch it up a lot after drawing the outline, but it's a lot better than just freestyling^^): http://fs5.directupload.net/images/151202/ybt44nwd.png Link to comment https://bolterandchainsword.com/topic/315709-i-need-a-good-tutorial-on-freehanding-the-ba-markings/#findComment-4241462 Share on other sites More sharing options...
LutherMax Posted December 2, 2015 Share Posted December 2, 2015 If you do go down the transfer route, I wrote a little tutorial on using Microset / Microsol a while back - some of it might be useful for the Tamiya version too. 1) Apply gloss varnish to the surface where you're applying the decal and allow to dry completely (very important step!) 2) Cut the decal out and dip it into the bottle of Microset then remove and put to one side for a second. If you leave it in too long you risk it sliding off the backing into the bottle and having to fish it out! You literally just have to dip it in for a few seconds. A pair of spring loaded clamps (like reverse tweezers) helps here so you can rest it down on the table while you move onto step 3... 3) Brush Microset all over the surface to which you'll be applying the decal. 4) Using your brush, still wet with Microset, slide the decal into position. Once you're happy, let it soften for a couple of minutes then very gently press it onto the surface with a moist cotton bud to remove any air bubbles and flatten it completely. Now let it dry completely for a few minutes (maybe 15 or 20). 5 - optional ) Brush Microsol over the top of the decal. Don't overdo because the decal will be pretty soft at this point, but make sure you cover it completely. You may notice the decal wrinkle up at this point but don't worry, that's exactly what you want. It will shrink and 'melt' into the surface. Let that completely dry then repeat if necessary. May take two or three coats on curved or irregular surfaces. 6) Once completely dry (you may even want to leave it overnight) apply a coat of gloss varnish on top. 7) Once that's dry apply matte or satin varnish to the whole model. I use Lahmian Medium through an airbrush but spray can is just as good, Purity Seal, Testors etc. 8) Your decal will look painted on :) Link to comment https://bolterandchainsword.com/topic/315709-i-need-a-good-tutorial-on-freehanding-the-ba-markings/#findComment-4241482 Share on other sites More sharing options...
appiah4 Posted December 3, 2015 Author Share Posted December 3, 2015 If you do go down the transfer route, I wrote a little tutorial on using Microset / Microsol a while back - some of it might be useful for the Tamiya version too. 1) Apply gloss varnish to the surface where you're applying the decal and allow to dry completely (very important step!) 2) Cut the decal out and dip it into the bottle of Microset then remove and put to one side for a second. If you leave it in too long you risk it sliding off the backing into the bottle and having to fish it out! You literally just have to dip it in for a few seconds. A pair of spring loaded clamps (like reverse tweezers) helps here so you can rest it down on the table while you move onto step 3... 3) Brush Microset all over the surface to which you'll be applying the decal. 4) Using your brush, still wet with Microset, slide the decal into position. Once you're happy, let it dry for a few minutes (maybe 15 or 20) 5 - optional ) Brush Microsol over the top of the decal. Don't overdo because the decal will be pretty soft at this point, but make sure you cover it completely. You may notice the decal wrinkle up at this point but don't worry, that's exactly what you want. It will shrink and 'melt' into the surface. Let that completely dry then repeat if necessary. May take two or three coats on curved or irregular surfaces. 6) Once completely dry (you may even want to leave it overnight) apply a coat of gloss varnish on top. 7) Once that's dry apply matte or satin varnish to the whole model. I use Lahmian Medium through an airbrush but spray can is just as good, Purity Seal, Testors etc. 8) Your decal will look painted on :) Should be fairly helpful, cheers mate. Link to comment https://bolterandchainsword.com/topic/315709-i-need-a-good-tutorial-on-freehanding-the-ba-markings/#findComment-4242048 Share on other sites More sharing options...
LutherMax Posted December 3, 2015 Share Posted December 3, 2015 I forgot one important step! Have updated point 4... The most important thing is getting a proper gloss surface on the model before applying the decal. If you don't do this you'll get tiny pockets of air underneath and you'll always be able to see the silvery edge. A few costs of gloss beforehand and it's easy to get it to look painted on by following these steps. For the Tamiya product obviously cross reference with their instructions but everything probably applies more or less except point 5 as Microset/Sol is a 2-part system. Link to comment https://bolterandchainsword.com/topic/315709-i-need-a-good-tutorial-on-freehanding-the-ba-markings/#findComment-4242087 Share on other sites More sharing options...
Dont-Be-Haten Posted December 4, 2015 Share Posted December 4, 2015 Not sure if this helps, but I use this as one of my guidelines. http://fromthewarp.blogspot.com/2011/05/two-methods-for-mapping-out-your.htmlIt really helps out. Link to comment https://bolterandchainsword.com/topic/315709-i-need-a-good-tutorial-on-freehanding-the-ba-markings/#findComment-4243388 Share on other sites More sharing options...
Recommended Posts
Archived
This topic is now archived and is closed to further replies.