Xwingt65 Posted November 17, 2015 Share Posted November 17, 2015 Glorious Yellow! Link to comment https://bolterandchainsword.com/topic/315717-the-viith-legion-the-emperors-retribution-termi-done/page/2/#findComment-4227102 Share on other sites More sharing options...
nurgling6688 Posted November 18, 2015 Author Share Posted November 18, 2015 Everyone else has to go to my website to see this, but this is such a supportive forum I figured I would post it directly here. Here is my step by step tutorial on how I painted my Imperial Fist marine. Modeling the Base Since I decided I was going with a Phall theme for my force I knew I had to have bases that looked like deck plating. There are plenty of companies out there that sell pre-made bases that have tech themes that fit this idea, like Secret Weapon Miniatures, which are great, and if you want to spend the money are definitely the easiest route to take. If you want to make your own though it's pretty simple. All you need is: A base (mine is 32mm) Textured Plasticard (This is sold at most hobby or model train store and is cheap) Untextured Plasticard (same as above but even cheaper) Very thin Plastic Rod (really, you can probably get this all at the same place) You should have enough of each item from just one package of each to get you through the whole box set, if not most of an army. I then traced the top of the base onto the textured plasticard and cut it out. It wasn't a perfect cut so once I had glued it to my base I took a hobby knife and trimmed it to size. At this point you could call it done, and I probably will stop here for some of my bases to add variety. If, however, you want to add a bit more detail it's time to break out the untextured plasticard. I decided to make a small portion of some stairs, so I cut a part of the textured card off and glued a small strip of the untextured card there. I then took another small strip of the untextured card and glued it on top of the textured card to give it some height. I added a few rivets by cutting of very small slivers of the plastic rod and gluing them in place. Wanting to balance out the base a bit I took a small section of the rod, bent it into an L shape, and glued it on the opposite side as a conduit or pipe. All of this had to be trimmed to size once it was glued on. It's a lot easier to cut it a little too large before you glue it on, and then trim it down to get the perfect fit. My final touch were a few spent shell casings which were also cut from the plastic rod. Painting The Yellow Step 1 & 2. I of course forgot to take a picture of the very first step in my over eagerness to paint the model. All I did was prime the model using the Bone color spray paint from Army Painter and then tidy up any spots that were missed with Ushabti Bone. You could achieve the same effect using an airbrush or just painting it on with a brush. Although painting it on with a brush does make it take longer which is kind of counter productive with this technique since it's all about speeding things up. Once this was done I lined the armor with Agrax Earthshade mixed with Lahmian Medium. I got impatient at a few parts and just used straight Agrax but it doesn't look nearly as nice. His right leg was done with the Lahmian Medium mix and you can see that it's much smoother when compared to his left leg. You don't want to just slather it on the model at this point, because that will make you do a lot of clean up later. It's better just to take a bit more time and carefully paint the wash exactly where you need it. Step 3. I then went back with Ushabti Bone and tidied up in a few spots, but for the most part there wasn't much clean up. Next I highlighted all of the armor edges with straight White. I use a Reaper paint for this because I really don't like White Scar, but any pure white will work. Step 4. Time to make him yellow! Grab a pot of Lamenter Yellow, it's one of the glaze paints from GW, and just slather it all over the model. You don't want to water it down at all, just paint it straight on. The only thing you want to be careful of is to make sure the coat is as even as possible. If you see the glaze starting to pool more in one area then the other, just even it out a bit with your brush before it dries. If you're batch painting these (which I would recommend) by the time you finish the last one, the first one will probably be ready for the next step. Step 5. The glaze tends to make the shadows brighter, and the highlights duller, so at this point I go back in with the white. I don't go over all of the highlights at this point, I just accentuate a few areas I think are important. You will want to make your lines a little longer then you think at this point, because there are two more stages until the yellow is done. Step 6. Hit it with the glaze again! This will help really saturate the yellow as well as even it out. After this glaze you should have a really consistent yellow. This will also have dulled down that last highlight stage a bit. With two different highlights, under two different glazes you should be getting a nice, smooth transition in your highlights. Step 7. This is the final highlight. I just took some white again and only picked out the more prominent important parts. How many of these steps you do is up to you. This model honestly looked table top ready after step four, it just depends on how much you want to push the highlights. The Metals Step 1. This step is fairly simple, I just basecoated all the metallic bits with Leadbelcher. I also painted the deck plating on the base at this point. Be careful not to get any on the yellow. Step 2. Next I shaded all of the metal parts except for the base with P3 Armor Wash. This stuff is amazing and gives you great, and easy contrast. Areas that didn't have any recesses to shade did not get this step, like the studs on his leg and the little bits on his "ears." The deck plating was given a wash of Agrax Earthshade instead. I did this for two reasons. First I didn't want as stark of contrast on the base as on the rest of him, and I wanted it to look dirtier and have a different feel to the metal on the marine himself. Step 3. All of the metallic parts besides his base were given a quick edge highlight of Runefang Steel. Any areas that needed tidying up with Leadbelcher also had that done, but it wasn't many areas. The base during this step got a dry brush of Leadbelcher, followed by a dry brush of Runefang Steel. We will come back to the base more later and add some more details. Weathering Step 1. To weather the model I took some spare foam from a carrying case and roughed up one of the edges a bit. This gives it an uneven texture. I then used it to sponge on some Rhinox Hide around areas I felt would receive a lot of use. After this was done I went back in with a brush and added a few longer lines and clumped some of the smaller blobs into larger blobs. You just want it to look natural and random. Ideally you want to do this step before the metal, I just forgot. You want to make sure you get this weathering only on the yellow. The Black Step 1. All of the areas that were going to be black were basecoated with Abaddon Black. This was the shoulder pad trim, the pouches, the various tubes, the bolter casing, and his eye lenses as well. Step 2. All these areas except for the eye lenses got a line highlight of Eshin Grey. Step 3. A final highlight of Dawnstone Grey was painted onto just the most prominent areas of black. On the shoulder trim that is just near the corners. The Final Details Step 1. At this point all that's left is the base, the eyes, and a few odds and ends. The buttons on the pouches got painted with Leadbelcher, the stairs and bullet casings on the base got a base coat of Balthasar Gold and the wire got a base coat of Iyanden Darksun. This color doesn't exist anymore, but any yellow would work really. Step 2. The wire had black hazard striped painted on, then got a final line highlight of Screaming Skull along one side of it. The brass areas got a wash of Agrax Earthshade and then a highlight of a Balthasar Gold/Runefang Steel mix. I also splotched on some more Agrax onto the metal grating at this point to add some variation to it. Step 3. Using Skrag Brown I painted on little patches of rust onto the metal grating. I made sure to have the brown heavily watered down, so it was a wash consistency. Step 4. Lastly for the base I added some blood splatters with Blood for the Blood God and painted the rim black. Step 5. I painted the front half of the lenses with Mephiston Red and then added two highlights to it by mixing in Yellow and painting it in a smaller and smaller crescent. This was finished off with a dot of pure white. That's it! Your Imperial Fist is now ready to battle some Iron Warriors at Phall. I will add Legion symbols to him when I get a transfer sheet, but until then he's ready for the tabletop. Total Paint Time: About 4 Hours (minus drying time) Hope this is useful to people on here, thanks! Link to comment https://bolterandchainsword.com/topic/315717-the-viith-legion-the-emperors-retribution-termi-done/page/2/#findComment-4228525 Share on other sites More sharing options...
Xwingt65 Posted November 18, 2015 Share Posted November 18, 2015 Aaaarrgghhh Lamenters Yellow. The one paint that will be hard to impossible to find soon. Link to comment https://bolterandchainsword.com/topic/315717-the-viith-legion-the-emperors-retribution-termi-done/page/2/#findComment-4228535 Share on other sites More sharing options...
nurgling6688 Posted November 18, 2015 Author Share Posted November 18, 2015 Aaaarrgghhh Lamenters Yellow. The one paint that will be hard to impossible to find soon. Is it going away? It's still for sale on the website. Just called customer service to confirm, they said it's still showing in their system as a currently stocked item. Link to comment https://bolterandchainsword.com/topic/315717-the-viith-legion-the-emperors-retribution-termi-done/page/2/#findComment-4228541 Share on other sites More sharing options...
Xwingt65 Posted November 18, 2015 Share Posted November 18, 2015 Aaaarrgghhh Lamenters Yellow. The one paint that will be hard to impossible to find soon. Is it going away? It's still for sale on the website. There are changes to the paint line this weekend i believe. And Lamenters Yellow is out apparently. Link to comment https://bolterandchainsword.com/topic/315717-the-viith-legion-the-emperors-retribution-termi-done/page/2/#findComment-4228546 Share on other sites More sharing options...
augustmanifesto Posted November 18, 2015 Share Posted November 18, 2015 This looks great. I've had problems in the past with consistent results using yellow glazes for base-coat substitutions, especially on larger flat surfaces like vehicles. It caused me just to abandon the approach and spray a lot of yellow out of an airbrush instead, as I found that even when I got good results with glazes it ended up not saving too much time. Have you run into these problems? Link to comment https://bolterandchainsword.com/topic/315717-the-viith-legion-the-emperors-retribution-termi-done/page/2/#findComment-4228614 Share on other sites More sharing options...
nurgling6688 Posted November 18, 2015 Author Share Posted November 18, 2015 No problems on the smaller models. My plan for tanks and such is to apply the glaze with an airbrush. You need to do several layers of glaze to get an even look. Link to comment https://bolterandchainsword.com/topic/315717-the-viith-legion-the-emperors-retribution-termi-done/page/2/#findComment-4228654 Share on other sites More sharing options...
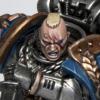
augustmanifesto Posted November 18, 2015 Share Posted November 18, 2015 No problems on the smaller models. My plan for tanks and such is to apply the glaze with an airbrush. You need to do several layers of glaze to get an even look. Makes sense. Seems to be the method used here on armor, although from a brown (?) basecoat to which the glaze was applied. Look forward to seeing your results! Link to comment https://bolterandchainsword.com/topic/315717-the-viith-legion-the-emperors-retribution-termi-done/page/2/#findComment-4228675 Share on other sites More sharing options...
Xwingt65 Posted November 18, 2015 Share Posted November 18, 2015 An amazing looking yellow, but a bit of a faff. I will stick with airbrushing mine. Link to comment https://bolterandchainsword.com/topic/315717-the-viith-legion-the-emperors-retribution-termi-done/page/2/#findComment-4228708 Share on other sites More sharing options...
GrandMagnus Posted November 23, 2015 Share Posted November 23, 2015 Hurry, someone pass me the awesomesauce! Link to comment https://bolterandchainsword.com/topic/315717-the-viith-legion-the-emperors-retribution-termi-done/page/2/#findComment-4232950 Share on other sites More sharing options...
nurgling6688 Posted November 23, 2015 Author Share Posted November 23, 2015 The first Cataphracti Terminator is now done! http://i75.photobucket.com/albums/i317/tylerrox6688/Mobile%20Uploads/image_zps3hpu7cqz.jpg http://i75.photobucket.com/albums/i317/tylerrox6688/Mobile%20Uploads/image_zpskwtxhcij.jpg http://i75.photobucket.com/albums/i317/tylerrox6688/Mobile%20Uploads/image_zpsoli82cqk.jpg http://i75.photobucket.com/albums/i317/tylerrox6688/Mobile%20Uploads/image_zpszuw1bqzs.jpg http://i75.photobucket.com/albums/i317/tylerrox6688/Mobile%20Uploads/image_zpspuacjsvb.jpg And the duo: http://i75.photobucket.com/albums/i317/tylerrox6688/Mobile%20Uploads/image_zpsskukl2pq.jpg I have more tutorials for this guy covering the parts that are unique to him and weren't on the standard marine. Right now it's on my site, but I'll try and get it up here later. http://www.mengelminiatures.com/2015/11/gallery-tutorial-imperial-fist.html?m=1 Thanks for looking! Link to comment https://bolterandchainsword.com/topic/315717-the-viith-legion-the-emperors-retribution-termi-done/page/2/#findComment-4233261 Share on other sites More sharing options...
Dosjetka Posted November 23, 2015 Share Posted November 23, 2015 Terrific! You've nailed the yellow :tu: Link to comment https://bolterandchainsword.com/topic/315717-the-viith-legion-the-emperors-retribution-termi-done/page/2/#findComment-4233424 Share on other sites More sharing options...
hushrong Posted November 24, 2015 Share Posted November 24, 2015 That termie is looking the business! And thanks for the tutorial! I'm going to have to check out your blog here in a minute. Link to comment https://bolterandchainsword.com/topic/315717-the-viith-legion-the-emperors-retribution-termi-done/page/2/#findComment-4233660 Share on other sites More sharing options...
Darth Bob Posted November 24, 2015 Share Posted November 24, 2015 Really lovely yellow. In principle, this seems like a technique that could be applied to a variety of schemes, if you substitute the base and glaze colors for something else. Really lovely tutorial, though, thanks! Lamenters Yellow should be pretty easy to replicate with a yellow ink and some glaze medium, once it disappears. Link to comment https://bolterandchainsword.com/topic/315717-the-viith-legion-the-emperors-retribution-termi-done/page/2/#findComment-4234070 Share on other sites More sharing options...
Recommended Posts
Archived
This topic is now archived and is closed to further replies.