Giggs Posted September 5, 2016 Share Posted September 5, 2016 Hello everyone! Earlier this year I set out to challenge myself on a very large diorama. I'm not a professional painter by any means so I was really stepping outside my comfort zone with this project. As you will see, all of the terrain was built from scratch and many of the Space Marine poses are custom. There was quite a bit of planning and thought put into this piece, and the titan wasn't actually going to be on this originally, but was added later to have the viewer wonder what kind of epic battle lied beyond. Since the titan is ignoring the local threat, what could he possibly be targeting out in the distance??? I'm posting pictures of the final product first and then feel free to scroll down and see exactly how this project progressed. I've got nearly 200 hours into this thing, some were a lot of fun and some seemed very tedious and I dreaded every moment of them lol, but finally it all came together in the end. I hope you enjoy! http://i69.photobucket.com/albums/i61/pltgiggs/IMG_8271_zpstphucaf7.jpg http://i69.photobucket.com/albums/i61/pltgiggs/IMG_8272_zpsvovymglb.jpg http://i69.photobucket.com/albums/i61/pltgiggs/IMG_8274_zps46eqog5b.jpg http://i69.photobucket.com/albums/i61/pltgiggs/IMG_8275_zpsbfeugxwp.jpg http://i69.photobucket.com/albums/i61/pltgiggs/IMG_8276_zpsbmhdhfaa.jpg http://i69.photobucket.com/albums/i61/pltgiggs/IMG_8277_zpsvmq2jz68.jpg http://i69.photobucket.com/albums/i61/pltgiggs/IMG_8278_zpsn9ae0u33.jpg http://i69.photobucket.com/albums/i61/pltgiggs/IMG_8279_zpsoblfjzt2.jpg http://i69.photobucket.com/albums/i61/pltgiggs/IMG_8280_zpsuvhcyxkm.jpg http://i69.photobucket.com/albums/i61/pltgiggs/IMG_8281_zpsfy9kvidu.jpg http://i69.photobucket.com/albums/i61/pltgiggs/IMG_8282_zpsctuwamdf.jpg http://i69.photobucket.com/albums/i61/pltgiggs/IMG_8283_zpserd0pf9r.jpg http://i69.photobucket.com/albums/i61/pltgiggs/IMG_8284_zpseidyqgu6.jpg http://i69.photobucket.com/albums/i61/pltgiggs/IMG_8285_zpsu3s2ccj4.jpg http://i69.photobucket.com/albums/i61/pltgiggs/IMG_8286_zpsnznvpbnd.jpg http://i69.photobucket.com/albums/i61/pltgiggs/IMG_8287_zpsqqqcekcg.jpg http://i69.photobucket.com/albums/i61/pltgiggs/IMG_8288_zpsl635utwn.jpg http://i69.photobucket.com/albums/i61/pltgiggs/IMG_8289_zpsjg6gpu7c.jpg http://i69.photobucket.com/albums/i61/pltgiggs/IMG_8290_zps39dzuxzt.jpg Link to comment https://bolterandchainsword.com/topic/325527-warhound-titan-diorama-progress-completion/ Share on other sites More sharing options...
Brother Pheidias Posted September 5, 2016 Share Posted September 5, 2016 +10 points for Black Dragons!Outstanding work, there's a certain lack of Dioramas in this hobby, something that I found less prevalent when I was younger. Link to comment https://bolterandchainsword.com/topic/325527-warhound-titan-diorama-progress-completion/#findComment-4491395 Share on other sites More sharing options...
NovemberIX Posted September 5, 2016 Share Posted September 5, 2016 That's absolutely awesome, I love all the little details, like the OSL from the heavy bolter, to the post-flamer remains of the fauna, and the acid saliva that's dripping down. I gotta give you Kudos, I'm feeling rather inspired! Link to comment https://bolterandchainsword.com/topic/325527-warhound-titan-diorama-progress-completion/#findComment-4491399 Share on other sites More sharing options...
Ovidius Incertus Posted September 5, 2016 Share Posted September 5, 2016 He's crushing the Rhino! "LOL, sorry guys, smashed your ride!" Surely someone in accounting will have something to say about that! Link to comment https://bolterandchainsword.com/topic/325527-warhound-titan-diorama-progress-completion/#findComment-4491401 Share on other sites More sharing options...
Giggs Posted September 5, 2016 Author Share Posted September 5, 2016 Now we'll take you on a journey from the very beginning, to when this was merely just an idea... It all started with this guy, Captain of the Dragon Fury Space Marines Chapter, successors of the White Scars (obviously my own Chapter, bare with me here :) One day I was messing around with some extra bits I had, this guy, and thought it would be cool to create some sort of small scene. http://i69.photobucket.com/albums/i61/pltgiggs/IMG_7154_zpsst1nmspc.jpg Then I thought, let's put some other SMs under attack by some Tyranids. Since this pose of the Captain looked like he was running with purpose I decided to make him rushing over to save one of his Marines.. I thought, what about a Marine getting impailed by a gaunt?? http://i69.photobucket.com/albums/i61/pltgiggs/IMG_7158_zpsiajlwtc6.jpg http://i69.photobucket.com/albums/i61/pltgiggs/IMG_7160_zpsavjyhep9.jpg I thought the Captain's action pose needed a little more, I wanted him to be portrayed as a hero of the piece. Let's make him impaling a gaunt on the way to the rescue... http://i69.photobucket.com/albums/i61/pltgiggs/IMG_7163_zpsg9xef3jh.jpg Since this was looking pretty cool, I decided I wanted to expand on the project by adding more SMs fighting more nids... Marine being dragging to safety after his leg was impaled... http://i69.photobucket.com/albums/i61/pltgiggs/IMG_7166_zpsd3wh0uz8.jpg Dead gaunt added... http://i69.photobucket.com/albums/i61/pltgiggs/IMG_7167_zpsp6uferi8.jpg Flamer somewhere, you always have to have a flamer! More on him later... http://i69.photobucket.com/albums/i61/pltgiggs/IMG_7168_zpsfrn3mbvj.jpg Then let's just keep the creative juices flowing... more gaunts, Marine stabbing a gaunt right through his skull... gross!!! (but awesome) http://i69.photobucket.com/albums/i61/pltgiggs/IMG_7169_zpskezacuhq.jpg Ohhhhh, I know, a Rhino!!! We'll make the guy getting dragged the Rhino driver being dragged from the hatch (more on that later) http://i69.photobucket.com/albums/i61/pltgiggs/IMG_7170_zpsynfy4ilv.jpg http://i69.photobucket.com/albums/i61/pltgiggs/IMG_7172_zpsyneakcfl.jpg More to come!!! Link to comment https://bolterandchainsword.com/topic/325527-warhound-titan-diorama-progress-completion/#findComment-4491405 Share on other sites More sharing options...
Giggs Posted September 5, 2016 Author Share Posted September 5, 2016 +10 points for Black Dragons! Outstanding work, there's a certain lack of Dioramas in this hobby, something that I found less prevalent when I was younger. Thanks! I LOVE dragons (game of thrones anyone) and also am stoked on White Scars lore, so I figured what better than a wild group of dragon marines! And thanks I've always loved dioramas too, and at least this one I can use in battle when I take my Titan to the tabletop! That's absolutely awesome, I love all the little details, like the OSL from the heavy bolter, to the post-flamer remains of the fauna, and the acid saliva that's dripping down. I gotta give you Kudos, I'm feeling rather inspired! Thank you so much! More progress to follow, make sure you read on and I'll explain all about the OSL and the bolter later in the thread (and the acid at that). Both of those details were after thoughts that I'm so glad ended up on this piece! He's crushing the Rhino! "LOL, sorry guys, smashed your ride!" Surely someone in accounting will have something to say about that! LMAO Link to comment https://bolterandchainsword.com/topic/325527-warhound-titan-diorama-progress-completion/#findComment-4491407 Share on other sites More sharing options...
Pearson73 Posted September 5, 2016 Share Posted September 5, 2016 Really nice work here, especially on the poses and osl from the heavy bolter. Link to comment https://bolterandchainsword.com/topic/325527-warhound-titan-diorama-progress-completion/#findComment-4491415 Share on other sites More sharing options...
Giggs Posted September 5, 2016 Author Share Posted September 5, 2016 Now on to the creation of the base. This is where I needed mental help, as I've never done this before LOL. My first thought was a large square, thin sheet of wood. Since the possibility of a titan on here was floating around in my mind I knew that wasn't going to cut it. Then I went to the local arts and crafts store and stumbled across some plaques; one rectangle and one oval. Since I've seen a lot of Warhounds mounted on oval bases (it makes sense) I almost went that route. But then I thought, nah let's make this battle scene as EPIC as possible. An oval base would have only restricted how much I could actually fit on it, so rectangle base it was! Here's a picture of most of the supplies I purchase to start building. I had never worked with styrofoam before but the heck with it, here we went! http://i69.photobucket.com/albums/i61/pltgiggs/IMG_7171_zpsnrhqfrq9.jpg Then the building began... I hadn't really thought about what the final product (terrain) was going to look like, but with a Titan in mind I knew I needed something for it to rest its foot on. Let's build a hill.. http://i69.photobucket.com/albums/i61/pltgiggs/IMG_7173_zpsboa4itms.jpg Once the styrofoam was complete it was time to lay down the Brown Earth. Its such a great product for adding texture to bases. I've used it a ton on my minis so I figured why couldn't it work for a huge base as well? I later learned that THANK GOD I did use it because the spray primer would have eaten up all of the styrofoam completely and I would have had to start from scratch. Whew! Dodged that bullet.. http://i69.photobucket.com/albums/i61/pltgiggs/IMG_7174_zpsc4niwspr.jpg More to come... Link to comment https://bolterandchainsword.com/topic/325527-warhound-titan-diorama-progress-completion/#findComment-4491430 Share on other sites More sharing options...
Giggs Posted September 5, 2016 Author Share Posted September 5, 2016 Now on to the details and the setting of the scene. Once all of the Brown Earth was laid down it was time to set up the models. I also added a tree which was made from scratch by wrapping wire around itself over and over and over and over and... yeah, that's how tedious that was. Anyway, here's the tree progress and then the setting of the scene... http://i69.photobucket.com/albums/i61/pltgiggs/IMG_7177_zpsm7dzivxw.jpg http://i69.photobucket.com/albums/i61/pltgiggs/IMG_7179_zpsgkllsjz4.jpg Barrels were added, water cans, a bucket, dead gaunt parts, rubble made from scratch using window screens, sand, rocks and other stuff (that's the black stuff you see here). This is where the project really got fun because now I was starting to see the fruits of my labor, and the whole project was coming to life! http://i69.photobucket.com/albums/i61/pltgiggs/IMG_7180_zpswzfn9rfa.jpg http://i69.photobucket.com/albums/i61/pltgiggs/IMG_7176_zpsmgjk5knx.jpg http://i69.photobucket.com/albums/i61/pltgiggs/IMG_7175_zpshhuwj6pf.jpg Green stuff was added to the tree because... Flamer. Yes I wanted to make it look like he burnt that tree to a crisp while taking down some gaunts with it. You can see their remains in the dirt. I can't give myself full credit for this one as I had seen someone do something similar on an existing project and I loved it! The titan, burnt tree and the color of the ruins were all ideas pulled from a previous project completed here: http://forums.relicnews.com/showthread.php?267319-Commission-Golden-Demon-Warhound-Titan-Diorama-Hunting-Bigger-Game So I figured out how to do it and did it myself with my own little spin... http://i69.photobucket.com/albums/i61/pltgiggs/IMG_7181_zps1ognzfm0.jpg http://i69.photobucket.com/albums/i61/pltgiggs/IMG_7181_zps1ognzfm0.jpg More details of the terrain... http://i69.photobucket.com/albums/i61/pltgiggs/IMG_7183_zpsmuun2vjr.jpg http://i69.photobucket.com/albums/i61/pltgiggs/IMG_7184_zpskbagishy.jpg http://i69.photobucket.com/albums/i61/pltgiggs/IMG_7184_zpskbagishy.jpg http://i69.photobucket.com/albums/i61/pltgiggs/IMG_7185_zpssoxf7eao.jpg Once I had enough fun staring at this, just wondering how the heck I was going to tackle all of the painting, it was time to prime it all black... You can see some spots where I had missed the Brown Earth. Remember when I said THANK GOD I covered it?? Yeah so the primer was eating away any foam that wasn't covered. No matter how many times I sprayed it, it would just keep eating it away. So I added more Brown Earth in those patches later and resprayed... http://i69.photobucket.com/albums/i61/pltgiggs/IMG_7186_zpsh8jsmaos.jpg http://i69.photobucket.com/albums/i61/pltgiggs/IMG_7187_zpsg7rlzdc7.jpg http://i69.photobucket.com/albums/i61/pltgiggs/IMG_7188_zpsehj0tfaf.jpg More to come... Link to comment https://bolterandchainsword.com/topic/325527-warhound-titan-diorama-progress-completion/#findComment-4491445 Share on other sites More sharing options...
Giggs Posted September 5, 2016 Author Share Posted September 5, 2016 Since by now it was certain I was adding a titan, I needed something for the other foot to stand on. Hence, the Rhino was definitely going to be a permanent addition of this scene. I broke it, battered it, cut it up and took a drill to it all over the place. I wanted it to appear broken down, shot up and off its tracks. Then I wanted to add some terrain to the sides of it to make it look like it was lodged in the dirt... http://i69.photobucket.com/albums/i61/pltgiggs/IMG_7205_zpsl7wvuxi0.jpg http://i69.photobucket.com/albums/i61/pltgiggs/IMG_7206_zpswffnpvdu.jpg Now more Brown Earth... http://i69.photobucket.com/albums/i61/pltgiggs/IMG_7207_zps46f6kqre.jpg and the patching of terrain that I was talking about earlier... http://i69.photobucket.com/albums/i61/pltgiggs/IMG_7208_zpse7qgkt4s.jpg http://i69.photobucket.com/albums/i61/pltgiggs/IMG_7209_zpsmmssojzi.jpg http://i69.photobucket.com/albums/i61/pltgiggs/IMG_7210_zpsdzvhsfxv.jpg ... now onto paint.. Link to comment https://bolterandchainsword.com/topic/325527-warhound-titan-diorama-progress-completion/#findComment-4491450 Share on other sites More sharing options...
Giggs Posted September 5, 2016 Author Share Posted September 5, 2016 First I painted all of the terrain with its base colors, and also finished up some details, like the barrels and ammo cans adding a bit of rust here and there to them http://i69.photobucket.com/albums/i61/pltgiggs/IMG_7258_zpsqtbug6ct.jpg Also white highlights were added to the "green stuff" in the tree so we could later paint the burnt umbers http://i69.photobucket.com/albums/i61/pltgiggs/IMG_7259_zpsdx1dfoxl.jpg http://i69.photobucket.com/albums/i61/pltgiggs/IMG_7259_zpsdx1dfoxl.jpg http://i69.photobucket.com/albums/i61/pltgiggs/IMG_7261_zpsoelxzmiv.jpg Basecoat on the Rhino as well. http://i69.photobucket.com/albums/i61/pltgiggs/IMG_7263_zps9liibrvu.jpg http://i69.photobucket.com/albums/i61/pltgiggs/IMG_7264_zpsolaf7qnq.jpg Started adding even more details... http://i69.photobucket.com/albums/i61/pltgiggs/IMG_7265_zpskp7wpkvv.jpg http://i69.photobucket.com/albums/i61/pltgiggs/IMG_7266_zps9iqwqrrx.jpg http://i69.photobucket.com/albums/i61/pltgiggs/IMG_7267_zpsryksrrym.jpg http://i69.photobucket.com/albums/i61/pltgiggs/IMG_7268_zpsqwvrvlbl.jpg http://i69.photobucket.com/albums/i61/pltgiggs/IMG_7269_zpsyu90zejo.jpg http://i69.photobucket.com/albums/i61/pltgiggs/IMG_7270_zpst5a0j0w7.jpg http://i69.photobucket.com/albums/i61/pltgiggs/IMG_7271_zpsyv8xgqvu.jpg http://i69.photobucket.com/albums/i61/pltgiggs/IMG_7272_zpsjgnevdsp.jpg http://i69.photobucket.com/albums/i61/pltgiggs/IMG_7273_zps0rubbdpz.jpg Now it was on to painting the ruins. These were all painted using an airbrush, then a dark wash in the cracks and dry-brush highlighting, and then airbrushed at the base of each to give it the appearance of mildew/mold http://i69.photobucket.com/albums/i61/pltgiggs/IMG_7292_zps0qisbzal.jpg http://i69.photobucket.com/albums/i61/pltgiggs/IMG_7293_zpsmxfnj0qd.jpg http://i69.photobucket.com/albums/i61/pltgiggs/IMG_7294_zpsp6uz8srj.jpg Link to comment https://bolterandchainsword.com/topic/325527-warhound-titan-diorama-progress-completion/#findComment-4491455 Share on other sites More sharing options...
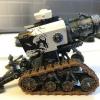
Giggs Posted September 5, 2016 Author Share Posted September 5, 2016 Now for the titan. If you've built one of these before you know how much time and effort is put into this model. I had never built one so I had no idea what I was getting myself into. I spent many hours on the couch while my wife watched TV and I built this bad boy. I wanted to make sure his pose was as aggressive as possible to make it appear as though he was passing through to join the large part of the battle http://i69.photobucket.com/albums/i61/pltgiggs/IMG_7433_zpsgu0czy0u.jpg http://i69.photobucket.com/albums/i61/pltgiggs/IMG_7434_zpsckrqj9jo.jpg http://i69.photobucket.com/albums/i61/pltgiggs/IMG_7435_zpsrjotv4ix.jpg Fitting the feet in place.. http://i69.photobucket.com/albums/i61/pltgiggs/IMG_7437_zpsooi0a7s8.jpg And the legs (not pinned yet, just free standing)... http://i69.photobucket.com/albums/i61/pltgiggs/IMG_7439_zpseepjgbyi.jpg http://i69.photobucket.com/albums/i61/pltgiggs/IMG_7440_zpse5ppv1zu.jpg primed black... http://i69.photobucket.com/albums/i61/pltgiggs/IMG_7449_zps0ji5l5hm.jpg Fitting it all on there to make sure it fits properly... http://i69.photobucket.com/albums/i61/pltgiggs/IMG_7451_zpss7vdnbum.jpg http://i69.photobucket.com/albums/i61/pltgiggs/IMG_7452_zpsuxmlrp6m.jpg http://i69.photobucket.com/albums/i61/pltgiggs/IMG_7453_zpsre7yvjin.jpg http://i69.photobucket.com/albums/i61/pltgiggs/IMG_7455_zps1ej8lqhj.jpg http://i69.photobucket.com/albums/i61/pltgiggs/IMG_7456_zpsnejdxvzl.jpg then basecoated... http://i69.photobucket.com/albums/i61/pltgiggs/IMG_7465_zpstoegirgj.jpg http://i69.photobucket.com/albums/i61/pltgiggs/IMG_7466_zpsy9nk0ael.jpg Now it was onto the troops, gaunts and more of the titan for paint... http://i69.photobucket.com/albums/i61/pltgiggs/IMG_7473_zpszlccqsxb.jpg http://i69.photobucket.com/albums/i61/pltgiggs/IMG_7474_zpsoqfo0peu.jpg Link to comment https://bolterandchainsword.com/topic/325527-warhound-titan-diorama-progress-completion/#findComment-4491459 Share on other sites More sharing options...
Giggs Posted September 5, 2016 Author Share Posted September 5, 2016 One by one I would paint each model and place it on the board. As I finished up each Marine or Gaunta sense of relief hit me as I felt that much closer to completion http://i69.photobucket.com/albums/i61/pltgiggs/IMG_7468_zpscxbmk9zf.jpg http://i69.photobucket.com/albums/i61/pltgiggs/IMG_7469_zpsjbc5l8xd.jpg http://i69.photobucket.com/albums/i61/pltgiggs/IMG_7470_zpsqnavjmn4.jpg http://i69.photobucket.com/albums/i61/pltgiggs/IMG_7471_zpslhkcp522.jpg http://i69.photobucket.com/albums/i61/pltgiggs/IMG_7537_zpswwijqo1w.jpg http://i69.photobucket.com/albums/i61/pltgiggs/IMG_7538_zps7sceu766.jpg http://i69.photobucket.com/albums/i61/pltgiggs/IMG_7539_zps2tqfqy5b.jpg http://i69.photobucket.com/albums/i61/pltgiggs/IMG_7540_zpswrelqjnj.jpg http://i69.photobucket.com/albums/i61/pltgiggs/IMG_7541_zpsxtvjcon7.jpg Link to comment https://bolterandchainsword.com/topic/325527-warhound-titan-diorama-progress-completion/#findComment-4491468 Share on other sites More sharing options...
Brother Dallo Posted September 5, 2016 Share Posted September 5, 2016 Dude, this is seriously impressive. Loving the WIP shots and the walk through. Keep up the good work. Dallo Link to comment https://bolterandchainsword.com/topic/325527-warhound-titan-diorama-progress-completion/#findComment-4491486 Share on other sites More sharing options...
Giggs Posted September 5, 2016 Author Share Posted September 5, 2016 More and more and more paint... All of the dragons and other small details are freehand, the base coating of all models was done using an airbrush.. http://i69.photobucket.com/albums/i61/pltgiggs/IMG_7555_zps5vrsbcjo.jpg http://i69.photobucket.com/albums/i61/pltgiggs/IMG_7589_zpswodhknps.jpg http://i69.photobucket.com/albums/i61/pltgiggs/IMG_7590_zpszorexa2m.jpghttp://i69.photobucket.com/albums/i61/pltgiggs/IMG_7590_zpszorexa2m.jpg http://i69.photobucket.com/albums/i61/pltgiggs/IMG_7597_zps7lvotjbu.jpg http://i69.photobucket.com/albums/i61/pltgiggs/IMG_7594_zpsz1205b2m.jpg http://i69.photobucket.com/albums/i61/pltgiggs/IMG_7595_zpsfiiiv5t7.jpg http://i69.photobucket.com/albums/i61/pltgiggs/IMG_7599_zpsyjjw1gx9.jpg http://i69.photobucket.com/albums/i61/pltgiggs/IMG_7600_zpsz8t93hxc.jpg http://i69.photobucket.com/albums/i61/pltgiggs/IMG_7601_zpsvfhqexkq.jpg http://i69.photobucket.com/albums/i61/pltgiggs/IMG_7602_zpsauq4uvtm.jpg http://i69.photobucket.com/albums/i61/pltgiggs/IMG_7715_zpsxntt9rql.jpg Dude, this is seriously impressive. Loving the WIP shots and the walk through.Keep up the good work.Dallo Thanks I'm glad you are enjoying it! A few more posts to go!! Link to comment https://bolterandchainsword.com/topic/325527-warhound-titan-diorama-progress-completion/#findComment-4491490 Share on other sites More sharing options...
Elzender Posted September 5, 2016 Share Posted September 5, 2016 Just, wow. I absolutely love battle scenes dioramas, and this is just amazing . I actually have a couple dioramas in mind and I've got one of them started featuring tyranids against IG, and this is greatly inspiring, specially seeing all the WIP pictures. And the fact that you started from "hey, this pose looks cool" and evolved to "I'm totally adding a titan in there" is just the best kind of crazy . I salute you, sir. Link to comment https://bolterandchainsword.com/topic/325527-warhound-titan-diorama-progress-completion/#findComment-4491496 Share on other sites More sharing options...
Giggs Posted September 5, 2016 Author Share Posted September 5, 2016 And last but not least, the guy I haven't even discussed yet. The Heavy Bolter. Originally he was just going to be on the base waiting for his turn to strike. But once the entire model and scene was completed, it just seemed like something was missing, as though there were a giant blank space on the back of the diorama. Luckily my cousin made a suggestion to add more gaunts running up the titan's leg, and then I said well heck if I'm going to do that, let's make the Heavy Bolter guy shooting them up! I've done spent shells before on other models, so that was a must add for him, however what I hadn't done before was muzzle flash. That was a detail that I thought couldn't be left off. I found a tutorial online on using green stuff, mounting it on a paper clip and molding it using tweezers and your fingers (a little water on your fingers). Personally I think this is one of the highlights of the entire scene. He went from almost being scrapped to a champ, funny how that works... Modeling the leg gaunts... http://i69.photobucket.com/albums/i61/pltgiggs/IMG_7742_zpsynlxxuyo.jpg http://i69.photobucket.com/albums/i61/pltgiggs/IMG_7763_zpsayn0imcp.jpg Final product with fully painted gaunts, acid saliva running down the leg and if you look real close, a HB bullet piercing right through the middle gaunt and coming out the other side (yes it is suspended in mid air using hot glue)... http://i69.photobucket.com/albums/i61/pltgiggs/IMG_7843_zpssr78bpos.jpg Here's the blank scene on the back with the Heavy Bolter... looks empty http://i69.photobucket.com/albums/i61/pltgiggs/IMG_7729_zpsjaepbo5y.jpgA Adding the spent shells, and using fishing wire to show them ejecting from his gun! http://i69.photobucket.com/albums/i61/pltgiggs/IMG_7839_zpswqtxxrsl.jpg http://i69.photobucket.com/albums/i61/pltgiggs/IMG_7842_zpsxmrjt90c.jpg then I molded the muzzle flash.. MUCH NEEDED DETAIL!!! http://i69.photobucket.com/albums/i61/pltgiggs/IMG_7849_zpsyjnwl61h.jpg holding it up to a different HB guy for sizing... http://i69.photobucket.com/albums/i61/pltgiggs/IMG_7850_zpsrzkwzc7r.jpg Primed.. http://i69.photobucket.com/albums/i61/pltgiggs/IMG_7863_zpszcj3lc0e.jpg Aibrushed... http://i69.photobucket.com/albums/i61/pltgiggs/IMG_7864_zpsaqirjxag.jpg then the HB dude needed some OSL to finish off the effect. I layered it four different times with different shades of the same color, brightest closest to the flash and getting darker as it goes outwards... http://i69.photobucket.com/albums/i61/pltgiggs/IMG_7865_zpsyoicpwvb.jpg http://i69.photobucket.com/albums/i61/pltgiggs/IMG_7866_zpsdfzv9so6.jpg http://i69.photobucket.com/albums/i61/pltgiggs/IMG_7867_zpshnpih76v.jpg http://i69.photobucket.com/albums/i61/pltgiggs/IMG_7868_zpsdzfgkt9w.jpg http://i69.photobucket.com/albums/i61/pltgiggs/IMG_7869_zpszcsua93u.jpg then added the flash itself. BINGO!!! http://i69.photobucket.com/albums/i61/pltgiggs/IMG_7872_zpstu2h94d9.jpg http://i69.photobucket.com/albums/i61/pltgiggs/IMG_7870_zpszb22l6qz.jpg http://i69.photobucket.com/albums/i61/pltgiggs/IMG_7871_zpsxg2wzjt7.jpg http://i69.photobucket.com/albums/i61/pltgiggs/IMG_8280_zpsuvhcyxkm.jpg AND the FINAL PRODUCT once again. I really hope you enjoyed this post. Thank you for taking the time to check out my journey. I'm hoping to enter this into the amateur competition next year at LVO. Hopefully we'll see some of you there! http://i69.photobucket.com/albums/i61/pltgiggs/IMG_8271_zpstphucaf7.jpg Just, wow. I absolutely love battle scenes dioramas, and this is just amazing . I actually have a couple dioramas in mind and I've got one of them started featuring tyranids against IG, and this is greatly inspiring, specially seeing all the WIP pictures. And the fact that you started from "hey, this pose looks cool" and evolved to "I'm totally adding a titan in there" is just the best kind of crazy . I salute you, sir. haha thank you so much! If you end up doing your dioramas please please plese post a link here so I can check them out! I love seeing other people's work and supporting fellow hobbiest. Thanks for checking all of this out. My final post is up now Link to comment https://bolterandchainsword.com/topic/325527-warhound-titan-diorama-progress-completion/#findComment-4491501 Share on other sites More sharing options...
lionofjudah Posted September 6, 2016 Share Posted September 6, 2016 Ummmm... Whoa!! That's absolutely fantastic man!! Tel me moar of the colors you airbrushed on your buildings....also, a layout of the colors you painted the ground please. Also, I'd love to hear about the blue of the warhounds eyes. The black is superb and I am floored by the attention to detail your 200 hours has achieved!! Please tell me you're entering this in a painting comp somewhere Link to comment https://bolterandchainsword.com/topic/325527-warhound-titan-diorama-progress-completion/#findComment-4491515 Share on other sites More sharing options...
BlueBelly1863 Posted September 6, 2016 Share Posted September 6, 2016 Wow. That was the best 50 minutes I've ever used being distracted in my class lectures. I absolutely love dioramas, I used to make them as a kid with WW2 figures. This blows me away. The scale, the posing, and the vivid story it so clearly tells is fantastic. It was a joy reading the process and looking at the diorama from all the different angles you provided. Fantastic work, I hope that diorama is proudly displayed somewhere where many people can enjoy it. All that work seems to have paid off. Infinite awesome. Link to comment https://bolterandchainsword.com/topic/325527-warhound-titan-diorama-progress-completion/#findComment-4492529 Share on other sites More sharing options...
Carrick Posted September 6, 2016 Share Posted September 6, 2016 Absolutely stunning. It is the small details that really make such a large piece as this. Link to comment https://bolterandchainsword.com/topic/325527-warhound-titan-diorama-progress-completion/#findComment-4492643 Share on other sites More sharing options...
Ovidius Incertus Posted September 6, 2016 Share Posted September 6, 2016 Not enough likes to give out! One of the best and most detailed WIPs I've seen. Link to comment https://bolterandchainsword.com/topic/325527-warhound-titan-diorama-progress-completion/#findComment-4492899 Share on other sites More sharing options...
Andvarr A Posted September 6, 2016 Share Posted September 6, 2016 Bloody impressive....well done that man! Link to comment https://bolterandchainsword.com/topic/325527-warhound-titan-diorama-progress-completion/#findComment-4492929 Share on other sites More sharing options...
Giggs Posted September 7, 2016 Author Share Posted September 7, 2016 Ummmm... Whoa!! That's absolutely fantastic man!! Tel me moar of the colors you airbrushed on your buildings....also, a layout of the colors you painted the ground please. Also, I'd love to hear about the blue of the warhounds eyes. The black is superb and I am floored by the attention to detail your 200 hours has achieved!! Please tell me you're entering this in a painting comp somewhere I use all Valejo paints, mostly Valejo Model or Game Air colors. I hope I can remember all of the colors. For the buildings I airbrushed and believe I used Valejo Model Air Light Brown and highlighted using Model Air Sand (Ivory). Then I drybrushed using Bonewhite. The red parts were a basecoat of Valejo Model Air Ferrari Red and then a darker blend using Model Air Fire Red. The wash used was Citadel Nulin Oil. The greens at the bottom I think were Valejo Model Air Cam Olive Green and some other green/brownish blends - I honestly can't remember and I have to do some touch up and wing it! For the Warhound Eyes I cut up plasticard in a shape that would fit in the sockets. I then airbrushed them while not inserted in the head using a blend of blues; imperial blue base, then mixed with white all the way up I believe. I may have also mixed in some Light Sea Blue (all Valejo Model Air colors). After I painted the top of the head I inserted the completed eyes and viola! I'm planning to be at LVO in February and was going to enter it into the armature competition. I've never entered a painting competition before and I didn't think it was of the quality for the "big leagues", but based on the feedback I'm getting I'm not sure which one to enter it in now lol. Regardless I just love the piece and am not really looking for accolades, just trying to share a piece of me and my art with the world so others can enjoy the story it portrays. Wow. That was the best 50 minutes I've ever used being distracted in my class lectures. I absolutely love dioramas, I used to make them as a kid with WW2 figures. This blows me away. The scale, the posing, and the vivid story it so clearly tells is fantastic. It was a joy reading the process and looking at the diorama from all the different angles you provided. Fantastic work, I hope that diorama is proudly displayed somewhere where many people can enjoy it. All that work seems to have paid off. Infinite awesome. hahaha your first comment was amazing and hilarious at the same time. I love it! Thank you so much for your kind words. I'm glad you get the story I was trying to tell. It can go so many different ways too. Will the Space Marines be able to hold off the Tyranid horde? Are there reserve Marines nearby? Are there a significant amount of bugs approaching? Are the Marines trapped in these ruins fighting for survival? You decide! As of right now its sitting in my closet LOL. After posting it I'm starting to think it needs to be displayed somewhere in my house... if my wife will allow it :) Absolutely stunning. It is the small details that really make such a large piece as this. Thanks! I was trying to be all about the details on this thing, and apparently it worked :) Not enough likes to give out! One of the best and most detailed WIPs I've seen. Thanks dude this means a ton to me!! I've really enjoyed putting it together. This is truly a hobby of love. Bloody impressive....well done that man! Thanks! I appreciate it. Link to comment https://bolterandchainsword.com/topic/325527-warhound-titan-diorama-progress-completion/#findComment-4493114 Share on other sites More sharing options...
BlueBelly1863 Posted September 7, 2016 Share Posted September 7, 2016 Oh goodness you can't let this thing sit. I hope the missus lets you proudly display it! You've spent so much time and money on it, it'd be a shame to have it collect dust where none can see it. Maybe your local GW or FLGS would put it on display? Link to comment https://bolterandchainsword.com/topic/325527-warhound-titan-diorama-progress-completion/#findComment-4493716 Share on other sites More sharing options...
abraxus Posted September 7, 2016 Share Posted September 7, 2016 It doesn't need to be displayed, itneeds to be used in a massive apocalypse game where it can tear enemies apart! Fantastic work, you need to tag this one and get it seen by GW and FW. Link to comment https://bolterandchainsword.com/topic/325527-warhound-titan-diorama-progress-completion/#findComment-4493767 Share on other sites More sharing options...
Recommended Posts
Archived
This topic is now archived and is closed to further replies.