Iron-Daemon Forge Posted June 21, 2017 Share Posted June 21, 2017 (edited) Did you get the recent Dark Imperium box game during the week? Have you gotten the really great Nurgle models converted &/or painted. I though I'd create a topic for this, to let memeber post up those cool models & also a great way for help any new memeber or anyone who thinking start the Chaos side from the Dark Imperium box game. Dark Imperium box game https://www.games-workshop.com/en-GB/Warhammer-40000-dark-imperium-eng-2017 Here Maxime Pastourel (who did a lot of the work along side Aly) painted up the new Nurgle Terminator lord for his own warband Blog http://leskouzes.blogspot.co.uk/2017/06/electus-lheritier.html?m=1 I'll hopeful start work on my own Nurgle force in the next few days. Edited June 21, 2017 by Insane Psychopath Ebsolom, Midnightmare, Prot and 1 other 4 Back to top Link to comment https://bolterandchainsword.com/topic/335331-dark-imperium-nurlge-show-case/ Share on other sites More sharing options...
Midnightmare Posted June 21, 2017 Share Posted June 21, 2017 Imho that gritty paint job looks much better than the studio scheme :tu: Link to comment https://bolterandchainsword.com/topic/335331-dark-imperium-nurlge-show-case/#findComment-4791806 Share on other sites More sharing options...
Sception Posted June 21, 2017 Share Posted June 21, 2017 Amazing job. Link to comment https://bolterandchainsword.com/topic/335331-dark-imperium-nurlge-show-case/#findComment-4791855 Share on other sites More sharing options...
Olis Posted June 22, 2017 Share Posted June 22, 2017 So... I did a thing... not finished yet, of course. Only about halway done so far. I still need to sort out the right shoulder guard (it's an amalgamation of two that don't quite sit right together) by covering it, probably, with a cloak or something. The head was an old Night Lord one, with the wings swapped out for DG spikes from other starter kit models that I've been modifying. Torso was a Tartaros one to begin with. Not sure if I've finished with that yet. The backpack is a Crimson Slaughter one, as is the bolter arm. Ideas, comments and critique are welcome. Link to comment https://bolterandchainsword.com/topic/335331-dark-imperium-nurlge-show-case/#findComment-4793047 Share on other sites More sharing options...
El_Dicko Posted June 22, 2017 Share Posted June 22, 2017 Looking rad so far! Glad to see these can all be mashed together. Olis 1 Back to top Link to comment https://bolterandchainsword.com/topic/335331-dark-imperium-nurlge-show-case/#findComment-4793067 Share on other sites More sharing options...
Olis Posted June 22, 2017 Share Posted June 22, 2017 (edited) Looking rad so far! Glad to see these can all be mashed together. Word to the wise - I just grabbed a bunch of stuff that sorta goes together but it's not anywhere near a 'kitbash', it's much more like a proper conversion, with epoxy putty needed for some gaps. I'll likely need some for the other arm at the shoulder, judging by the way it lines up atm. Edit - Cloakey bit started. Rat tail added. Edited June 22, 2017 by Olis Prot and El_Dicko 2 Back to top Link to comment https://bolterandchainsword.com/topic/335331-dark-imperium-nurlge-show-case/#findComment-4793119 Share on other sites More sharing options...
El_Dicko Posted June 22, 2017 Share Posted June 22, 2017 Yeah, I've messed around a bit with the DV chosen so I expected it wouldn't be cut and dry ;) Link to comment https://bolterandchainsword.com/topic/335331-dark-imperium-nurlge-show-case/#findComment-4793210 Share on other sites More sharing options...
DeadFingers Posted June 22, 2017 Share Posted June 22, 2017 Some nice scenic pictures and detail shots of Maxime Pastourel's Plaguebones today on Warhammer Community. Go look at 'em! El_Dicko, Mr. Poe, Sception and 1 other 4 Back to top Link to comment https://bolterandchainsword.com/topic/335331-dark-imperium-nurlge-show-case/#findComment-4793299 Share on other sites More sharing options...
Olis Posted July 5, 2017 Share Posted July 5, 2017 Progress! Contrary to recent reports, I'm not dead! I have been quite busy doing other things, but it's mostly looking after an injured family member (broken ankle) and working. There was also the small matter of a gathering of Mods at Warhammer World over the weekend of the 23rd (a good time was had by all). But, still, I had better show some progress, little as it may be. Yes, I am continuing to work on this. I've actually attached his other arm now, so the model looks far more complete. I'm also in the process of de-horning his foot, just to set him further apart from his original twin. Note the shoulder pad horn has also gone. I've begun smoothing the join on the inside of the cloak - I think one application of Liquid Green Stuff might suffice after this. # And, finally, the outside cloak/right shoulder pad. The censer just wasn't working, so I've ditched that - though, I haven't decided yet what to put in it's place. And the cloak has been built up a little. It dawns on me that I'm not a particularly skilled sculptor, hence the lack of definition so far. Basically, it looks like a blob. Yeah. I'll keep working on that. So, any ideas what to fill that gap in the middle of the shoulder pad with? WarriorFish 1 Back to top Link to comment https://bolterandchainsword.com/topic/335331-dark-imperium-nurlge-show-case/#findComment-4809317 Share on other sites More sharing options...
WarriorFish Posted July 5, 2017 Share Posted July 5, 2017 How about a skull? It's 40k can't go wrong with that :P Link to comment https://bolterandchainsword.com/topic/335331-dark-imperium-nurlge-show-case/#findComment-4809321 Share on other sites More sharing options...
Olis Posted July 5, 2017 Share Posted July 5, 2017 I'll toss a coin. A skull or a bunch of tentacles. ;) Link to comment https://bolterandchainsword.com/topic/335331-dark-imperium-nurlge-show-case/#findComment-4809352 Share on other sites More sharing options...
Olis Posted July 7, 2017 Share Posted July 7, 2017 I found a nifty thing! By Trovarion (aka Christoph Eichhorn): NOT MINE. Just in case it wasn't clear. ;) DeadFingers, Mister Feral and KrautScientist 3 Back to top Link to comment https://bolterandchainsword.com/topic/335331-dark-imperium-nurlge-show-case/#findComment-4811973 Share on other sites More sharing options...
DeadFingers Posted July 8, 2017 Share Posted July 8, 2017 Hey, that's the dude on the cover of the Death Guard booklet! Link to comment https://bolterandchainsword.com/topic/335331-dark-imperium-nurlge-show-case/#findComment-4812152 Share on other sites More sharing options...
DuskRaider Posted July 13, 2017 Share Posted July 13, 2017 (edited) I suppose I'll jump in on this... here's my Death Guard so far. Third Grand Company, dubbed "The Ebon Third" by the Inquisition due to their replacement of green with black. I've almost completed painting the first 20 Poxwalkers and am currently converting the next 20. Here's what I have so far, both painted and modeled: http://i.imgur.com/UMQmti5h.jpg http://i.imgur.com/s5HOdr4h.jpg http://i.imgur.com/098PNRSh.jpg http://i.imgur.com/t8mQGQEh.jpg http://i.imgur.com/4Vl5rLfh.jpg http://i.imgur.com/2Gd49d6h.jpg http://i.imgur.com/WPMSg1xh.jpg http://i.imgur.com/YD0hs9rh.jpg http://i.imgur.com/vqmnSuHh.jpg http://i.imgur.com/jDunnYfh.jpg http://i.imgur.com/S9AkYTah.jpg http://i.imgur.com/LbzyLcyh.jpg http://i.imgur.com/N0gtdJYh.jpg Edit: Just finished the first batch of 20 Poxwalkers, here you go! http://i.imgur.com/fPxxCQ4h.jpg http://i.imgur.com/0905g2Mh.jpg http://i.imgur.com/32jJouEh.jpg http://i.imgur.com/GD0Cl8Sh.jpg http://i.imgur.com/x78zUuch.jpg http://i.imgur.com/QCRQhVnh.jpg Edited July 13, 2017 by DuskRaider 1000 Sons, Azekai, El_Dicko and 2 others 5 Back to top Link to comment https://bolterandchainsword.com/topic/335331-dark-imperium-nurlge-show-case/#findComment-4817526 Share on other sites More sharing options...
Azekai Posted July 13, 2017 Share Posted July 13, 2017 Loving that pale armor, DuskRaider... and good work keeping it fresh with the converted poses! Link to comment https://bolterandchainsword.com/topic/335331-dark-imperium-nurlge-show-case/#findComment-4817530 Share on other sites More sharing options...
TempestBlade Posted July 13, 2017 Share Posted July 13, 2017 Awesome job! How did you get the poxwalkers skin like that? I'm going to start them soon but I have no idea how to paint large areas of skin Link to comment https://bolterandchainsword.com/topic/335331-dark-imperium-nurlge-show-case/#findComment-4818090 Share on other sites More sharing options...
Fhanados Posted July 14, 2017 Share Posted July 14, 2017 (edited) I kinda regret not going with the cream coloured armour now, it looks so cool! This is a few days work on mine so far. Edited July 14, 2017 by Fhanados DuskRaider and Azekai 2 Back to top Link to comment https://bolterandchainsword.com/topic/335331-dark-imperium-nurlge-show-case/#findComment-4818485 Share on other sites More sharing options...
DuskRaider Posted July 14, 2017 Share Posted July 14, 2017 Awesome job! How did you get the poxwalkers skin like that? I'm going to start them soon but I have no idea how to paint large areas of skin Thanks guys! As for the Poxwalker's flesh, it's as follows: Model is primed Corax White Base coat Pallid Wych Flesh Watered down layer of Seraphim Sepia At this point, you can use whatever washes you'd like for yours. I'll give you what I used, but feel free to experiment to match whatever look or theme you'd like. So for the next steps: Carrosburg Crimson in the recesses and anywhere the model should be shaded or darker, like under bellies, in creases of the arms or whatnot Athonian Camoshade in the same areas. At this point, I picked out certain areas I wanted the flesh to look bruised with Druchii Violet. This you can try directly from the pot if you want a more bruised look, or water it down to make it more subtle. Light drybrush of Pallid Wych Flesh. Make sure there's very little on the brush and you're only getting the raised and large areas. Don't worry if you mess this up, you'll be fixing it before the end. Boils are done with a base coat of Balor Brown. Wash them with Seraphim Sepia right from the bottle. Then, add some 50 / 50 Balor Brown - Pallid Wych Flesh, focusing more on the middle of the boil. Finally, a small area in the very center with Pallid Wych Flesh. Think of it as the head of a zit. Finally, once I was done with all of the flesh I went and did a final wash of Carrosburg Crimson in the recesses I had before. I did this watered down and focused it on the recesses and used the brush to spread it out from each area, blending it into the rest of the flesh. Pretty much, these guys rely on a lot of carefully placed washes. Like I said, you don't have to use the colors I used, you could do literally anything you want. I could see Athonian Camoshade and Agrax Earthshade working out well. Play with it, have fun! Azekai and Bat33.1 2 Back to top Link to comment https://bolterandchainsword.com/topic/335331-dark-imperium-nurlge-show-case/#findComment-4818543 Share on other sites More sharing options...
TempestBlade Posted July 14, 2017 Share Posted July 14, 2017 Thanks! I'm stealing your paint guide Link to comment https://bolterandchainsword.com/topic/335331-dark-imperium-nurlge-show-case/#findComment-4818931 Share on other sites More sharing options...
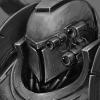
KrautScientist Posted July 15, 2017 Share Posted July 15, 2017 The model hasn't been painted yet, but I do think I may have discovered one possible way of making the Malignant Plaguecaster look a bit less awkward: As usual, more pictures can be found in my ongoing WIP thread. Azekai, Wrath of Bruinen and Olis 3 Back to top Link to comment https://bolterandchainsword.com/topic/335331-dark-imperium-nurlge-show-case/#findComment-4819683 Share on other sites More sharing options...
MoGuy Posted July 15, 2017 Share Posted July 15, 2017 Finished the Plague Marines and the Bloat Drone! More pics in my thread. :) Azekai and Fhanados 2 Back to top Link to comment https://bolterandchainsword.com/topic/335331-dark-imperium-nurlge-show-case/#findComment-4820108 Share on other sites More sharing options...
Olis Posted July 21, 2017 Share Posted July 21, 2017 By Camelson, pinched from his FB page: (Disclaimer: This is Camelson's, not mine. Just to be clear.) Link to comment https://bolterandchainsword.com/topic/335331-dark-imperium-nurlge-show-case/#findComment-4827685 Share on other sites More sharing options...
aceytrixx Posted July 21, 2017 Share Posted July 21, 2017 http://i.imgur.com/EVnIl8J.jpg Working through my Poxwalkers. Need to get these done quicker though... Happy with how they are turning out turning out though. brettfp 1 Back to top Link to comment https://bolterandchainsword.com/topic/335331-dark-imperium-nurlge-show-case/#findComment-4827897 Share on other sites More sharing options...
MoGuy Posted July 21, 2017 Share Posted July 21, 2017 Finished my Poxwalkers and Lord Of Contagion! Azekai 1 Back to top Link to comment https://bolterandchainsword.com/topic/335331-dark-imperium-nurlge-show-case/#findComment-4827909 Share on other sites More sharing options...
Bloody Legionnaire Posted July 21, 2017 Share Posted July 21, 2017 Is that a new nurgle daemon prince in the background? Link to comment https://bolterandchainsword.com/topic/335331-dark-imperium-nurlge-show-case/#findComment-4827913 Share on other sites More sharing options...
Recommended Posts
Create an account or sign in to comment
You need to be a member in order to leave a comment
Create an account
Sign up for a new account in our community. It's easy!
Register a new accountSign in
Already have an account? Sign in here.
Sign In Now