Beaky Brigade Posted March 25, 2018 Share Posted March 25, 2018 Quite often the Imperial Superheavy is the 'capstone' of a collection. What you add to your force when you've built and painted everything else you can think of, or you build several and speed paint them for that upcoming apocalypse game. Now that's a generalisation, and there's nothing wrong with doing either of those things. But what if your Superheavy was lavished with as much love and individual character as say, a knight household or titan maniple? After all, super heavy companies are somewhat rare if not as rare as the aforementioned houses and legions. The main hindrances I can see are the traditional drab military colours and lack of a poseable human form. I'm not necessarily talking just about doing it as a display or competition piece, but want to give it a human touch that some people miss when thinking about tanks. Until terrifying drone tanks become a thing in real life, all tanks have a crew who in wartime eat sleep and live within the machine, and they play a big role in the success or failure of the machine in battle. Now showing this without a platoon of tank riders, or a field depot of baggage strapped to the sides will be interesting. The best starting point is a name. And this engine of war shall be known as, Imperial Sun. Link to comment https://bolterandchainsword.com/topic/345581-imperial-sun-arkurian-pattern-stormblade/ Share on other sites More sharing options...
Marshal Argos Posted March 27, 2018 Share Posted March 27, 2018 Looking forward to seeing this progress along. I felt the same way when i did upmy Stormblade, but looking back on it now i fell like it could be redone. If i can give you a tip. Take your time, take you time, take your time. I did the first two but let the fever get the best of me and rushed at the end. Link to comment https://bolterandchainsword.com/topic/345581-imperial-sun-arkurian-pattern-stormblade/#findComment-5041582 Share on other sites More sharing options...
Boomslang Posted March 27, 2018 Share Posted March 27, 2018 Giving tanks a human touch? That's an interesting concept have you any thoughts or ideas about how you might achieve that? Link to comment https://bolterandchainsword.com/topic/345581-imperial-sun-arkurian-pattern-stormblade/#findComment-5041598 Share on other sites More sharing options...
Beaky Brigade Posted March 27, 2018 Author Share Posted March 27, 2018 Thanks brothers. @Marshal, I think I will be taking it slow... I find myself cleaning up mould lines on the tracks forge world did not bother with for their masterclass book... . I'll probably build the plastic up relatively quick, as it's hard to know what needs to be done to the resin until I can dry fit it all properly. @Boomslang I'm still thinking of ideas, but the first things that come to mind are: 1) An unbuttoned crew (hatches open). You get two hatches to play with on the Stormblade, commander and driver, but if I'm feeling brave enough I might cut out the loaders hatch and make that functional too. It would probably be neutral/travel/manoeuvring poses, no 'drive me closers' or banners. 2) A base... I know, tanks on bases, more controversial than infantry without bases, this being a gaming base rather than a display one, but I'll see if a couple of cm of base around the edge of the tank will add anything. The tank being a giant square thing it might be limited. Maybe something that shows it's weight. 3) Character details for the actual tank. Traditionally this is battle damage or weathering or kill markings, but there might be one or two extra things more subtle than a free hand Celestine mural on the sides. Maybe some road wheels in a different colour or red primer to show replacements from the stores. Link to comment https://bolterandchainsword.com/topic/345581-imperial-sun-arkurian-pattern-stormblade/#findComment-5042109 Share on other sites More sharing options...
Boomslang Posted March 27, 2018 Share Posted March 27, 2018 I'm onboard with all of that, I'm not sold on the idea of a base for the tank though, certainly not for gaming - maybe make a display-esqe base that the tank can be removed from. I love the idea of the paintings of pin up girls on the sides of vehicles/airplanes and kill markings. That's what makes the difference between a good paint job and a great one! Link to comment https://bolterandchainsword.com/topic/345581-imperial-sun-arkurian-pattern-stormblade/#findComment-5042298 Share on other sites More sharing options...
spafe Posted March 28, 2018 Share Posted March 28, 2018 If you make the loader area viewable... having the ammo different ptters (shiny blue for AP, yellow tips for HE, yellow stripe for smoke) or whatever. details like that really add something I think, rather than having them all silver/whatever colour. I really like the idea of red primed for spare. Radios/antenas are a great detail too, although I get if its a gaming piece these arnt the most sturdy. If you are having the tank 'at rest' you could show a compartment open with the crews stowage visible, although obvs not if it's in action. coiled ropes atached to the side armour or handing off the turret could be a nice detail. One final thing that really makes them pop is signs... 'fuel' in a red rectangle above the fuel point, caution signs on the engine smoke stacks, or near pinch points (hazard markers near where the track returns under the cowling), things like that could make it really pop I reckon. Link to comment https://bolterandchainsword.com/topic/345581-imperial-sun-arkurian-pattern-stormblade/#findComment-5042583 Share on other sites More sharing options...
walter h Posted March 28, 2018 Share Posted March 28, 2018 Did you ever see the picture of the tankers cooking eggs on their tank. I believe it was the dessert campaign. Link to comment https://bolterandchainsword.com/topic/345581-imperial-sun-arkurian-pattern-stormblade/#findComment-5042616 Share on other sites More sharing options...
Beaky Brigade Posted March 28, 2018 Author Share Posted March 28, 2018 Thanks for the suggestions guys. @boomslang Part of the reason I like the idea is I shudder at the thought of the tracks scrapping the table after I put so much effort into the thing. Basing tanks is quite rare in 40k but, there is at least one GW employee army who has done it and the results surprised me when I saw them first (bad photo). Good Ideas @spafe, the ammo would not work as the Stormblade is the one with the huge plasma gun, so no shells, but a good idea on another vehicle. I was thinking just having the hatch open and the crewman poking out would be enough, no interior detail on this project... @Walter h Well, with the Stormblade they could probably fry breakfast on the muzzle for the whole crew! Not sure what the machine spirit would think though. Link to comment https://bolterandchainsword.com/topic/345581-imperial-sun-arkurian-pattern-stormblade/#findComment-5042998 Share on other sites More sharing options...
spafe Posted March 29, 2018 Share Posted March 29, 2018 Ah cool, sorry I really should have looked up the vairient you were using. I'll check out the model and see if anything else jumps out that could be done on it. Really looking forward to seeing how this goes though! Link to comment https://bolterandchainsword.com/topic/345581-imperial-sun-arkurian-pattern-stormblade/#findComment-5043358 Share on other sites More sharing options...
Beaky Brigade Posted April 4, 2018 Author Share Posted April 4, 2018 Ave Deus Mechanicus! With the main lower hull and track assemblies coming together (I'm afraid I lost the photos) it is time for an extra dry fit. I have built a lot of tank kits but never a baneblade, and only games workshop seem to think it's a good idea to make your hull by gluing flat plates together instead of just moulding a plastic tub, but ho hum, I suppose it's more 'realistic' this way :D. The resin does replace a significant part of the kit, so it's time for the messy and toxic cleanup to begin. Remember always wear a respirator and clean up your work environment when building resin kits kids! First job will probably to straighten the banana hull. I got a little overexcited thinking up names for other tanks in this company/regiment, but I have reminded myself I should probably finish this one before ordering a new Shadowsword or Stormhammer Link to comment https://bolterandchainsword.com/topic/345581-imperial-sun-arkurian-pattern-stormblade/#findComment-5048085 Share on other sites More sharing options...
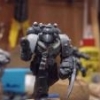
Beaky Brigade Posted April 17, 2018 Author Share Posted April 17, 2018 Gosh its been two weeks has there been progress? Of a sort... I decided it was more fun to solve the base and crew issues than actually do things like sanding filing and cutting of resin, though I did manage to do some initial bending of the hull today. To match the crewman who comes with the tank I decided I wanted the Malcador crew, as their uniform is pretty much the same, and they are basically the same model with a few extra GS additions from the sculptor. Only problem is, I don't have a Malcador, and even though anecdotally most pictures of the Malcador suggest people build them sans crew, no one appeared to be selling them on ebay or trading groups during the time I was searching. Commander very angry to be relegated to driver/ assistant driver right below that big gets hot thing... Using the logic that if the supermarket is out of milk, try the farmer instead, I contacted someone selling an army with a painted Malcador and asked if he still had the crew...Luckily the 3rd guy did, and I was very pleased to buy them from him for about the price Forgeworld would probably sell them separately (If they did). With a renegade commander as a bonus. As for the basing problem, after many cardboard mockups and head scratching, I decided that a large display base is impractical and not really what I want anyway. I also did not want my base to be made of MDF or plasticard, so I opted to use two 150 x 100mm rectangular bases from Games Workshop placed together on the long edges. There will probably bee some reinforcement required, but the join will get most of it's strength from being perpendicular to the tracks, if that makes sense. It's not a lot of square cm to actually base it with anything interesting, so what I do with it is important. I won't just go for flat grass or sand, as that would be a waste of opportunity. Please shoot me if decide to model the suspension moving over a bump with posed road wheels and flexing lower track... Now the 'posing' is over, I need to begin the hard graft of getting the resin to fit nicely. Link to comment https://bolterandchainsword.com/topic/345581-imperial-sun-arkurian-pattern-stormblade/#findComment-5058839 Share on other sites More sharing options...
duz_ Posted April 17, 2018 Share Posted April 17, 2018 That is a pretty sexy tank... Given I'm a sucker for large plasma cannons I may have to get one just because :lol: Link to comment https://bolterandchainsword.com/topic/345581-imperial-sun-arkurian-pattern-stormblade/#findComment-5058852 Share on other sites More sharing options...
Spyboy Posted April 17, 2018 Share Posted April 17, 2018 What if you have it going up a hill, would add some dimension and you wouldn't have to modify the tracks. Link to comment https://bolterandchainsword.com/topic/345581-imperial-sun-arkurian-pattern-stormblade/#findComment-5058882 Share on other sites More sharing options...
WarriorFish Posted April 18, 2018 Share Posted April 18, 2018 Looking good, keep us updated :tu: Link to comment https://bolterandchainsword.com/topic/345581-imperial-sun-arkurian-pattern-stormblade/#findComment-5059235 Share on other sites More sharing options...
walter h Posted April 18, 2018 Share Posted April 18, 2018 Is it just me or is the barrel off(tilted). It is a thing of beauty. Link to comment https://bolterandchainsword.com/topic/345581-imperial-sun-arkurian-pattern-stormblade/#findComment-5059250 Share on other sites More sharing options...
Beaky Brigade Posted April 18, 2018 Author Share Posted April 18, 2018 Is it just me or is the barrel off(tilted). It is a thing of beauty. It is, but it's just resting in place, when all the resin feeds are sanded away and it's glued/pinned it should be fine. Link to comment https://bolterandchainsword.com/topic/345581-imperial-sun-arkurian-pattern-stormblade/#findComment-5059602 Share on other sites More sharing options...
Recommended Posts
Archived
This topic is now archived and is closed to further replies.