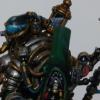
Magos Takatus Posted January 17, 2019 Share Posted January 17, 2019 Hi. I'm currently working on a Drukhari Kronos and I want to paint the armour a bone colour. However, I'd like to paint a lot of contrast onto the model so there is dark areas in shadow, and I'm wondering how to go about it. I'd usually just shade through Karak Stone and Baneblade Brown but I'm wondering if there are better ways to achieve a smooth result. It's a one-off model so I don't have to worry about simplifying it to paint a whole army. Here's the wip so far. In this second pic you can see the armour on the underside hasn't been shaded yet. Thanks for your time. Link to comment https://bolterandchainsword.com/topic/353203-how-to-shade-large-areas-of-bone/ Share on other sites More sharing options...
PeteySödes Posted January 17, 2019 Share Posted January 17, 2019 Using wash through an airbrush creates a pretty smooth look. It would be a bit more like a glaze since it wouldnt pool so much. Link to comment https://bolterandchainsword.com/topic/353203-how-to-shade-large-areas-of-bone/#findComment-5236950 Share on other sites More sharing options...
Imren Posted January 18, 2019 Share Posted January 18, 2019 This is what I would do in your situation: Mask off the nice pink flesh areas. Take the bonecolour you used as base colour and mix 50/50 straight in the airbrush cup with some saturated tone browns (steel legion drab maybe?) and dilute it with alcohol thinner (like vallejo airbrush thinner or X20A) so that they dry fast although diluted. Go in very gently with airbrush starting from the recessed edge and work your way out a third of the way to the protruding edges. Add bonecolour into the 50/50 mix and lighten it up colourwise, now you blend in the darker 50/50 painted areas with the pure bone colour areas. Gloss varnish the carapace areas. Heavily dilute van Dyke brown oilpaint in white spirit and do a pin wash in the recessed lines between the carapace areas. When you're done with the mini completely you satin or matt varnish it and the gloss surface of the carapace will be dulled down Link to comment https://bolterandchainsword.com/topic/353203-how-to-shade-large-areas-of-bone/#findComment-5237133 Share on other sites More sharing options...
sarabando Posted January 18, 2019 Share Posted January 18, 2019 id just use very very thinned down Agrax and a spot of dish soap to break surface tension and do loads of really thin washes/glazes Link to comment https://bolterandchainsword.com/topic/353203-how-to-shade-large-areas-of-bone/#findComment-5237153 Share on other sites More sharing options...
Magos Takatus Posted January 18, 2019 Author Share Posted January 18, 2019 I am hesitant to get out the airbrush for this but I do have masking liquid so I may give that a go. I'm curious about the pin wash since I've never used oil paints before. I don't think I have time to order any but I might try that out on my Knight further down the line. Thanks for all the help. Link to comment https://bolterandchainsword.com/topic/353203-how-to-shade-large-areas-of-bone/#findComment-5237192 Share on other sites More sharing options...
Subtle Discord Posted January 18, 2019 Share Posted January 18, 2019 If I was going to use my airbrush I would aim to do it like the coats I've painted on my Skitarii. Do a wash from the inside lip of each of the overlapping panels out to the edge; heavy in close to the cease and try to keep the outer edge damp and blend it as best you can. You want to try and avoid lines, drips, and tide marks by working quick and having an extra damp brush handy for smoothing and blending but if there's a little it's not a problem really. in fact, a few blotches, lines, and inconsistency to the application can look good after the next step because it ends up looking like natural mottling, veins, and variations in the pale colour. Then mask off the panels from the back to the front and use the airbrush to blend the bright edge back into the washed crease; be heavy on the edge for a pure bone colour and then quickly soften the application to back-blend the transition you started to create with the wash. Blending the wash is harder but using the airbrush to tweak and smooth it works well. Note: I have flexible masking tape that can handle curves like this so I'm not sure if I'd want to do this with masking fluid. If was was trying to do it without the airbrush I would try to do the first step more carefully by using a large broad brush to dampen the armour panel I was working on before I started applying the wash, again working from the back to the front. Dampen the surface in a broad stroke with the large brush, apply the wash to the crease, and then do your best to smooth and blend the transition with another clean brush and try to complete each panel as a single step before moving to the next or you're likely to have problems trying to keep up with all the tide makes as you progress. Once that's done, back blend any troubled spots with really thinned bone colour paint, again keeping a clean brush at hand to help keep the cleanup/transition smooth. Build this up to pure bone along the edge and again don't too be worried if there are some rough patches in this blending. Once it's down you can go back with the wash again but use it as a very thin glaze just to further smooth the transition from the dark crease to the brighter edge and maybe a bit more along the crease line to darken them further if you want. The back-and-forth might seem a bit tedious but it's not that bad once you get the hang of it with some practice. You're not going to get airbrush smooth transitions without taking great care and time but once you get the hang of it it's not an involved as it seems at first. And again, a bit of mottling and variation can actually look good considering the colour/effect you're aiming for. Link to comment https://bolterandchainsword.com/topic/353203-how-to-shade-large-areas-of-bone/#findComment-5237509 Share on other sites More sharing options...
Recommended Posts
Archived
This topic is now archived and is closed to further replies.