Search the Community
Showing results for tags 'thunderhawk'.
-

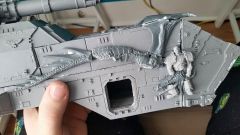
The Bane of Asirnoth Thunder Hawk
Memento Of Prospero posted a gallery image in Adeptus Astartes / Legiones Astartes
From the album: Heresy
-
Hello, B&C! I have recently purchased what I believe to be the last classic FW Thunderhawk (#2003) and after a few weeks of modelling (a lot) and converting (minimal) I'm at the point where I can slap some paint on it (with more or less skill; I'll let you be the judges). I'm calling it the Beast as a working title. Since I have started painting, I thought, I might make the progress available here in a centralised location for this particular project. If you're interested in a general log of my other projects, or a log of the building process, please click the link in my signature. A few words before I start with the pictures: I am very bad at photographing. Please excuse my failures in this field. Should you be interested in clarifying pictures, just post the request here, and I'll try to fulfill it with another crappy photo I am a "traditional" painter; i.e. no fancy NMM shenanigans, no wet palette and I've never painted such a giant model. My biggest model so far is an Imperial Knight (pictures of which: again, signature). For this reason, I've bought an airbrush set and I'm still figuring out the basics, such as pre-shading. I'm getting there. I hope. I've also integrated interior lighting in the form of red LEDs, because I'll paint the interior and want to be able to actually see something there The upper hull will be removable, which is one main reason for why I'm painting more than the flight deck; the main cannons are magnetized, and I've dark-angel-ized (this is a word now) the Beast with Dark Angels Land Raider doors and a Rhino front plate from FW. It will be mounted on a themed base on a 2cm diameter acrylic rod. This base is not yet constructed, as well as the engine room, but I'll come to that once the main model is built and painted. I'm of the firm conviction that such expensive models should be treated with the utmost of respect and attention. This being said, I've had to develop new skill sets (working with epoxy, soldering, and airbrushing) to tackle this project. I'll give it the best of my abilities, but it may not be enough sometimes. Okay, enough babbling, here are the pictures. First, we have a frontal view of a dry fit. You can already see the painted pilots inside (if you squint hard enough) Here's a shot of the lowered assault ramp, with interior lighting running. It seems very bright in the darkness, but I mainly took this picture to see if the light shines through thin parts of the resin. Which it does and is now fixed with a plasticard bracing inside. Still unpainted, though, just for kicks. Here's the painting process of the pilots. I've dremeled out one of the heads to replace it with a DA Techmarine head, and the shoulder pads are from FW. Flight deck still unpainted, dry fitting. Now some (terribly blurry) pictures of the finished pilots: Since then, I've started priming and basecoating the interior. Which you can't really make out since this picture was taken in natural sunlight. But here it is anyways, in bone white. Take my word for it. The inner part of the assault ramp is almost done already. It will get a good sponging for more weathering, and then it'll be ready for permanent mounting on the nose. Speaking of the nose. This part is still not glued to the lower hull, for two reasons: First, it would be very awkward to paint the lower deck with it in place; second the flight deck needs to be mounted to really be able to glue the nose in place. And to mount the flight deck, everything inside must be painted, and the LED cables need to be connected. This is going to be fiddly work. Thank you for your time, I hope you enjoy the project as much as I do!


