BigJon Posted September 20, 2008 Share Posted September 20, 2008 Welcome to the first (or second) look at the drop pod. I decided to tackle it this morning so I can throw some paint on it soon. First off are the door. Not much mold likes which is good, but have some rubber bands handy to hold them together. http://farm4.static.flickr.com/3209/2873117698_cf10c69e16_o.jpg Next is the base, here you do not glue the doors down but glue the top of the base to the bottom of the base, make sure this fits snug and not to let glue seep into the door pegs. http://farm4.static.flickr.com/3213/2872289857_9e2b318f77_o.jpg Next is inside. This is the rough part. The direction included are a rough CAD drawing that is very confusing. I installed the first two harness supports backwards because that's how the directions have it on the left side of the page. The red circle on the left is the WRONG way, both those pices will have to be snipped to let the wings on the pod, the red circle on the right is correct. Also, the directions only have you installing one set of harness's, but the kit has enough for both sides and in fact both sides need to be installed. Don't worry, I'm still working on the mold lines. http://farm4.static.flickr.com/3114/2873119534_5b90570e69_o.jpg Next image is for scale, also, three of my doors are having a hard time staying closed, going to need to engineer a solution. http://farm4.static.flickr.com/3212/2873119494_8a5892deae_o.jpg And a top down image so you get an idea of how much room your will need to Drop Pod assault them in. Top down view to help with Drop Pod assault spacing and room. http://farm4.static.flickr.com/3117/2873119512_3a06ee36be_o.jpg As with all GW kits the next few drop pods will be much easier as I go along. BigJon P.S. Did I mention the CAD instructions are crap? Link to comment https://bolterandchainsword.com/topic/146648-my-first-drop-pod/ Share on other sites More sharing options...
CarbonBased Posted September 20, 2008 Share Posted September 20, 2008 Is this the new plastic kit? Link to comment https://bolterandchainsword.com/topic/146648-my-first-drop-pod/#findComment-1701005 Share on other sites More sharing options...
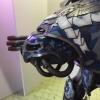
Brother Gothard Posted September 20, 2008 Share Posted September 20, 2008 Cool, nice close up look of the new kit. Have you glued those wings in, or are you going to paint it up unassembled then assembled it afterwards? three of my doors are having a hard time staying closed, going to need to engineer a solution. Three words: rare earth magnets. Link to comment https://bolterandchainsword.com/topic/146648-my-first-drop-pod/#findComment-1701006 Share on other sites More sharing options...
Primarch Corax Posted September 20, 2008 Share Posted September 20, 2008 I found that the doors seem to come unglued an awful lot ater it is made. Its is a very fiddly kit that GW has made over-complicated. Link to comment https://bolterandchainsword.com/topic/146648-my-first-drop-pod/#findComment-1701009 Share on other sites More sharing options...
BigJon Posted September 20, 2008 Author Share Posted September 20, 2008 I have the magnets on my work bench and am working out away to use them, after I mow the yard lol. I did glue the wings on, I have a pretty simple paint scheme for my chapter so I was not to worried. BigJon Link to comment https://bolterandchainsword.com/topic/146648-my-first-drop-pod/#findComment-1701014 Share on other sites More sharing options...
Abbadons Chosen Posted September 20, 2008 Share Posted September 20, 2008 made mine today its gonna be a chaos one but not a dreadclaw and they are such a nice kit to make i could make hundreds and not get bord i hope to get about 4 more yay droppodness wooooooooooooo Link to comment https://bolterandchainsword.com/topic/146648-my-first-drop-pod/#findComment-1701023 Share on other sites More sharing options...
brother Hastatus Posted September 20, 2008 Share Posted September 20, 2008 I finished mine today, and I agree its not easy to put together your first one. On my one, the engine is not quite directly above the centre of the model, so the doors don't quite shut properly. I also had to cut the pipe off the harness frame, the pipe that joins to the wing/fin, as I didn't glue it on properly. It sure is a hard kit to get used to though, but I think it'll be easier after your first one, as then you know how it works, etc. Link to comment https://bolterandchainsword.com/topic/146648-my-first-drop-pod/#findComment-1701159 Share on other sites More sharing options...
Isiah Posted September 20, 2008 Share Posted September 20, 2008 Fiddly maybe but it's great lookin isn't it. Thanks for posting this up BigJon as I've yet to see the model in it's pre-made state at all. Cheers I Link to comment https://bolterandchainsword.com/topic/146648-my-first-drop-pod/#findComment-1701210 Share on other sites More sharing options...
nurglespuss Posted September 21, 2008 Share Posted September 21, 2008 Hmmm by the look of that interior, I may assemble mine 'closed' and paint them, save the interior for bits... Link to comment https://bolterandchainsword.com/topic/146648-my-first-drop-pod/#findComment-1701317 Share on other sites More sharing options...
lord_bunny Posted September 21, 2008 Share Posted September 21, 2008 It looks like a great peice of kit! prehaps a loose pin to keep the doors closed? Oh if you don't mind, whats the basic diamiter of the base (with the doors 'up' i.e not landed)? I need to gat some bases to represent a 'pod' (my chapter are all ghostly, so its the point the appear from, with some sort of mysterious lightning representing the storm bolter) thanks... how much did it cost? Link to comment https://bolterandchainsword.com/topic/146648-my-first-drop-pod/#findComment-1701586 Share on other sites More sharing options...
King Tiger Posted September 21, 2008 Share Posted September 21, 2008 Hmmm by the look of that interior, I may assemble mine 'closed' and paint them, save the interior for bits... thats what I was thinking of doing as well Link to comment https://bolterandchainsword.com/topic/146648-my-first-drop-pod/#findComment-1701590 Share on other sites More sharing options...
Stargazer Posted September 21, 2008 Share Posted September 21, 2008 I built mine and i didn't think it was that bad. If the doors don't seem to close properly try pushing them at the base of the door instead of the top. 2 of my doors wouldn't shut then i pushed them that way and they seem to close fine now Link to comment https://bolterandchainsword.com/topic/146648-my-first-drop-pod/#findComment-1701638 Share on other sites More sharing options...
ilnar Posted September 21, 2008 Share Posted September 21, 2008 id make the doors openable,,,, simple because toyr troops are deploying into cover if the leaves are open Link to comment https://bolterandchainsword.com/topic/146648-my-first-drop-pod/#findComment-1702030 Share on other sites More sharing options...
BigJon Posted September 21, 2008 Author Share Posted September 21, 2008 I used some rare earth magnets to help secure the doors, even the ones that stayed closed. I did not make it neat for clever, just glued them to the tips of the doors and then to the engine shaft. I will include some pics later as I am currently at work, but it does seem to work so much better. BigJon Link to comment https://bolterandchainsword.com/topic/146648-my-first-drop-pod/#findComment-1702177 Share on other sites More sharing options...
Recommended Posts
Archived
This topic is now archived and is closed to further replies.