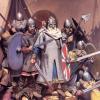
styygens Posted December 21, 2008 Share Posted December 21, 2008 http://i259.photobucket.com/albums/hh290/jrf-photos/P1010005-19.jpg?t=1229880895http://i259.photobucket.com/albums/hh290/jrf-photos/P1010005-19.jpg?t=1229880930http://i259.photobucket.com/albums/hh290/jrf-photos/P1010007-16.jpg?t=1229880978http://i259.photobucket.com/albums/hh290/jrf-photos/P1010008-18.jpg?t=1229881000http://i259.photobucket.com/albums/hh290/jrf-photos/P1010010-20.jpg?t=1229881022http://i259.photobucket.com/albums/hh290/jrf-photos/P1010011-17.jpg?t=1229881047http://i259.photobucket.com/albums/hh290/jrf-photos/P1010012-13.jpg?t=1229881069http://i259.photobucket.com/albums/hh290/jrf-photos/P1010013-16.jpg?t=1229881092http://i259.photobucket.com/albums/hh290/jrf-photos/P1010015-14.jpg?t=1229881117http://i259.photobucket.com/albums/hh290/jrf-photos/P1010016-14.jpg?t=1229881145http://i259.photobucket.com/albums/hh290/jrf-photos/P1010017-16.jpg?t=1229881165http://i259.photobucket.com/albums/hh290/jrf-photos/P1010018-9.jpg?t=1229881186http://i259.photobucket.com/albums/hh290/jrf-photos/P1010019-15.jpg?t=1229881205http://i259.photobucket.com/albums/hh290/jrf-photos/P1010020-14.jpg?t=1229881225 Not my best pictures... But I think they get the point across. I'm working on building the entire Fifth Company with the proper support for siege. I got tired of painting all that yellow and black, so I switched to adding to my White Scars army... Link to comment https://bolterandchainsword.com/topic/155480-5th-company-imperial-fists/ Share on other sites More sharing options...
Brother Atheos Posted December 21, 2008 Share Posted December 21, 2008 fantastic job. how did you do the yellow out of interest? Link to comment https://bolterandchainsword.com/topic/155480-5th-company-imperial-fists/#findComment-1815850 Share on other sites More sharing options...
Dejay Posted December 21, 2008 Share Posted December 21, 2008 Wow nice job :( Link to comment https://bolterandchainsword.com/topic/155480-5th-company-imperial-fists/#findComment-1815851 Share on other sites More sharing options...
Vash113 Posted December 21, 2008 Share Posted December 21, 2008 Very nice, clean yellow ya got there. One question though whats with the red helmets and white stripes on the Termies and the Dread? Thats the Ultras standard markings for Veteran Sergeants, but the IF don't use those, just a red stripe to deliniate Vet Sergeants which I see you did do on the Iron Armored sergeant. So is there a reason you picked that particular set of markings for the helmets? Link to comment https://bolterandchainsword.com/topic/155480-5th-company-imperial-fists/#findComment-1815859 Share on other sites More sharing options...
aNex88 Posted December 22, 2008 Share Posted December 22, 2008 HURRAH!! I love seeing Imperial Fists models hahaha. I like the idea of the Power Fist serving as the main icon for the Dread's banner pole. Only thing I have to say is that you could use some shading for your yellow. That'll make the armour plates pop. Good luck on building your 5th company. I'm working on my 3rd company of Imperial Fists Link to comment https://bolterandchainsword.com/topic/155480-5th-company-imperial-fists/#findComment-1816462 Share on other sites More sharing options...
odinswolf Posted December 22, 2008 Share Posted December 22, 2008 question.. how did you get the fist decals to stay flat to the shoulder pad? mine just wont do it :) Link to comment https://bolterandchainsword.com/topic/155480-5th-company-imperial-fists/#findComment-1816596 Share on other sites More sharing options...
Sons of Horus Posted December 22, 2008 Share Posted December 22, 2008 great work i especially love the banner on that dread and the Mk.V marine. :ph34r: :P :tu: nothing screams shoot me like yellow armoured marines lol :P Link to comment https://bolterandchainsword.com/topic/155480-5th-company-imperial-fists/#findComment-1816653 Share on other sites More sharing options...
Reyner Posted December 22, 2008 Share Posted December 22, 2008 Gotta love Imperial Fist armies, they really stand out! Good job man, I like the old school marines mixed in :ph34r: Link to comment https://bolterandchainsword.com/topic/155480-5th-company-imperial-fists/#findComment-1816690 Share on other sites More sharing options...
styygens Posted December 22, 2008 Author Share Posted December 22, 2008 A couple of quick responses... The yellow does "pop" better in person. The harsh lighting I used here washes it out some. Still, the yellow is more of a construction zone yellow than a golden corn yellow, so the plates aren't as bright as in the GW books. I'm going for a "siege" theme (ultimately) so I think the more subdued yellow fits. Painting is pretty complicated. I prime these white, paint the recesses with scorched brown, paint the recesses again with snakebite leather. Then I paint the plates with the most yellow "brown" in the GW paints (I'm sorry, it's not in front of me and I don't remember the precise name.) Then I mix that brown 1:1 with golden yellow and paint most of the plates again. Then I highlight with pure golden yellow. Why the red and white helmets on the termies? Basically because I like the look. I do a ton of research to try to get these things "right." And that includes deep-diving on the internet for pictures, browsing though old 40K books I've scrounged, and reading and re-reading the various Index Astartes articles. But I always find, in the end, that I veer off with some detail or another because it looks cool. Somewhere or another I saw a Fist vet with a red and white stripe helmet and thought it looked good. Once I had that in mind, I was realized it could tie in with the heraldry on the termi tilting plates. I'm not a total fluff nazi, sue me. And tell me all that yellow doesn't need something to break it up and create a bit of visual interest. (BTW; the vet sergeants in the squads have the red stripes and red skulls.) If you didn't like the red/white helmets -- watch what blasphemy I'm going to inflict on the two assault squads! Regarding the Fists deals. There is no doubt in my mind the GW decals are among the worst I've ever run across in all my years of modeling. The next skill I'm going to learn is making my own decals. That said: Step 1: carefully use a very sharp hobby knife to partly slit the decal in four places. Be sure you slit through the outer edge of the circle. I use the angle of the black gauntlet to help hide the cut. DON"T cut the decal into four pieces, just cut halfway along the radius. Step 2: Transfer the decal to the shoulder pad. Soak away excess water. If you did it right, the slit will fold over themselves and you won't notice it's not a perfect circle. Step 3: Brush on some decal setting solution. There are several brands available at model and hobby stores. This will soften the decal to conform to the contours of the pad. Step 4: Once the setting solution is dry, brush on a clear flat coat. Once this dries, you shouldn't see any evidence of the decals having been slit, or that nasty silver film around them. Good luck. I specifically chose archive Marine models because the Fists are so codex. They needed something to give them a subtle visual cue. My other armies all have something to make them out as different: BT have chains and knightly imagery; the White Scars are all bikey, nomads with horse tails, scimiatars and tulwars, and exotic lances. And the Space Wolves I'm planning have all that Viking Barabarian stuff. Old Armor marks give an instant aura of history to the Fists, a First Founding chapter. Link to comment https://bolterandchainsword.com/topic/155480-5th-company-imperial-fists/#findComment-1817165 Share on other sites More sharing options...
jeremy1391 Posted December 22, 2008 Share Posted December 22, 2008 very nice yellow!! Link to comment https://bolterandchainsword.com/topic/155480-5th-company-imperial-fists/#findComment-1817167 Share on other sites More sharing options...
odinswolf Posted December 23, 2008 Share Posted December 23, 2008 RE Regarding the Fists deals. There is no doubt in my mind the GW decals are among the worst I've ever run across in all my years of modeling. The next skill I'm going to learn is making my own decals. That said: Step 1: carefully use a very sharp hobby knife to partly slit the decal in four places. Be sure you slit through the outer edge of the circle. I use the angle of the black gauntlet to help hide the cut. DON"T cut the decal into four pieces, just cut halfway along the radius. Step 2: Transfer the decal to the shoulder pad. Soak away excess water. If you did it right, the slit will fold over themselves and you won't notice it's not a perfect circle. Step 3: Brush on some decal setting solution. There are several brands available at model and hobby stores. This will soften the decal to conform to the contours of the pad. Step 4: Once the setting solution is dry, brush on a clear flat coat. Once this dries, you shouldn't see any evidence of the decals having been slit, or that nasty silver film around them. Good luck. thank you very much.. I will be giving that a go over Christmas :tu: Link to comment https://bolterandchainsword.com/topic/155480-5th-company-imperial-fists/#findComment-1817702 Share on other sites More sharing options...
Master Toddius Posted December 24, 2008 Share Posted December 24, 2008 They look great. I like the dread in particular. A proud army to have. ;) Link to comment https://bolterandchainsword.com/topic/155480-5th-company-imperial-fists/#findComment-1818649 Share on other sites More sharing options...
Shortsonfire79 Posted December 24, 2008 Share Posted December 24, 2008 Dude..no words..no words...no words can explain this awesomeness. Link to comment https://bolterandchainsword.com/topic/155480-5th-company-imperial-fists/#findComment-1818997 Share on other sites More sharing options...
Recommended Posts
Archived
This topic is now archived and is closed to further replies.