Naglfar Posted January 23, 2009 Share Posted January 23, 2009 Just recently started picking up this hobby after a few years of lax, with only a odd small game here and there, usually using a proxy or two. But having learned from past "mistakes" I figured I needed an extra incentive to do the work needed to get this stuff across something that can look like a finish line, and help counter my "Painting and Converting ADHD" .. I have it bad. Only thing I have in my army that I consider "finished" is one of my Dreads. So to start off: (Poor quality on the photos .. guess it's about time to start reading that manual .. after having had the camera for 3 years .. ) Link1, Link2 A few notes. Yes, I know. No highlighting what so ever. 1. It's old, and I was far less skilled than I am today. 2. Most highlighting I've seen, especially on black surfaces does very little for me in the sense of lighting realism. A bit lacking on converting, which I really would like to do more of. But I'm gonna stay away from that model with the knife and GS for now. (Only the claws, CC arm purity seal and a stake are alterations from the base model.) So I still don't do it. I do highlights and similar on non-black surfaces tho. .. but now that I see the pictures close up of it I get the feeling I should touch it up again .. I'm never going to get the army truly finished. T_T (Blood on the CC hand needs redoing, wax seals needs to be darkened, gold surfaces definitely needs highlighting .. ect.) .. ANYWAYS! Current works: http://i176.photobucket.com/albums/w190/HieraLastStand/LCMarshalCompletecopy2.jpg See further down for comments. Old Post cont. http://i176.photobucket.com/albums/w190/HieraLastStand/WIPChaplainA01.jpg The highlights on the cape is impossible to make out, as is the glazing/blending (never really caught on to what you call it when you gradiate a color from lights to dark) on the inside of his cape. Something that will eventually become a Jump chaplain, which should also be able to remove the backpack if I only manage to get my finger out of my you-know-what and get some of those small magnets and a drill tool of some sorts to cut out the sockets needed for them. Body is a fuse between one of the BT upgrade fronts and the "running" robed body from the DA vet box. Right arm I have no idea where came from, but the book is also from the DE Vet box. Left arm is also, yet again from the DA Vet box, but with the DA icon hanging from the wrist cut and swapped with one of those small crosses/rosarius' from the Termie box. Head, which you can't really see well (the green, gray and red blob in the middle) is a "skull head" from the old Chaos Warrior plastic multi-part box. Also considering to swap the crozius arcanum head (Read: mace head) with one of those bits from the Termie box that you're supposed to attach to the top of the sergeant. There's still plenty of other bits I'm going to stick to him, but leaving that for later when I can properly see where I got places left and such. http://i176.photobucket.com/albums/w190/HieraLastStand/WIPGeneric01.jpg Some other models in various states of completion: A nearly finished standard bearer. Missing the top of the flag, which is the white thing to the left and a few purity seals and/or other random bits. Contemplating whether or not to add more litanies/text or some symbol of sorts to the banner. Not too sure. Company Champion. His armor untouched by litanies, which is dangerously close to heresy seeing they are Black Templars. Also missing the backpack and maybe a random bit or two. Terminator. Was originally the free terminator that came with the WD assault on black reach launch issue. Cut his helmet to be a bit more crusaderish and painted his eyes .. that's it. Gonna give him a Thunderhammer and Stormshield instead of the SB-PF combo he came with. In the back you can also see the nearly finished Assault Marine squad, or parts of it. Have bits for another .. 9 laying around somewhere .. The Land raider is a "gift". Got it from a friend who decided he didn't want Dark Angles anymore. Just finished covering up all that bone/green paint. Also have a attack bike that's .. well .. about 1/4th or 1/5th finished .. or something like that .. and a few special weapons type people .. but I'm not gonna focus on those for now. Bases are still left untouched because I haven't decided on what theme to go for. Desert seems to be the status quo for Black Templars, but being a "old fashioned" Norwegian, I have a small measure of love towards winter and snow. But doing that requires various levels of glue and baking ingredients apparently, so I've left that out for now. But yeah. Gonna go looking at that camera manual, hopefully before I take any more pictures .. if I can still find it that is. C&C, tips and suggestions welcome. Edit: Dread pics changed to links due to load time and poor quality photos. Link to comment https://bolterandchainsword.com/topic/158431-black-templars/ Share on other sites More sharing options...
Captain Mick Posted January 23, 2009 Share Posted January 23, 2009 Very cool looking mini`s if whole army is painted like this it looks really well. Good job already and i will keep following this topic :sweat: . Link to comment https://bolterandchainsword.com/topic/158431-black-templars/#findComment-1854903 Share on other sites More sharing options...
Naglfar Posted January 24, 2009 Author Share Posted January 24, 2009 Thank you. Personally I feel that are a bit bland yet, due to the lack of "various bits" like the BT upgrade box stuff. But waiting with adding it all to avoid using it all up too soon. And I seem to have found a solution to the miniature picture quality that does not involve me neither reading nor even finding the manual for my camera. :3 *is pleased with self* Turns out one of my friends just bought a 500£ (or so) camera, and seem to be quite adept at using it. (Her brother being a professional photographer n' stuff.) *cheers* Anyways, I have a question for anybody that might be reading this, and know a few bits about it: Robes, highlight, shade or a mix? What do you think is the best way to get a decent look and feel without requiring too much time on a basic model? Gonna do some more work on the assault squad tomorrow, and see if I can't get a "test run" from my newly acquired photographer. :3 Link to comment https://bolterandchainsword.com/topic/158431-black-templars/#findComment-1855822 Share on other sites More sharing options...
BlackKnight1239 Posted January 27, 2009 Share Posted January 27, 2009 Have you given any thought to washes? I've been using them to shade my tabards, and it seems to work quite well. Link to comment https://bolterandchainsword.com/topic/158431-black-templars/#findComment-1859544 Share on other sites More sharing options...
paulson games Posted January 27, 2009 Share Posted January 27, 2009 If you have a digital camera that automatically focuses all you have to do is turn on either the marco or super macro function for close ups of the models, which is usually indicated by a flower icon. You may also want to turn off the flash and shoot in natural sunlight, at that close the camera flash will usually reflect too strongly and wash out the picture. Most cameras are set to take pictures at 4-6 feet, if you are closer than that will often cause focusing issues. The macro setting tells the camera that the range is under a foot so that the software opperates the auto focus correctly. I use a olympus stylus camera, and have also used a sony cybershot, both take good pics with the macro setting are aren't terribly exspensive. For painting the tunics I've found I have a difficult time with washes, they either come out too dark for my taste or worse leave a ring around the area they are supposed to be darkening. What I've found that works for my style of paint is to paint the robe a darker color, bootstrap leather or simular tan color, then I run a 50/50 mix of that color and bleached bone covering the areas that aren't recessed. Once that's dry I go over the higher areas with a 100% mix of bleached bone on the high areas, leaving a little bit of the mix showing so there's a transition between the deep areas of the fold to the higher areas. The final steps is to add very thin lines of a 50/50 mix of bleached bone and skull white to highlight only the highest edges. The tunics on these models were painted that way, (the models are still in progress) they still need the final highlight mix which really makes the tunics look 3-d and pop on the table but at arms length they already look good. Depending on how much time you want to put in you can start out with an even deeper brown if you want and add more subtile layers/steps to build up to the final color. My primary focus was getting the models done quickly and look ok on the table. http://www.paulsongames.instantecom.net/i/warhammer/2squad1.JPG One character models I do carefuly drybrushing to get the shading more subtile, but in order to crank out the line troops quickly I don't bother with drybrushing as the contrast on the tunics looks very good at table distance. I would suggest doing multiple models at a time that way you can lay down whatever color you have mixed and do them assembly line style it'll save a lot of time. Also if you plan on doing a lot of figures with the same color robes you might want to pick up an empty paint pot and mix enough paint to cover all your mini's that way you don't spend extra time trying to remix that color every time you sit down to paint. I'm also a huge fan of privateer press's P3 wet palette, it's awesome and will help you get nice consistant paint with a very long work life, so you can use the paint for an hour+ without it drying out as you work. Also it an incredible tool for wet blending. For bases I'm planning on my templars having a blasted rock & gravel look. From all the story fluff in the books I see them as seige experts and launching heavy assaults as opposed to fighting on open ground, hence why I want to add stuff that looks like broken and blasted concrete/rock. I've also found that using a sand/gravel base looks pretty good when it's painted to black and then drybrush shades of grey, helps set off the dark look/feel of the templars as they are coming through scorched ground (and bringing hell with them). I think it's a bit weird to see such cool dark models on bright green turf or bright tan sand bases. Link to comment https://bolterandchainsword.com/topic/158431-black-templars/#findComment-1859724 Share on other sites More sharing options...
Naglfar Posted January 27, 2009 Author Share Posted January 27, 2009 *grumbles* Error in by photobucket caused me to loose the post .. and I'm hungry. /grumpy-mode Seems proper use of the macro function was what I was lacking. The camera cost about 130£ not too long a time ago, so should still be somewhat decent. Poor pictures is more my fault than the camera. As I have yet to actually read the manual for it. Have you given any thought to washes? I've been using them to shade my tabards, and it seems to work quite well. And similar to Paulson Games, I don't have much good experiences with washing tabards and the like. I find surfaces without clear details and recesses to miss out on the desired effect from washes. I currently base my tabards with a 50/50 mix of bleached bone and scorched brown (It's the only brown I got .. really need to get new paints soon). And then progress up to pure bleached bone cowering most of the surfaces. And at the end add some thin layers of skull white mixed with bleached bone in varying stages. In my opinion, it leaves a nice gradation. But so far, I seem completely unable to capture this on picture. It -barely- shows. But then again, it fits with my general painting style. I don't want hyper visible highlighting lines and such, and instead aim for a more "natural" feel. At least that is what I preffer to think of it as. Too bad it takes forever to do properly. >_>' First image is with only natural / indirect lighting, and the second with the flash on. Distances ranged from 6-8 inches (15-20cm), as opposed to the 2-3 foot I was using earlier. Seems the one with the flash turned out cleared and .. well, simply better than the indirect lightening one. At any rate, this leaves me with something to show! So .. Latest Progress: http://i176.photobucket.com/albums/w190/HieraLastStand/Assault02.jpg http://i176.photobucket.com/albums/w190/HieraLastStand/Assault01.jpg Left most Initiate is missing some work on the conversion. can't complete it as I simply don't have the color blue, or other blueish gray colors needed to make a proper tau skin color. Mixing just skull white and chaos black leaves them feeling .. way past rigor mortis. And I intend for the head to be "fresh". So that does not mix well. And I will be adding litanies and other minor details, along highlighting the jump pack straps and maybe even the red edges on the shoulder pats in some fashion. But leaving such out at the moment, as I'd rather finish the army for my up and coming games. The date is not overtly fixed just yet. But time moves faster than you'd think. And I hate playing with proxies or half finished models. Those requiring small touch ups are something completely different. *nods* All in all, I consider them table top worthy. Bases will be done once I have experimented a bit with the snow effects a bit. And preferably the entire first "segment" of the army in one go. Next in line is: Initiates x3, all with CCW+BP Current State: 1 only needing a head swap + touch ups. 2 Needing last paint strokes before assembly, and then the following litanies and other details. Marshal with Ligthening Claws, melta bomb and Terminator honors. Current State: Still in sprues. After that I'm only really missing the neophytes for the current setup of my 1000 point crusade. Also, now that I have unloced the techno arcana behind taking more decent pictures, I suppose redoing the Dread Pictures are in order. Link to comment https://bolterandchainsword.com/topic/158431-black-templars/#findComment-1859811 Share on other sites More sharing options...
paulson games Posted January 27, 2009 Share Posted January 27, 2009 The pics look good, much clearer :( To get the all white background, I use a piece of paper propped up with a small box so that it forms a slight slope something like an uppercase J. Sometimes the camera will lock on a particular color in foreground or the background and the picture gets tinted slightly to that color, if you are getting odd colors try covering the table etc with a sheet of paper, also you can probably print out a gradient page which is basiclly just a sheet of paper that runs from a very light blue on one end to a darker blue on the other. Cameras react to blue lighting differant than they do with other colors so it can be used to help get the correct balance if you are using a lot of color extremes. Put the lighter side under the model so that the dark edge is away from the camera's focus area. You should be able to find a printable gradient image on google. The paint is good so far, nice and clean looking. Link to comment https://bolterandchainsword.com/topic/158431-black-templars/#findComment-1859821 Share on other sites More sharing options...
Captain Mick Posted January 27, 2009 Share Posted January 27, 2009 Nice update im looking forward to see more ;) . Link to comment https://bolterandchainsword.com/topic/158431-black-templars/#findComment-1860077 Share on other sites More sharing options...
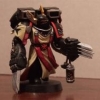
Naglfar Posted April 13, 2009 Author Share Posted April 13, 2009 An update, at long last. Nothing huge, but still important. And given my ability to question my own decisions, I'm turning to you for an answer. The heads, which one do you think looks the best for a dual Lightening Claw Marshal? And why? Also, the collar. Gold, silver or red trim? And, being a not so huge fan of gold usage on templars, I'm open for the suggestion of making the wings & "eyebrows" silver instead. http://i176.photobucket.com/albums/w190/HieraLastStand/AssaultLCMarshalheadoptionscopy.jpg The left head is from the DA vet box, where I got most of the body from, and the right one is a beakie head converted into a crusader helmet with "wings". Unfortunately, this is as good as I can make the pictures right now. Got a few more marines that have entered various stages of completion, but still not quite there, so not showing those of just yet. Will have them in a day or two tho, I hope. :s Link to comment https://bolterandchainsword.com/topic/158431-black-templars/#findComment-1952756 Share on other sites More sharing options...
Warmongrel Posted April 13, 2009 Share Posted April 13, 2009 Your painting looks really well done. You might benefit from use of this (click) background for your model pics. I can also tell you from personal experience that the macro setting makes a world of difference. Good work, and good luck. Link to comment https://bolterandchainsword.com/topic/158431-black-templars/#findComment-1952803 Share on other sites More sharing options...
Naglfar Posted April 13, 2009 Author Share Posted April 13, 2009 @Warmongrel Thank you. Unfortunately, I'm lacking access to a printer as it were. So I'll have to make a post-it note for that background. And the macro setting is used on the later pictures. Might have gone a wee bit too close on the last picture though. My comment about the poor quality on the last picture was more directed at the poor light setting than actual photo quality. And you (skillfully) avoided the question I raised. :3 So .. Hints/tips/ideas anyone? Link to comment https://bolterandchainsword.com/topic/158431-black-templars/#findComment-1952883 Share on other sites More sharing options...
Warmongrel Posted April 14, 2009 Share Posted April 14, 2009 I dig the gold and the wings, but it seems like they would restrict his movement by hitting the jump pack intakes. Therefore, I would go for the hooded dual lightning claw Marshal, and I would use the winged helmet soldier as an Emperor's Champion (with a normal pack for better clearance) maybe? The later photos do look better, just that black paint that eats up all the light! :lol: Link to comment https://bolterandchainsword.com/topic/158431-black-templars/#findComment-1954044 Share on other sites More sharing options...
Naglfar Posted April 16, 2009 Author Share Posted April 16, 2009 http://i176.photobucket.com/albums/w190/HieraLastStand/LCMarshalCompletecopy2.jpg Decided to keep the winged helmet despite the collision issue with the jet pack because .. well. I like it. And it doesn't look too off. Still need to fix the laurels on the fists. But that'll have to wait for when the new paints arrive. (nearly out of everything, black. :s) And contemplating adding some litanies / other patterns to the red .. things on his tunic. So, what ya think? Next project? Either just some boring ol marines, or finishing the land raider. Link to comment https://bolterandchainsword.com/topic/158431-black-templars/#findComment-1957529 Share on other sites More sharing options...
paulson games Posted April 17, 2009 Share Posted April 17, 2009 I like it, the arms seem a bit too long to me though. I know the terminator arms are bigger than teh stock marine arm. Did you attach them as is or cut them before the elbow and join them to a marine arm? Overall it's a very nice conversion and I really like the mix of the tabard and robed legs, I may be borrowing that idea. ;) Link to comment https://bolterandchainsword.com/topic/158431-black-templars/#findComment-1957756 Share on other sites More sharing options...
Naglfar Posted April 22, 2009 Author Share Posted April 22, 2009 @Paulson: Good to hear that you like em. As for the length, the elbow it self is about 1 mm further down that on a regular marine, so I don't think it looks too bad. Probably not the best angle either. Looks somewhat better in real life (don't they always?) And no, they are not cut at the elbow, would mess up the power cabling (I think). Instead I cut out allot of the top of the shoulder itself, had to GS some to fill up the inside of the shoulder pad. As for the question I've been asked in a PM, but thought I'd just put it here. The wings on the helmet is from the .. Plastic Dread. When I bought my original dread, there was 3 "front plates" in it. One with a DA-esq iconography, one with a more ultramarine/generic one, and a Crusader one (Maltese cross-Termie Honour mix). Obviously opting for the one with the cross, I tried to make use of the rest of the bits. End result was one that ended up as scrap, and the other as the wings for that helmet. Started out as an attempt to make use of the beakie helmets, which I'm no big fan off. But those tend to end up a tad "flat" if you only redo the front of them. So I added the wings, which worked out rather nicely if I may say so myself. As for cutting out the wings out of the plate. Be careful. Cut myself 3 times I think. (It's a long time ago) For referenced: http://i176.photobucket.com/albums/w190/HieraLastStand/Dreadplate.jpg Link to comment https://bolterandchainsword.com/topic/158431-black-templars/#findComment-1963306 Share on other sites More sharing options...
Recommended Posts
Archived
This topic is now archived and is closed to further replies.