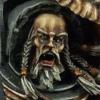
pingo Posted November 5, 2012 Share Posted November 5, 2012 Hi folks. For my Space Wolf army, I'm trying something a bit different. In the past I've spent a lot of time painstakingly line highlighting armour and, frankly, I got bored of it! I resolved to come up with something different to speed up the process while retaining as much quality as I could. Also, it meant exploring a new style and new techniques. This is what I came up with: 1) Undercoat with Army Painter Uniform Grey Primer 2) Drybrush with GW Longbeard Grey 3) Wash lightly with a custom mix of (old) GW washes – 2 parts Badab Black, 1 part Devlan Mud, 1 part Asurman blue This is the end result. http://1.bp.blogspot.com/-gBi5ltzFbig/UJg-V-o-ilI/AAAAAAAAAKc/LiCCo4qdoo4/s1600/test.jpg Full stage-by-stage tutorial with photos can be found on my blog here. Thanks for looking, and I hope this is useful. Link to comment https://bolterandchainsword.com/topic/265108-fast-effective-space-wolf-armour/ Share on other sites More sharing options...
Tamwulf Posted December 20, 2012 Share Posted December 20, 2012 Pingo- could you show us a finished model using this technique? I went to your blog and viewed the test model, and it looks like you added a couple more layers of grey to this one for the finished product. The model looks barely distinguishable from the white primer- is it because of the harsh light used and the dark background of the photo? For step two, dry brushing with the GW Longbeard Grey- did you drybrush the whole model? Or did you do a "top down" drybrush? Finally, have you by chance tried the darker primer, then spray from a good distance away just the top of the model to "dust" it? I've only seen it done with black primer on the model, then using white from a good 2'-3' away from the top of the model to dust the raised areas. It creates instant shading and an almost open source lighting effect. I wonder if you could do the same here. Use a darker grey primer for the base coat, dust with a lighter grey, then wash the mini. Link to comment https://bolterandchainsword.com/topic/265108-fast-effective-space-wolf-armour/#findComment-3265917 Share on other sites More sharing options...
pingo Posted December 20, 2012 Author Share Posted December 20, 2012 Hi Tamwulf. Taking your questions in turn ... Pingo- could you show us a finished model using this technique? I went to your blog and viewed the test model, and it looks like you added a couple more layers of grey to this one for the finished product. The model looks barely distinguishable from the white primer- is it because of the harsh light used and the dark background of the photo? Correct; my lighting was far too harsh when I took these photos. The armour colour you see on the finished photos on my blog is very representative of the real life colour as by the time I took them I had a proper lighting set-up. So, I added no more layers of grey to the basic paint scheme above. These photos are way way too light. In fact, the primer is not white as you said, it is mid-grey. For step two, dry brushing with the GW Longbeard Grey- did you drybrush the whole model? Or did you do a "top down" drybrush? I drybrushed the whole model, so no top-down method was used. That's not to say I paid much attention to the underside of things, but the main aim was to pick out the raised areas, create a general highlight, add some texture. Finally, have you by chance tried the darker primer, then spray from a good distance away just the top of the model to "dust" it? I've only seen it done with black primer on the model, then using white from a good 2'-3' away from the top of the model to dust the raised areas. It creates instant shading and an almost open source lighting effect. I wonder if you could do the same here. Use a darker grey primer for the base coat, dust with a lighter grey, then wash the mini. I have never used that technique, but I have seen it done, and with other colours too. You may be interested in these links to the From the Warp blog which talk about this technique: http://fromthewarp.blogspot.co.uk/2012/10/...k-and-easy.html http://fromthewarp.blogspot.co.uk/search/label/zenith You could absolutely do what you suggest for Space Wolves, it's just not a direction I chose to go in. Link to comment https://bolterandchainsword.com/topic/265108-fast-effective-space-wolf-armour/#findComment-3266081 Share on other sites More sharing options...
Recommended Posts
Archived
This topic is now archived and is closed to further replies.