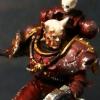
Sh0sen Posted December 8, 2012 Share Posted December 8, 2012 These are my favourite Iron Warriors so far! The rust and dirt really makes them look like they've been in the field for a long time. I only have one comment to make tho. All the heads on your Sternguard are facing the same, it makes them look really static. If even just a couple of them where looking in another direction it would give the unit a little variety. Other than that one little quibble I'm very impressed, and your turn around time is definitely better than mine! Link to comment https://bolterandchainsword.com/topic/265913-122nd-iron-warrior-grand-company/page/2/#findComment-3256708 Share on other sites More sharing options...
Skrall Posted December 17, 2012 Author Share Posted December 17, 2012 I am in awe. Your weathering makes the models look like if you were careless while handling them, you may get Tetanus! Best. Responce.ever. Now it's time for the main event. I've been considering this for days, and here's the plan. I wish to develop a... younger version of perturarbo. I want to town down some of the more 'chaos' elements later designs have. As a result i've decided to develop an artificer version of this; http://media.moddb.com/images/groups/1/3/2055/Angel-exterminatus-art-01.jpg I want to keep some of the design elements (layered armour, bulky shoulders, bolter-fists, thunderhammer) but give him more of a normal marine feeling. I also want to keep that slightly slender feeling they developed with angron (where the body looks more triangular than square). Here's my early mock up; http://i1123.photobucket.com/albums/l547/Gitzkrieg/SAM_0970.jpg and a really crappy sketch on the photo to show roughly what i am planning to develop in terms of bulk. http://i1123.photobucket.com/albums/l547/Gitzkrieg/SAM_09701.jpg if anyones got any questions (ignore the fact his atonomy is off, i am working on that as the sculpt develops) or wants to suggest things they are welcome! Updates... probably not until the weekend. -skrall Link to comment https://bolterandchainsword.com/topic/265913-122nd-iron-warrior-grand-company/page/2/#findComment-3263060 Share on other sites More sharing options...
Wicced Posted December 17, 2012 Share Posted December 17, 2012 very interesting perturabo build brother. i'll definitely follow this :lol: my only suggestion would be about his hammer. if he's not going to hold it in an aggressive attack pose, i'd recommend the hammer head to rest on the floor, instead of the other way around. in my opinion it looks odd balanced on the haft. just my two flayed skulls Link to comment https://bolterandchainsword.com/topic/265913-122nd-iron-warrior-grand-company/page/2/#findComment-3263147 Share on other sites More sharing options...
Biohazard Posted December 17, 2012 Share Posted December 17, 2012 Perturabo is looking good so far, I like the plans to bulk him up a little as well. Im not so sure the hammer really needs changed thouugh, I quite like the way it looks. Link to comment https://bolterandchainsword.com/topic/265913-122nd-iron-warrior-grand-company/page/2/#findComment-3263374 Share on other sites More sharing options...
Red Skullz Posted December 17, 2012 Share Posted December 17, 2012 Chainmail. Lots of it! R Link to comment https://bolterandchainsword.com/topic/265913-122nd-iron-warrior-grand-company/page/2/#findComment-3263469 Share on other sites More sharing options...
Skrall Posted December 18, 2012 Author Share Posted December 18, 2012 thanks for the comments guys; nothing is set with the hammer, only the open arm is staying. Update; I have now built everything, next up green stuff and paint. http://i1123.photobucket.com/albums/l547/Gitzkrieg/SAM_0974.jpg I won't be posting in this again until i either make significant progress on the primarch or actually paint a damn thing. Hopefully christmas will let me make some big leaps. -skrall Link to comment https://bolterandchainsword.com/topic/265913-122nd-iron-warrior-grand-company/page/2/#findComment-3264226 Share on other sites More sharing options...
Skrall Posted December 21, 2012 Author Share Posted December 21, 2012 Hey guys. As promised the start of the tutorial for an imperial fist. Don't forget if you want to see any updates when they come out (rather than stumbling across them) check out the Facebook page or the new blog Part 1 of the tutorial time for the imperial fist as promised. Part 1; get a white base coat on your mini; http://i1123.photobucket.com/albums/l547/Gitzkrieg/SAM_0977.jpg Step 2; I use a mixture of XV-88/Snakebite and Golden yellow (or a similar colour) to produce a yellow base. It doesn't matter if you do this by paint brush or by hand. I use an airbrush because i have one and it's amazing. http://i1123.photobucket.com/albums/l547/Gitzkrieg/SAM_0978.jpg Step 3; Golden yellow and Sunburst/bad moon yellow highlight. Paint on the main surface of the armour, leaving it on the dark yellow recesses is optional, but i do it. http://i1123.photobucket.com/albums/l547/Gitzkrieg/SAM_0980.jpg Step 4; i use a mixture of sunburst and white for this, nothing to heavy, a 60:40 max. It's about getting a nice bright colour on the plainer segments of armour a head of part 2. http://i1123.photobucket.com/albums/l547/Gitzkrieg/SAM_0981.jpg Next up in part 2; actually moving past having a bright yellow custard marine! -skrall Link to comment https://bolterandchainsword.com/topic/265913-122nd-iron-warrior-grand-company/page/2/#findComment-3267003 Share on other sites More sharing options...
AGPO Posted December 21, 2012 Share Posted December 21, 2012 I love everything about this blog. I'm particularly in awe of your OSL, sometimes I almost can't tell what is LEDs and what has been painted. Would you mind sharing the recipe for the red glow? Every time I've tried this it's come out too orange or pink. Link to comment https://bolterandchainsword.com/topic/265913-122nd-iron-warrior-grand-company/page/2/#findComment-3267046 Share on other sites More sharing options...
Skrall Posted December 22, 2012 Author Share Posted December 22, 2012 I love everything about this blog. I'm particularly in awe of your OSL, sometimes I almost can't tell what is LEDs and what has been painted. Would you mind sharing the recipe for the red glow? Every time I've tried this it's come out too orange or pink. i might do one after new year, but i won't get time before then. Part 2; Step 5; http://i1123.photobucket.com/albums/l547/Gitzkrieg/SAM_0982.jpg Put down all your basic colours, gold and black in my case. Then wash it with a 50/30/20 mix of water, black and brown. step 6; http://i1123.photobucket.com/albums/l547/Gitzkrieg/SAM_0983.jpg Use a sponge to apply a dark brown damage pattern. 50/50 black brown should get a nice colour, but this can vary with taste of the painter. step 7; http://i1123.photobucket.com/albums/l547/Gitzkrieg/SAM_0984.jpg Apply silver highlights. mithril's best Step 8; http://i1123.photobucket.com/albums/l547/Gitzkrieg/SAM_0986.jpg Use the rest of the mixture for the dark brown damage to make a wash, and apply over the damage to get a nice tone to it all. Step 9; http://i1123.photobucket.com/albums/l547/Gitzkrieg/SAM_0987.jpg Step 10; http://i1123.photobucket.com/albums/l547/Gitzkrieg/SAM_0988.jpg This is the last step of 'Decay' the second phase of painting. Here you start highlight and toning down the armour's damage with a nice golden yellow, since it's thin (at least the old stuff is) you can apply it without much worry. if your using a thicker paint, water it down and apply it very carefully. Step 11; http://i1123.photobucket.com/albums/l547/Gitzkrieg/SAM_0990.jpg Now it's time for restoration phase. This is where you paint the rest of it at you normally would, in this case gold highlight, purity seals ect. Step 12; http://i1123.photobucket.com/albums/l547/Gitzkrieg/SAM_0993.jpg Tamya clear red is a must. i was annoyed when i found i was fresh out if it, it adds so much more to the lens effect you cannot imagine. Step 13; http://i1123.photobucket.com/albums/l547/Gitzkrieg/SAM_0996.jpg Highlights once more, and touch ups where you want them. You've now got your basic scheme. Step 14; http://i1123.photobucket.com/albums/l547/Gitzkrieg/SAM_0997.jpg Now i've been asked for a tutorial for this about 9000 times, so here it is.... very easy. You'll need Vallejo air light sea blue and white... and an airbrush. there's other ways out there, but if your serious about your hobby i'd advise getting one, it just opens so many doors for painting. Start by applying the sea blue; Step 12; http://i1123.photobucket.com/albums/l547/Gitzkrieg/SAM_0998.jpg next up is the white. Spray it pretty thin to achieve the highlights. Total paint time; 2hrs. There's a warning hear, the clever amidst you will have noticed the issues with the painting; it's peeled off. Metal mini's are hard to do this with, because they peel. However, take a look at the resin/plastic models in my army for a clue on how they would react on the mini's GW currently do. I hope this is useful to someone, in the mean time i'm going to finish painting and basing this guy. This tutorial is just the quick and dirty approach to making Grimdark Imperial fists, you can take a little more care and time to do this, this is just me hammering it through to completion. -skrall Link to comment https://bolterandchainsword.com/topic/265913-122nd-iron-warrior-grand-company/page/2/#findComment-3267569 Share on other sites More sharing options...
Skrall Posted January 12, 2013 Author Share Posted January 12, 2013 Now for an iron warriors update, i'm trying to get the army to table-top standard by next monday... so here's the HQ's done. http://i1123.photobucket.com/albums/l547/Gitzkrieg/SAM_1060.jpg http://i1123.photobucket.com/albums/l547/Gitzkrieg/SAM_1057.jpg http://i1123.photobucket.com/albums/l547/Gitzkrieg/SAM_1058.jpg http://i1123.photobucket.com/albums/l547/Gitzkrieg/SAM_1059.jpg sorry about the photo's, my lighting rig isn't up to it's usual standards atm. -skrall Link to comment https://bolterandchainsword.com/topic/265913-122nd-iron-warrior-grand-company/page/2/#findComment-3280616 Share on other sites More sharing options...
Captain Semper Posted January 12, 2013 Share Posted January 12, 2013 This looks waaaay better than mere table-top standard! These minis have so much personality, you're in for a very unique army indeed! Hope you make to Monday! Good luck! Link to comment https://bolterandchainsword.com/topic/265913-122nd-iron-warrior-grand-company/page/2/#findComment-3280671 Share on other sites More sharing options...
Skrall Posted January 13, 2013 Author Share Posted January 13, 2013 This looks waaaay better than mere table-top standard! These minis have so much personality, you're in for a very unique army indeed! Hope you make to Monday! Good luck! thanks man, it's tabletop for me. They represent about 2 hours painting time but i've got another unit to finish building and paint before next monday. after that it's going to be about upgrading the paint jobs on everyone. Oh, and on a note; i've not been on the forum since the update. I am suprised how popular iron warriors have become, i started mine last febuary and everyone and his mother seem to be collecting them. -skrall Link to comment https://bolterandchainsword.com/topic/265913-122nd-iron-warrior-grand-company/page/2/#findComment-3281300 Share on other sites More sharing options...
Captain Semper Posted January 13, 2013 Share Posted January 13, 2013 Well, funnily enough, they are my favorite Traitors too! hahahaha! Link to comment https://bolterandchainsword.com/topic/265913-122nd-iron-warrior-grand-company/page/2/#findComment-3281497 Share on other sites More sharing options...
Recommended Posts
Archived
This topic is now archived and is closed to further replies.