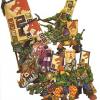
Kierdale Posted June 10, 2013 Share Posted June 10, 2013 I made the above carry case for 300 yen (400 yen if you include the cost of hot glue sticks and paint. That works out at about 4 dollars US, 2 pounds and sixty pence back in Blighty).It holds forty infantry snugly.Parts and Tools One plastic stationary/document case (approximately 11"Lx9"Wx1.5"H external dimensions). Twelve kitchen sponges (approximately 4"Lx2"Wx1"H). One hot glue gun and a pack of sticks. Paint. Due to the type of plastic the case is made from I used acrylic spray (again cheap stuff from the 100 yen store). - All bought from my local hundred yen store. I'm presuming similar shops (pound-shop, dollar-store) can be found outside Japan. If not then a suitable case should be available from a stationary shop, and sponges from a supermarket, pushing up the price a little.Construction The case.Take the twelve sponges (or however many you'll need to fill the case if your dimensions differ) and cut them in half so you get two thin slabs (as equal in thickness as you can manage). Doing it in several cuts with a good pair or sharp scissors or a modelling knife is better than one or two cuts.Then test the fit. Colour coordinate to taste.There is some space at the clasp-end of the box (the bottom of the above photo) but this allows for miniature bases to 'hang over', storage for alternative weapons or even dice.On reflection some space could be left between rows of sponge in order to sandwich the bases of lying miniatures, though once the case closes they are held quite tightly.If you're happy with the fit then remember how the sponges go in, take them all out and start glueing them in with the hot glue gun.Glue around the edges (and perhaps across one diagonal) of each sponge then put it in place, pushing firmly.Afterwards you may wish to run the glue gun around the edge to seal it to the wall of the case though do this quite deeply so no glue remains near the surface where miniatures will lie.I also ran glue between each sponge, at a depth.Here you can see both sides done.The surface of the sponges is a little uneven but not sufficiently to affect the lie of the models. In fact after models have been in the case for some length of time the sponge begins to take the shape of the minis.Initially I thought about using sections of sponge to box-off areas for miniatures but a quick test with some infantry showed that they were held very firmly and did not move even when the case was sealed and shook violently.I under coated the case with black spray and then silver.I printed out 'Departmento Munitorum' using the stencil font and carefully cut it out with a modelling knife, spraying it onto one side. I also printed out some choice 40k 'Thoughts for the Day' (thanks to the members of the IG forum for their suggestions) for the other side. Those got discoloured by the final spray of varnish. I may simply paint slogans on in future.Admittedly, models which are quite three-dimensional in their pose (as opposed to guard or marines with their weapons held across their bodies) would not fit well, or might be damaged. I plan to next make some containers for carrying armour (using some of the larger boxes available from 100 yen stores rather than document ones), then perhaps another infantry one with 'walls' and more room for miniatures with more three-dimensional poses, though no doubt less capacity overall.I'd also like to add some iconography (probably bitz such as the IG winged skull) to the clips.Here ends my tutorial. Simple to make and high-capacity.Suggestions are welcome for how to improve it when I do get around to Mk.II and III (one for armour and an improved infantry one). Link to comment https://bolterandchainsword.com/topic/276690-budget-carry-case-tutorial-mki-and-mkii/ Share on other sites More sharing options...
RADU LYKAN Posted June 11, 2013 Share Posted June 11, 2013 nice, still plenty of room for a longer quote :) looking forward to the other cases Link to comment https://bolterandchainsword.com/topic/276690-budget-carry-case-tutorial-mki-and-mkii/#findComment-3391846 Share on other sites More sharing options...
Kierdale Posted June 12, 2013 Author Share Posted June 12, 2013 Thanks RADU. I hope to make a couple more over the coming months, but I'm concerned about the plastic the case is made of. It's basically the same material that Tupperware is made of and it doesn't take paint well. A bit of research tells me that washing it with Xylene(?) would make it take paint, but I'm not keen on going to such measures (cost, storage of such a chemical with a young kid in the house, etc). The completed case had a couple of layers of black, then silver and finally a clear varnish, but I still fear it may scratch off easily. I'm considering covering the next one with mesh tape before spraying. That should take paint, and the mesh will give it a nice look (or at least an interesting texture). Experimenting continues! Link to comment https://bolterandchainsword.com/topic/276690-budget-carry-case-tutorial-mki-and-mkii/#findComment-3392505 Share on other sites More sharing options...
Puhnupetteri Posted June 12, 2013 Share Posted June 12, 2013 Great idea. Thank You for sharing! Link to comment https://bolterandchainsword.com/topic/276690-budget-carry-case-tutorial-mki-and-mkii/#findComment-3392577 Share on other sites More sharing options...
Kierdale Posted February 9, 2014 Author Share Posted February 9, 2014 The paint didn't stay on the carry case too well, though the foam has proven to be fine.I found some black and yellow striped tape and so used that plus some more black mesh tape to recover the case, add added some more 40k phrases. And at last tried a Mark II carry case. As the Mark I simply sandwiches the miniatures, you can't really put in any models with elaborate bases or poses, so I wanted to make one with proper compartments for each mini. Thus:Though it reduces the capacity from the Mark I's 40-or-so infantry, to 23 minis.And since I decided to keep my 1k Sons in it, I did it with red tape, though haven't yet got around to putting a Thousand Sons insignia on it. I will in time. Link to comment https://bolterandchainsword.com/topic/276690-budget-carry-case-tutorial-mki-and-mkii/#findComment-3590198 Share on other sites More sharing options...
Recommended Posts
Archived
This topic is now archived and is closed to further replies.