Noble Korhedron Posted March 17, 2015 Share Posted March 17, 2015 @Shadespyre: If you can't get a Unicorn to work, why not try an Eagle's head? It could represent a Griffon or something similar? Link to comment https://bolterandchainsword.com/topic/284441-a-new-chapter-rt-space-marines-reinforcements/page/6/#findComment-3979817 Share on other sites More sharing options...
Carlson793 Posted March 17, 2015 Share Posted March 17, 2015 The Chapter doesn't have a name yet. I'm just painting everything in some colours that I liked! I had trouble making transfers of the Chapter badge I liked (a Unicorn) and so I haven't committed myself yet... Got an image of that Unicorn? I might be able to whip up a good transfer sheet for you. (See the downloads section for my decal sheet work.) Link to comment https://bolterandchainsword.com/topic/284441-a-new-chapter-rt-space-marines-reinforcements/page/6/#findComment-3979875 Share on other sites More sharing options...
Shadespyre Posted March 19, 2015 Author Share Posted March 19, 2015 You can see my first attempt at a Unicorn transfer on page 3. It's okay, just not perfect and rather fiddly. Currently having more success with using white transfer paper to put stripes on vehicles. Pictures tomorrow... Link to comment https://bolterandchainsword.com/topic/284441-a-new-chapter-rt-space-marines-reinforcements/page/6/#findComment-3980953 Share on other sites More sharing options...
Olis Posted March 19, 2015 Share Posted March 19, 2015 Brother, if Carlson is offering to do decals for you, give him a shot. From what I can tell of his work, you won't be disappointed. And if you aren't satisfied, well, don't use them. :) Carlson793 1 Back to top Link to comment https://bolterandchainsword.com/topic/284441-a-new-chapter-rt-space-marines-reinforcements/page/6/#findComment-3980961 Share on other sites More sharing options...
Carlson793 Posted March 19, 2015 Share Posted March 19, 2015 Looking at that logo, I can get ya something nice prepped. One idea to avoid close cutting circular decals (or any shape, for that matter) is to give it a close background color (doesn't have to match your actual background) and print on white paper. When cutting out the logo/decal, leave a bit of that color showing, then after the decal has been applied and set, paint the edges to match your background - flexible paint brushes are easier to manipulate than rigid knives/scissors. So one question: classic spiral horn, or smooth? (Oh, and thanks for the vote of confidence, Olis.) Link to comment https://bolterandchainsword.com/topic/284441-a-new-chapter-rt-space-marines-reinforcements/page/6/#findComment-3980981 Share on other sites More sharing options...
Kierdale Posted March 19, 2015 Share Posted March 19, 2015 Great stuff! Very nostalgic. Link to comment https://bolterandchainsword.com/topic/284441-a-new-chapter-rt-space-marines-reinforcements/page/6/#findComment-3981117 Share on other sites More sharing options...
Shadespyre Posted March 19, 2015 Author Share Posted March 19, 2015 (edited) WIP on the Rhinos... base coat, wash, drybrush (not over happy with the finish, I don't drybrush the Marines at all) and white stripe added with transfer paper. Which is fiddly but neater than painting. http://i1147.photobucket.com/albums/o541/Shadespyre/WARHAMMER/Space%20Marines/DSC02383_zpskatzx27o.jpg WRT transfers, I suspect what I really want to do (as discussed at length with JeffTibbets) is print white transfers on clear transfer paper. I wouldn't want anyone to spend time on it until I'm 100% sure what I want, but thanks for the offers. I'm more than happy to paint the whole army before I put a Chapter badge anywhere near it! Edited March 20, 2015 by Shadespyre FuriousFerret and Komodo 2 Back to top Link to comment https://bolterandchainsword.com/topic/284441-a-new-chapter-rt-space-marines-reinforcements/page/6/#findComment-3981862 Share on other sites More sharing options...
Olis Posted March 19, 2015 Share Posted March 19, 2015 Interesting avenue to take, brother, using transfer paper. Great results so far though, especially on the predator. Link to comment https://bolterandchainsword.com/topic/284441-a-new-chapter-rt-space-marines-reinforcements/page/6/#findComment-3981867 Share on other sites More sharing options...
infyrana Posted March 19, 2015 Share Posted March 19, 2015 White lines looking much neater, but a little clean ;) Link to comment https://bolterandchainsword.com/topic/284441-a-new-chapter-rt-space-marines-reinforcements/page/6/#findComment-3981871 Share on other sites More sharing options...
Pantherrex Posted March 20, 2015 Share Posted March 20, 2015 Ever heard of Dark Horse Studios? They are a comic company, they print Hellboy for example. Their logo might be exactly what you could use. Make transfers outta them. Might be a solution. http://www.darkhorse.com/ Logo is all over the page. Just use photo shop to change the color and add a point. Love the models and their colors. I have a multitude of beakies and RT guys myself. They are my vet sargents and vet squads. I am green with envy ya have that Chaplain. And the old Dreads The few figures I could not source back then......Although I have the old speeder :P Maybe they are a chapter on crusade to right a wrong perceived they had done. The Marines with No Name ;) Link to comment https://bolterandchainsword.com/topic/284441-a-new-chapter-rt-space-marines-reinforcements/page/6/#findComment-3982061 Share on other sites More sharing options...
Shadespyre Posted March 22, 2015 Author Share Posted March 22, 2015 I think these are finished for now - just like the Marines, they will need all the Chapter badges, company and squad markings and so on added in the future. Pretty happy with how these look, what do you think? http://i1147.photobucket.com/albums/o541/Shadespyre/WARHAMMER/Space%20Marines/DSC02388_zpsahg8mzrk.jpghttp://i1147.photobucket.com/albums/o541/Shadespyre/WARHAMMER/Space%20Marines/DSC02389_zpswineahjk.jpghttp://i1147.photobucket.com/albums/o541/Shadespyre/WARHAMMER/Space%20Marines/DSC02386_zpscpcsde8w.jpghttp://i1147.photobucket.com/albums/o541/Shadespyre/WARHAMMER/Space%20Marines/DSC02387_zpsl9izx6ze.jpghttp://i1147.photobucket.com/albums/o541/Shadespyre/WARHAMMER/Space%20Marines/DSC02390_zps9chvrj9i.jpghttp://i1147.photobucket.com/albums/o541/Shadespyre/WARHAMMER/Space%20Marines/DSC02391_zps1xvuyhak.jpg biggles666, Radiation, JeffTibbetts and 2 others 5 Back to top Link to comment https://bolterandchainsword.com/topic/284441-a-new-chapter-rt-space-marines-reinforcements/page/6/#findComment-3984203 Share on other sites More sharing options...
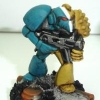
Noble Korhedron Posted March 23, 2015 Share Posted March 23, 2015 What is with the weird red hand on his shoulder?! Is he possessed or something?! Link to comment https://bolterandchainsword.com/topic/284441-a-new-chapter-rt-space-marines-reinforcements/page/6/#findComment-3985658 Share on other sites More sharing options...
Shadespyre Posted March 23, 2015 Author Share Posted March 23, 2015 No, he's just a Techmarine. I don't know why they used to have a shoulder pad shaped like a big claw, they just did. It does look like a Chaos Familiar in this pose, though! Link to comment https://bolterandchainsword.com/topic/284441-a-new-chapter-rt-space-marines-reinforcements/page/6/#findComment-3985756 Share on other sites More sharing options...
Carlson793 Posted March 25, 2015 Share Posted March 25, 2015 Hey Shadespyre, I know this wasn't actually requested, but since I spoke up before my self-imposed 'public-use-is-free-private-will-cost-you' rule, I worked up a possible logo for you. Let me know what you think and if it needs to be modified (or if I just need to mind my own business). Radiation and Olis 2 Back to top Link to comment https://bolterandchainsword.com/topic/284441-a-new-chapter-rt-space-marines-reinforcements/page/6/#findComment-3987517 Share on other sites More sharing options...
Shadespyre Posted March 28, 2015 Author Share Posted March 28, 2015 Thanks for those, very impressive! Way back near the start of the project, I made a rough force list. Thought I'd update it: HQ: Captain Terminator Captain Librarian Chaplain Techmarine Command Squad (still not sure what models to use!) Troops: 3 Tactical Squads 1 Tactical Squads Scouts Elites: 1 Sternguard Squad (using Terminator Honours marines) 3 Dreadnoughts 1 Terminator Squad Fast Attack: 1 Assault Squad 1 Bike Squad 1 Attack BIke Squad 1 Landspeeder Squadron Heavy Support: 1 Devastator Squad 2 Predator Destructors 1 Predator Annihilator 1 Whirlwind 1 Vindicator 1 Land Raider Transport: 2 Rhinos 2 Rhinos Anything in bold italics is completed (assembled, painted, without badging) What shall I do next? Nothing to complicated, I think, as I am lagging behind on my Fantasy projects again! Link to comment https://bolterandchainsword.com/topic/284441-a-new-chapter-rt-space-marines-reinforcements/page/6/#findComment-3990223 Share on other sites More sharing options...
Olis Posted March 28, 2015 Share Posted March 28, 2015 Maybe the Land Raider? :) Link to comment https://bolterandchainsword.com/topic/284441-a-new-chapter-rt-space-marines-reinforcements/page/6/#findComment-3990228 Share on other sites More sharing options...
Shadespyre Posted March 28, 2015 Author Share Posted March 28, 2015 Oh, I would love to, but that is going to be a huge job. The cheap second hand one I bought is in a right state, much worse than the Rhinos. :( Link to comment https://bolterandchainsword.com/topic/284441-a-new-chapter-rt-space-marines-reinforcements/page/6/#findComment-3990231 Share on other sites More sharing options...
Olis Posted March 28, 2015 Share Posted March 28, 2015 Ah, all right then, how about the Captain? Link to comment https://bolterandchainsword.com/topic/284441-a-new-chapter-rt-space-marines-reinforcements/page/6/#findComment-3990233 Share on other sites More sharing options...
Noble Korhedron Posted March 28, 2015 Share Posted March 28, 2015 @Shadespyre: Maybe save up and buy a Mk. 2 Land Raider from Forge World? Link to comment https://bolterandchainsword.com/topic/284441-a-new-chapter-rt-space-marines-reinforcements/page/6/#findComment-3990234 Share on other sites More sharing options...
Shadespyre Posted March 28, 2015 Author Share Posted March 28, 2015 Okay Olis, perhaps I'll dig out the Captain and maybe some Scouts, as they were being discussed recently. @Noble Korhedron - probably for the same amount I could buy a good condition Rogue Trader model. I'm not sure about using the "new old" models from Forge World at the moment. They look great, of course! Probably a decision to make when I get fed up trying to rebuild the old Raider that I've got! ;) Link to comment https://bolterandchainsword.com/topic/284441-a-new-chapter-rt-space-marines-reinforcements/page/6/#findComment-3990254 Share on other sites More sharing options...
JeffTibbetts Posted March 30, 2015 Share Posted March 30, 2015 I somehow missed the update for the finished tanks. Holy cow, that transfer paper idea is insanely well executed. I used to have a DIY SM army that had racing stripes on their vehicles, and this would have worked really well. They seemed to go on very well, and I know how tough big decals like this are to do, so bravo on that. I'm surprised there isn't more wave and warp going on, especially around the rivets. Do you have any tricks to share with us? Link to comment https://bolterandchainsword.com/topic/284441-a-new-chapter-rt-space-marines-reinforcements/page/6/#findComment-3992041 Share on other sites More sharing options...
Shadespyre Posted March 30, 2015 Author Share Posted March 30, 2015 Hi Jeff, I'm pleased that you like it. It was an idea based on desperation as I realised I did NOT want to hand paint those stripes. Tips? 1 - try not to fit parts to the vehicles before striping - things like the top hatches get in the way, and I had to work around them. Paint the vehicle and stick the extras on last. 2 - try to apply them in shorter lengths using natural breaks in the model. For example, the central window slot on the front. On one model I applied a really long piece right over the hatch. On the second, I used two strips, one either side, and it was much easier. 3 - keep the transfer on the backing paper for as long as possible - it makes handling the transfer without creases easier, and helps thread it around things like the front ram. 4 - use MicroSet and MicroSol. This stuff is amazing! MicroSet while positioning the transfer, and then MicroSol to soften it into place. 5- keep using MicroSol. Multiple applications (as in, a dozen or more) were needed to soften the transfer and let it settle over the details underneath, like rivet heads. 6 - look out for air bubbles and stress points in the transfer. I pricked bubbles with a pin, and in a couple of places cut the transfer with a scalpel to help it settle over gaps and steps. More MicroSol will tidy up the results. Apart from that, make sure you carefully cut the paper to make parallel lines, and try and be patient. I ruined a couple of strips while I was messing around learning things, don't be afraid to start again. Keeping the lines straight is fairly easy on these models as there are lots of visual cues to follow. Link to comment https://bolterandchainsword.com/topic/284441-a-new-chapter-rt-space-marines-reinforcements/page/6/#findComment-3992485 Share on other sites More sharing options...
JeffTibbetts Posted March 30, 2015 Share Posted March 30, 2015 Excellent! I'm already doing most of that, bar working with long strips, so that encourages me to give it a shot if it ever comes up. I think frankly I'll be looking for excuses to make it work somewhere now. :D Link to comment https://bolterandchainsword.com/topic/284441-a-new-chapter-rt-space-marines-reinforcements/page/6/#findComment-3992491 Share on other sites More sharing options...
Shadespyre Posted April 6, 2015 Author Share Posted April 6, 2015 (edited) I got bored of painting Vampires red, and took time out to do this guy: http://i1147.photobucket.com/albums/o541/Shadespyre/WARHAMMER/Space%20Marines/DSC02435_zpsewylovgy.jpghttp://i1147.photobucket.com/albums/o541/Shadespyre/WARHAMMER/Space%20Marines/DSC02438_zpsrfp9pgk3.jpg I decided to paint the hard armour and his gear in the "Chapter" colours, and then paint his fatigues in a "local" colour. It's actually a different grey from the concrete (Codex vs Fortress). The base isn't quite finished - needs the black scatter and some rebars - but I was keen to get some pics up! I feel a little guilty that this isn't a RT era model, but I like how he looks. Also, it's a shame that the Scouts with sniper rifles from this era don't include a firing pose, which eliminates some fun basing options. Oh well! Edited April 6, 2015 by Shadespyre Carlson793 1 Back to top Link to comment https://bolterandchainsword.com/topic/284441-a-new-chapter-rt-space-marines-reinforcements/page/6/#findComment-3999437 Share on other sites More sharing options...
infyrana Posted April 6, 2015 Share Posted April 6, 2015 I like it, yeah the grey blends the colours nicely. By firing post you mean prone? Makes for an awkward base ;) The best looking scout from that era is the heavy bolter and kneeling sniper! Link to comment https://bolterandchainsword.com/topic/284441-a-new-chapter-rt-space-marines-reinforcements/page/6/#findComment-3999465 Share on other sites More sharing options...
Recommended Posts
Create an account or sign in to comment
You need to be a member in order to leave a comment
Create an account
Sign up for a new account in our community. It's easy!
Register a new accountSign in
Already have an account? Sign in here.
Sign In Now