WarriorFish Posted January 5, 2016 Share Posted January 5, 2016 I recognised it right away before I read the text so it shows up fine ;) Link to comment https://bolterandchainsword.com/topic/303832-small-ig-and-scion-force/page/9/#findComment-4269531 Share on other sites More sharing options...
elmo Posted January 6, 2016 Share Posted January 6, 2016 Excellent work :) Link to comment https://bolterandchainsword.com/topic/303832-small-ig-and-scion-force/page/9/#findComment-4269803 Share on other sites More sharing options...
UltraRich Posted January 7, 2016 Author Share Posted January 7, 2016 All my bulgryn sprues came today so I couldnt resist putting this one together. It need cleaning up and filler applying to all the joints but I wanted to do the Nid shoulder pad and I think it works. I'll do a strap across to the body strap to tie it down once its all filled/sanded/dry The shields just tacked on for show at the moment. I think this works as its a throw back to ogre kingdoms but still looks 40K IMO http://i51.photobucket.com/albums/f372/rbrewster101/IMG_6206_zpswkkh7rll.jpg http://i51.photobucket.com/albums/f372/rbrewster101/IMG_6205_zpsvwo33cim.jpg WarriorFish, walter h, our_baz and 1 other 4 Back to top Link to comment https://bolterandchainsword.com/topic/303832-small-ig-and-scion-force/page/9/#findComment-4271001 Share on other sites More sharing options...
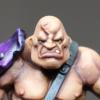
UltraRich Posted January 10, 2016 Author Share Posted January 10, 2016 I filled and base coated clubby the Bullgryn Ive tried another skin technique on this one that doesnt rely on washes but you paint the shade in from a purple/brown base upwards. If you look at the 2nd photo you can see it gives a much darker but more realistic skin tone than on the face of my 2nd Bullgryn http://i51.photobucket.com/albums/f372/rbrewster101/IMG_6213_zpsgqgxwzbv.jpg http://i51.photobucket.com/albums/f372/rbrewster101/IMG_6214_zps2rx2rybd.jpg You get so many heads and arms on the Bullgryn sprues Ive worked out a technique to get another three out out of the box with only buying three sets of legs (£7.50 gbp from bitz sites) If anyones interested I'll post a quick tutorial http://i51.photobucket.com/albums/f372/rbrewster101/IMG_6215_zps0cbkdmmp.jpg WarriorFish, Noserenda, elmo and 4 others 7 Back to top Link to comment https://bolterandchainsword.com/topic/303832-small-ig-and-scion-force/page/9/#findComment-4272823 Share on other sites More sharing options...
WarriorFish Posted January 10, 2016 Share Posted January 10, 2016 We always want tutorials ;) Guilloom 1 Back to top Link to comment https://bolterandchainsword.com/topic/303832-small-ig-and-scion-force/page/9/#findComment-4272842 Share on other sites More sharing options...
UltraRich Posted January 15, 2016 Author Share Posted January 15, 2016 (edited) Nid pad done Cheer up its Friday! http://i51.photobucket.com/albums/f372/rbrewster101/IMG_6219_zps5m5qxaiw.jpg I want to do a powered on effect on the mace but not like the minor green glow that the GW ones have I dont know if I do it white and blue though if it will be too many colours on the mini Edited January 15, 2016 by UltraRich elmo, The Ergonomic Enginseer and WarriorFish 3 Back to top Link to comment https://bolterandchainsword.com/topic/303832-small-ig-and-scion-force/page/9/#findComment-4276658 Share on other sites More sharing options...
WarriorFish Posted January 15, 2016 Share Posted January 15, 2016 I think he'll only cheer up if he gets to bash a few xenos in with his power maul ;) What about a black/metal and white on the maul? Link to comment https://bolterandchainsword.com/topic/303832-small-ig-and-scion-force/page/9/#findComment-4276664 Share on other sites More sharing options...
UltraRich Posted January 15, 2016 Author Share Posted January 15, 2016 Im thinking Hawk Turquoise / white like these power claws. It goes with blue though so im not sure about green http://i51.photobucket.com/albums/f372/rbrewster101/IMG_6226_zps6jjrat7k.jpg WarriorFish and duz_ 2 Back to top Link to comment https://bolterandchainsword.com/topic/303832-small-ig-and-scion-force/page/9/#findComment-4276670 Share on other sites More sharing options...
WarriorFish Posted January 15, 2016 Share Posted January 15, 2016 Blue can go with green usually, might be too light for the green with the purple but I think it could still work. Link to comment https://bolterandchainsword.com/topic/303832-small-ig-and-scion-force/page/9/#findComment-4276693 Share on other sites More sharing options...
UltraRich Posted January 17, 2016 Author Share Posted January 17, 2016 Im really starting to enjoy painting these guys. They have so much character (after painting 30 guard what wouldn't!!) Snow day tomorrow so might get a decent update done and the tutorial on making additional Bullgryn with the spare bits http://i51.photobucket.com/albums/f372/rbrewster101/IMG_6238_zpsd5gkvozi.jpg WarriorFish 1 Back to top Link to comment https://bolterandchainsword.com/topic/303832-small-ig-and-scion-force/page/9/#findComment-4277352 Share on other sites More sharing options...
UltraRich Posted January 17, 2016 Author Share Posted January 17, 2016 Started work on the ebay glue bomb that I bought last year I had to do a load of remodelling on the back and used some old bits Ive started to oil weather the sides only. It needs hitting with sealer so looks a bit shiny. It also looks way brighter than it is http://i51.photobucket.com/albums/f372/rbrewster101/IMG_6242_zpswq0isczl.jpg http://i51.photobucket.com/albums/f372/rbrewster101/IMG_6243_zpsndxbsbj3.jpg http://i51.photobucket.com/albums/f372/rbrewster101/IMG_6240_zpspfrs0e2u.jpg our_baz, WarriorFish, Mithrilforge and 1 other 4 Back to top Link to comment https://bolterandchainsword.com/topic/303832-small-ig-and-scion-force/page/9/#findComment-4277899 Share on other sites More sharing options...
WarriorFish Posted January 17, 2016 Share Posted January 17, 2016 Weathering looks great, good use of the Baneblade bits for the back though I have to ask what does the Baneblade have instead? librisrouge 1 Back to top Link to comment https://bolterandchainsword.com/topic/303832-small-ig-and-scion-force/page/9/#findComment-4277905 Share on other sites More sharing options...
UltraRich Posted January 17, 2016 Author Share Posted January 17, 2016 Weathering looks great, good use of the Baneblade bits for the back though I have to ask what does the Baneblade have instead? Thanks Its this. Its a kit from Blood and Skulls Industry. Its a fantastic kit once the joints are filled properly. You end up cutting the back up and centralising the turret Its just another project to finish!! http://i51.photobucket.com/albums/f372/rbrewster101/IMG_6244_zpsao8qblxt.jpg http://i51.photobucket.com/albums/f372/rbrewster101/IMG_6245_zpsokxmrlin.jpg duz_ and WarriorFish 2 Back to top Link to comment https://bolterandchainsword.com/topic/303832-small-ig-and-scion-force/page/9/#findComment-4277920 Share on other sites More sharing options...
UltraRich Posted January 18, 2016 Author Share Posted January 18, 2016 Started to highlight and decorate. Ill tie the skull into the weathering when I do the body http://i51.photobucket.com/albums/f372/rbrewster101/IMG_6252_zpsa9q4lms7.jpg CyderPirate and WarriorFish 2 Back to top Link to comment https://bolterandchainsword.com/topic/303832-small-ig-and-scion-force/page/9/#findComment-4278548 Share on other sites More sharing options...
UltraRich Posted January 23, 2016 Author Share Posted January 23, 2016 Back of the tank is now done Ive added mig pigment to the tracks so once thats dried it should look less shiny http://i51.photobucket.com/albums/f372/rbrewster101/IMG_6255_zpsb8r9bu9t.jpg The Ergonomic Enginseer, Guilloom and WarriorFish 3 Back to top Link to comment https://bolterandchainsword.com/topic/303832-small-ig-and-scion-force/page/9/#findComment-4282782 Share on other sites More sharing options...
elmo Posted January 23, 2016 Share Posted January 23, 2016 (edited) Nice work on the weathering. I have not had any experience with MIG pigments (I have Tamiya) but it seems to have worked well Are you going to try a little heat distressing on the exhausts too? The face on your Ogryn is fantastic by the way - looks like he needs a shave, don't let the Commissar see him Edited January 23, 2016 by elmo UltraRich 1 Back to top Link to comment https://bolterandchainsword.com/topic/303832-small-ig-and-scion-force/page/9/#findComment-4282843 Share on other sites More sharing options...
UltraRich Posted January 24, 2016 Author Share Posted January 24, 2016 Nice work on the weathering. I have not had any experience with MIG pigments (I have Tamiya) but it seems to have worked well Are you going to try a little heat distressing on the exhausts too? The face on your Ogryn is fantastic by the way - looks like he needs a shave, don't let the Commissar see him Thanks I did think about heat distressing but just went for soot at the top of the stack. Where would the heat marks form? At the bottom on the bends where the exhaust exits the engine or higher up? Link to comment https://bolterandchainsword.com/topic/303832-small-ig-and-scion-force/page/9/#findComment-4282924 Share on other sites More sharing options...
elmo Posted January 24, 2016 Share Posted January 24, 2016 At the bottom is where it would be hottest. duz_ and UltraRich 2 Back to top Link to comment https://bolterandchainsword.com/topic/303832-small-ig-and-scion-force/page/9/#findComment-4283168 Share on other sites More sharing options...
WarriorFish Posted January 24, 2016 Share Posted January 24, 2016 Fantastic weathering, especially on the sponson! I'm eager to see the tank finished :D UltraRich 1 Back to top Link to comment https://bolterandchainsword.com/topic/303832-small-ig-and-scion-force/page/9/#findComment-4283189 Share on other sites More sharing options...
UltraRich Posted January 24, 2016 Author Share Posted January 24, 2016 At the bottom is where it would be hottest. There you go I didnt want to over extend it up so I kept it to just the lower pipes Im onto the lenses on the turret next http://i51.photobucket.com/albums/f372/rbrewster101/IMG_6262_zpstlmnellq.jpg Toxichobbit, Son_of_D0rn, WarriorFish and 3 others 6 Back to top Link to comment https://bolterandchainsword.com/topic/303832-small-ig-and-scion-force/page/9/#findComment-4283415 Share on other sites More sharing options...
UltraRich Posted January 24, 2016 Author Share Posted January 24, 2016 Last update of the weekend Lenses are done I need to highlight the turret, pick out all the metal, finish the guns, weather the barrel and once Ive pimped this ride then paint the pimp! http://i51.photobucket.com/albums/f372/rbrewster101/IMG_6267_zpsuucm0y0q.jpg http://i51.photobucket.com/albums/f372/rbrewster101/IMG_6269_zpswcmuxk77.jpg Also managed to build another base for my heavy weapon teams.... nearly got one finished http://i51.photobucket.com/albums/f372/rbrewster101/IMG_6272_zpsqfrjxxnz.jpg Endman, CyderPirate, WarriorFish and 3 others 6 Back to top Link to comment https://bolterandchainsword.com/topic/303832-small-ig-and-scion-force/page/9/#findComment-4283594 Share on other sites More sharing options...
Guilloom Posted January 24, 2016 Share Posted January 24, 2016 You should write a few tutors about weathering and ogryns, you did an awesome work there ! ;) CyderPirate and UltraRich 2 Back to top Link to comment https://bolterandchainsword.com/topic/303832-small-ig-and-scion-force/page/9/#findComment-4283670 Share on other sites More sharing options...
Endman Posted January 25, 2016 Share Posted January 25, 2016 That Leman Russ looks great, like an actual piece of machinery. I'm a big fan of heavily-weathered vehicles over the standard GW scheme, which is far too clean for a warzone. UltraRich 1 Back to top Link to comment https://bolterandchainsword.com/topic/303832-small-ig-and-scion-force/page/9/#findComment-4283700 Share on other sites More sharing options...
WarriorFish Posted January 25, 2016 Share Posted January 25, 2016 Great bases on the HWTs :tu: Link to comment https://bolterandchainsword.com/topic/303832-small-ig-and-scion-force/page/9/#findComment-4283942 Share on other sites More sharing options...
UltraRich Posted January 25, 2016 Author Share Posted January 25, 2016 Thanks guys Im so close now no more updates until its finished! Give me a week...... duz_ 1 Back to top Link to comment https://bolterandchainsword.com/topic/303832-small-ig-and-scion-force/page/9/#findComment-4284393 Share on other sites More sharing options...
Recommended Posts
Create an account or sign in to comment
You need to be a member in order to leave a comment
Create an account
Sign up for a new account in our community. It's easy!
Register a new accountSign in
Already have an account? Sign in here.
Sign In Now