Tortura Posted June 22, 2015 Share Posted June 22, 2015 Hey guys! For a while now I've had my humble WIP thread over at the Blood Angels forums, and thought it might be fun to show my stuff (not limited to only BA) with the greater B&C community! To give you an idea of what i'm about i'll leave you with a few shots of some recent models! In the pipeline: Deredeo dread for the ETL, so watch this space for WIP content soon! BA Praetor I did for the Euro Forge World open a while back. Libby and Chappy I finished recently (for my army, not competition). Cheers! Link to comment https://bolterandchainsword.com/topic/309851-torturas-wip/ Share on other sites More sharing options...
Fenbain Posted June 22, 2015 Share Posted June 22, 2015 I've only ever seen your stuff linked in other threads but never actually run across your own thread, so I'm really excited to see the progress in this one! Needless to say it's outstanding so far. Link to comment https://bolterandchainsword.com/topic/309851-torturas-wip/#findComment-4098334 Share on other sites More sharing options...
dogfender Posted June 22, 2015 Share Posted June 22, 2015 Awesome stuff! Do share your recipes Link to comment https://bolterandchainsword.com/topic/309851-torturas-wip/#findComment-4098361 Share on other sites More sharing options...
disease Posted June 22, 2015 Share Posted June 22, 2015 hhhnngghh that's the noise i just made looking at these! seriously good stuff Link to comment https://bolterandchainsword.com/topic/309851-torturas-wip/#findComment-4098451 Share on other sites More sharing options...
AlphariusOmegon108 Posted June 22, 2015 Share Posted June 22, 2015 MY GOD, YES. Those are the best paint jobs I have seen. wow. please tell us how you got that amazing deep and crisp red. its gorgeus! Link to comment https://bolterandchainsword.com/topic/309851-torturas-wip/#findComment-4098472 Share on other sites More sharing options...
Brother Callidan Posted June 23, 2015 Share Posted June 23, 2015 Love your work man. Where is the chest from on the jump pack dude? Link to comment https://bolterandchainsword.com/topic/309851-torturas-wip/#findComment-4098745 Share on other sites More sharing options...
Tortura Posted June 23, 2015 Author Share Posted June 23, 2015 Hey guys! Here are the recipes. I use quite a few paint brands in combination but these should be easy enough to figure out using alternate colours/diff brands. The Praetor Red: Base: Mephiston Red, Wazdakka Red 1:1Shade: Base, Xereus Purple 2:1 + brush tip of black, then adding more black and purple until I had a very dark mix for the deepest shadows (about 5 additional mixes).Highlights: Base, Evil Sunz Scarlet 1:1, pure Evil Sunz, Evil Sunz, Wild Rider Red 1:1, pure Wild Rider, then White was added to Wild Rider in loads of steps, final light spots with pure white. After the highlights were done I glazed the transitions with various very diluted (10+ parts water to 1 part paint ratio) red mixes until it felt 'right'. The armour was done in an NMM style, by gradually painting smaller and narrower vertical lines as the colour turned brighter with each mix. Pairing this with really dark shadows and 'bright spots' in specific locations creates the shiny surface look. Gold: Base: Gehenna's Gold Shade: Base, Xereus Purple 2:1 + brush tip of black, then adding more black and purple until I had a very dark mix for the deepest shadows (about 5 additional mixes). Highlights: Base, adding more and more Vallejo metal medium in about 5 steps, glaze with W&N yellow ink, final light spots were done with pure metal medium. Green (gems, lenses):Base: Caliban Green, black 2:1Highlights: Caliban was gradually lightened by adding Warboss Green to the base, after which white was added up to almost pure white (loads of steps). The glow effect underneath the lense was done by carefully glazing the area with Warboss Green + white in about 3 stages. Final light spots were done with white. The Chaplain (skin, gold) Skin Base: 1:1 mix of Vallejo model air Light Grey and GW Kislev Flesh Shade: first shades were done with GW Druchii Violet wash (thinned further with water to about a 1:4 mix) Then the deeper parts of the face (under the eyes, nose, cheekbones, brow) were given touches of Army Painter red tone wash. Then the entire skin area was given a very diluted wash of GW Agrax Earthshade and water (1:5) The last shading was done by really only concentrating on the deepest parts of the skin, and around the metal/ implants, by applying Vallejo model air Burnt Umber, and finally Army Painter strong tone wash (the latter was only applied in de very deepest parts, so tiny dots rather than glazing an entire area) Highlights: I used the base mix and added more grey in about 2 stages, after which white was added in a further 2 stages for the final highlights. The scars/wounds were done by painting very fine lines with a mix of GW Mephiston red and Vallejo model air Deep Blue, after which they were underlined with pure white in specific places in order to create a '3d' look. The grey stubble on his head was done by glazing a mix of VMA Light Grey and water (3:1) in loads of steps. Gold Base: Mix of Vallejo model air Polished Gold and GW Gehenna Gold 1:1 Shade: Wash of GW Agrax Earthshade followed by a thinned wash of GW Seraphim Sepia (1:3 wash/water), followed by a glaze of thinned Vallejo model air Burnt Umber (not the whole part, concentrating on deeper parts of the model). Last shading is done with Army painter strong tone (only deepest shadows) Highlights: First the gold parts were re touched with the base mix after which more Polished Gold was added in 2 further steps (1:2, 1:3). Final highlights and little 'hot spots' were done with Vallejo Metal Medium, by placing tiny dots on edges and shadow parts in order to create a quite shiny effect. General recipes (army stuff) Red: Base: Vallejo model air black matt primer (2-3 light coats: keep them looking matt rather than wet on the surface of your piece). Red1: Vallejo model air Scarlet Red (2-3 light coats again). Shade1: Scarlet Red, VMA Burnt Umber, brush full of black 1:1:1 Shade2: Burnt Umber, black 1:1 (only deepest shadows). Highlight1: Vallejo game air Bloody red (this stage is done by spraying the colour from above the minature, creating the effect of an overhead light source). Highlight2: VGA Bloody red, GW wild rider red 1:1 (done the same as stage 1, but concentrating only on edges/ highest points of the model). Highlight3: edges are done with a 1:1 mix of wild rider/ army painter skeleton bone. (normal brush) Battle damage is then done by sponging a 1:1 mix of umber/black with a bit of blister foam, after which individual marks are underlined with the same mix used on the edges. As a last step, scorch/smoke/streak marks are done with burnt umber, black 1:2, and bare metal edges are applied with Vallejo Metal medium. That's it for now! If people have other recipe requests in the future, I'll edit/ update this post. Thanks for looking. Cheers. Link to comment https://bolterandchainsword.com/topic/309851-torturas-wip/#findComment-4099250 Share on other sites More sharing options...
MagicMan Posted June 23, 2015 Share Posted June 23, 2015 Wooooah. That painting is top notch. Consider me interested. Link to comment https://bolterandchainsword.com/topic/309851-torturas-wip/#findComment-4099267 Share on other sites More sharing options...
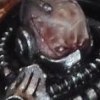
Tortura Posted June 23, 2015 Author Share Posted June 23, 2015 Love your work man. Where is the chest from on the jump pack dude? The base model for the Chaplain (I think you mean him right?) is Narik Dreygur, one of the event only models from Forge World for this year. In case you mean the libby, it's Astorath's torso and Lemartes' legs. Cheers! Link to comment https://bolterandchainsword.com/topic/309851-torturas-wip/#findComment-4099323 Share on other sites More sharing options...
AlphariusOmegon108 Posted June 23, 2015 Share Posted June 23, 2015 you sir, are a hero. Link to comment https://bolterandchainsword.com/topic/309851-torturas-wip/#findComment-4099953 Share on other sites More sharing options...
The Doctor Of War Posted June 23, 2015 Share Posted June 23, 2015 Great googly moogly those are fantastic miniatures. Link to comment https://bolterandchainsword.com/topic/309851-torturas-wip/#findComment-4100115 Share on other sites More sharing options...
Tortura Posted July 7, 2015 Author Share Posted July 7, 2015 Hey Folks! Have been making some progress on my Deredeo for the BA ETL. Plan to wrap it up in the next two days, but before I do, have some WIPS! Thanks for looking! Link to comment https://bolterandchainsword.com/topic/309851-torturas-wip/#findComment-4116224 Share on other sites More sharing options...
Vel'Cona Posted July 7, 2015 Share Posted July 7, 2015 Oh wow, that glow effect on the guns is excellent! I wish mine looked even close to that cool. The "coruscating" effect is top notch! Link to comment https://bolterandchainsword.com/topic/309851-torturas-wip/#findComment-4116341 Share on other sites More sharing options...
deathspectersgt7 Posted July 7, 2015 Share Posted July 7, 2015 Link to comment https://bolterandchainsword.com/topic/309851-torturas-wip/#findComment-4116397 Share on other sites More sharing options...
The Doctor Of War Posted July 7, 2015 Share Posted July 7, 2015 Fantastic. Link to comment https://bolterandchainsword.com/topic/309851-torturas-wip/#findComment-4116718 Share on other sites More sharing options...
Tortura Posted July 8, 2015 Author Share Posted July 8, 2015 Did some edge highlights and battle damage on the Dread. Also took a little break from painting and built him some Dragon's teeth for his base! Cheers! Link to comment https://bolterandchainsword.com/topic/309851-torturas-wip/#findComment-4117161 Share on other sites More sharing options...
Brother Heinrich Posted July 10, 2015 Share Posted July 10, 2015 Fantastic stuff dude! I love what you did with the Deredeo legs, it looks so Mechwarrior now! I Love it! Link to comment https://bolterandchainsword.com/topic/309851-torturas-wip/#findComment-4119276 Share on other sites More sharing options...
Tortura Posted July 15, 2015 Author Share Posted July 15, 2015 Finally done with this beast! On to the next project ;) Link to comment https://bolterandchainsword.com/topic/309851-torturas-wip/#findComment-4123290 Share on other sites More sharing options...
Anamnesis Posted July 23, 2015 Share Posted July 23, 2015 Very impressive stuff! will follow with interest ! Link to comment https://bolterandchainsword.com/topic/309851-torturas-wip/#findComment-4126143 Share on other sites More sharing options...
Torvak Kyre Posted July 23, 2015 Share Posted July 23, 2015 Everything here looks astounding. What did you use on the deredeo's legs if you don't mind me asking? Link to comment https://bolterandchainsword.com/topic/309851-torturas-wip/#findComment-4126375 Share on other sites More sharing options...
Tortura Posted July 24, 2015 Author Share Posted July 24, 2015 Everything here looks astounding. What did you use on the deredeo's legs if you don't mind me asking? The legs were done using 2 resin bits I found in my bitsbox that just fit really well and additional plates sculpted in Milliput. Problem is that I don´t remember where they were from originally, so writing up a tutorial won´t really be possible unfortunately. Link to comment https://bolterandchainsword.com/topic/309851-torturas-wip/#findComment-4127063 Share on other sites More sharing options...
deathspectersgt7 Posted July 24, 2015 Share Posted July 24, 2015 The best Dorito Dread I have seen + its a Blood Angel AWESOME!!!!! Link to comment https://bolterandchainsword.com/topic/309851-torturas-wip/#findComment-4127197 Share on other sites More sharing options...
Rastamarine Posted July 24, 2015 Share Posted July 24, 2015 That red is divine brother bravo!! Link to comment https://bolterandchainsword.com/topic/309851-torturas-wip/#findComment-4127256 Share on other sites More sharing options...
Recommended Posts
Archived
This topic is now archived and is closed to further replies.