Mandragola Posted February 2, 2023 Author Share Posted February 2, 2023 I’ve been playing a bit more AT, this time at a little two-game 1850 point “tournament” using the matched play book. This was the first time I’d been to an event using these missions so it was interesting to see. It was loyalist vs traitor with prizes for the best of each rather than an overall winner. the pack gave us all a choice of two primary and secondary missions for each mission, so we were all doing similar things each round. my list was a full Regia maniple. My Seniores warlord had missiles, plasma and macro Gatling, the other one had plasma, fist and Vulcans. I brought two plasma/VMB hounds and one with dual VMB. In support I had a banner of a lancer and Acheron, plus my three armiger warglaives. Game 1 was against a player who’d had to switch to traitor, so decided to bring a pretty intense Vulpa Corsair, with four dual-melee Reavers, a dire wolf and a couple of knights. This didn’t really work. Facing an opponent with basically no shooting meant that my own knights could run around freely. I used vox blackout to prevent one set of charges and a concealment barrage against another. My armigers outflanked to flush out the dire wolf, which was then shot by a couple of my hounds. There was an interesting fight between our two units of knights, where my lancer was able to beat the fancier FW knights thanks to its shield and bigger base strength, meaning I got much better ion saves, and then one of my Warlords intervened and ended the combat. The reavers got off one charge that damaged but didn’t kill a warlord, before I punched back and charged my lancer in to finish the engine off. I killed the enemy force by turn 4 for the loss of my Acheron knight and won 40:0. Oh the primary mission for both of us was to get close to the enemy board edge and secondary to kill a couple of enemy engines. This was a bit of a harsh game for my opponent. He was using his list for the first time and I’m getting quite practiced with my Astorum Regia. Personally at 1850 I’d have gone for more reavers instead of paying for loads of upgrades and mutations as he had. A Corsair’s agility counts for little if you’re out-activated. Game two was a lot tougher, though the mission was easier. We had to pick between retrieval or a thing where your Seniores had a flag to carry around, which could be Ickes up by someone else if they died. Bizarrely, due to having diagonal corner deployments, I was allowed to put my objective right by my table edge. A Warhound was able to run and get it by turn two and then immediately be removed in the end phase. My secondary was to keep two engines alive so I picked my Seniores and that warhound, meaning I scored 30 points when it left, without any real involvement from my opponent. My opponent had a Fortis maniple with an added warhound. Tracking gyros on the two warlords and shooty load-outs all round. In terms of the actual battle, things didn’t go too well at first. I tried to rush forward with my melee warlord but it got killed in turn one thanks to rolling a lot of 2s for shield saves, removing the shields from two of my warhounds in the process. I did manage to get my two knight banners around the sides, forcing the two enemy reavers to disengage and turn to deal with them. It wasn’t especially helpful to have my objective-carrying warhound leave, as I was then down on activations. I did some repairing so my Seniores and one hound in the centre were able to hold out and actually killed the enemy Seniores, though sadly its magazine detonated and all my knights, who were perfectly placed to tear into the back of the enemy, died! An enemy reaver picked up the flag on the second attempt, after one died trying. In the end I had my Seniores and a hound facing off against the remaining warlord and hound, but I’d done my objectives to get retrieve the crew (who could have just walked home from where they were) and keep my chosen two engines alive. My opponent only partially scored his two objectives so it finished 40:20 to me. My 80 points meant I actually won another little addition to the trophy cabinet* The organisers asked people to bring terrain, though only on a Facebook message which I didn’t see. This prompted me to do a bit of work on my own terrain collection, which has been languishing semi-painted in a box. Last night I splashed some contrast on these things and filled some massive seams on the statues. There’s a lot to do on these still but I think I’ll have a decent collection in the end. General Zodd, malika666, LameBeard and 6 others 9 Back to top Link to comment https://bolterandchainsword.com/topic/353158-mandragola%E2%80%99s-legio-astorum-and-mortis-and-stuff/page/34/#findComment-5905986 Share on other sites More sharing options...
Master Ciaphas Posted February 2, 2023 Share Posted February 2, 2023 Looks great, Mand! Good start on the terrain - and thanks for sharing the battles! Good job on the wins! Mandragola 1 Back to top Link to comment https://bolterandchainsword.com/topic/353158-mandragola%E2%80%99s-legio-astorum-and-mortis-and-stuff/page/34/#findComment-5905993 Share on other sites More sharing options...
Mandragola Posted February 2, 2023 Author Share Posted February 2, 2023 Thanks. I did actually finish a few buildings quite a while ago but only a bit less than half of them are finished. This hasn't stopped me using the stuff and I have filled a 6x4 board, with a nice ruined city battlemat. I've also got a few plans for future things to build. This does mean that I can see a situation where I'd have a nice collection of terrain, which would be a very cool thing. Link to comment https://bolterandchainsword.com/topic/353158-mandragola%E2%80%99s-legio-astorum-and-mortis-and-stuff/page/34/#findComment-5906054 Share on other sites More sharing options...
Sword Brother Adelard Posted February 5, 2023 Share Posted February 5, 2023 The retrieval objective with that corner deployment is a bit of an issue. It's bizarre that the marker doesn't have to be placed X inches from a board edge like a lot of the other missions. But you should still have had to get it back 24"? Link to comment https://bolterandchainsword.com/topic/353158-mandragola%E2%80%99s-legio-astorum-and-mortis-and-stuff/page/34/#findComment-5906886 Share on other sites More sharing options...
Mandragola Posted February 6, 2023 Author Share Posted February 6, 2023 (edited) On 2/5/2023 at 9:28 AM, Sword Brother Adelard said: The retrieval objective with that corner deployment is a bit of an issue. It's bizarre that the marker doesn't have to be placed X inches from a board edge like a lot of the other missions. But you should still have had to get it back 24"? Yeah this was a problem. I haven't actually read it back to see how it's meant to work but "not like that" is my bet. Edit: I have now read the mission and the first line says the objective has to be placed "along the horizontal centre line" of the board. So basically the TO's ruling on the day wasn't correct and the mission is mostly ok. I say "mostly", because some deployments let you set up pretty close, where you could realistically pick the objective up on T1, but at least then you'd have to run back 24" with the thing. It's perhaps worth mentioning that the stratagem (whose name I forget) that lets you move an objective D6" is far, far better than it might initially seem. In matched play events it can be well worth having in your hand I think, for cases like this. It can easily mean it takes the enemy one or even two more turns to accomplish their objective in games like Retrieval. Not an auto-take but well worth considering. Edited February 6, 2023 by Mandragola Sword Brother Adelard 1 Back to top Link to comment https://bolterandchainsword.com/topic/353158-mandragola%E2%80%99s-legio-astorum-and-mortis-and-stuff/page/34/#findComment-5907496 Share on other sites More sharing options...
Sword Brother Adelard Posted February 6, 2023 Share Posted February 6, 2023 There was a big discussion on Maximal Fire's discord as to whether a player's Battlefield Edge is where their deployment zone touches the board edge, or whether it's the whole of the horizontal edge, even where the deployment zone doesn't touch part of it. I reckon it must be the latter, as otherwise some of the objectives just don't work. Also, Defend and Extract has an error and is presently RAW impossible to max out. I feel like Stratagem Hands are going to cause a big change in the appearance of random niche strats like the objective moving one. I think they work better for events than one off games however. Link to comment https://bolterandchainsword.com/topic/353158-mandragola%E2%80%99s-legio-astorum-and-mortis-and-stuff/page/34/#findComment-5907518 Share on other sites More sharing options...
General Zodd Posted February 6, 2023 Share Posted February 6, 2023 The stratagem is False Intel for anyone interested, and having used it on occasion even before the introduction of Stratagem hands, I can thoroughly recommend it! Link to comment https://bolterandchainsword.com/topic/353158-mandragola%E2%80%99s-legio-astorum-and-mortis-and-stuff/page/34/#findComment-5907530 Share on other sites More sharing options...
Mandragola Posted February 7, 2023 Author Share Posted February 7, 2023 They do need to define what counts as your board edge. At the same event they ruled it was the edges of your deployment zone. I think it’s intended to be the actual edge of the board facing you, but that’s based on other games, not AT. In one game, with a DZ only on one side of the board, this meant enemy knights could outflank right in front of me. They didn’t really matter as I had a warlord pointed at them, and actually the way I’d have played it would have let the knights deploy right behind it, far inside my DZ. General Zodd 1 Back to top Link to comment https://bolterandchainsword.com/topic/353158-mandragola%E2%80%99s-legio-astorum-and-mortis-and-stuff/page/34/#findComment-5907643 Share on other sites More sharing options...
Sword Brother Adelard Posted February 7, 2023 Share Posted February 7, 2023 The neutral board edge is actually defined in the rulebook, just in the maps, not the words. It's any part of the non player edges not in a player's deployment zone. I'll try and find MF's maps with definitions. Link to comment https://bolterandchainsword.com/topic/353158-mandragola%E2%80%99s-legio-astorum-and-mortis-and-stuff/page/34/#findComment-5907678 Share on other sites More sharing options...
Sword Brother Adelard Posted February 7, 2023 Share Posted February 7, 2023 This is what Twisted Titanicus used weekend just gone: Only one players side is defined, the opponent would mirror, Red is the player's Battlefield Edge, the green is the neutral flank, blue horizontal objective line. Mandragola 1 Back to top Link to comment https://bolterandchainsword.com/topic/353158-mandragola%E2%80%99s-legio-astorum-and-mortis-and-stuff/page/34/#findComment-5907684 Share on other sites More sharing options...
Mandragola Posted February 8, 2023 Author Share Posted February 8, 2023 That's helpful. It would be worth sending to the writers so they can put it into a FAQ, because the RAW is unclear. The text says that the maps highlight the battlefield edges that are relevant to missions, but then there's nothing on the maps themselves. And it's also helpful to define where outflankers can come on. Sword Brother Adelard, General Zodd and Oxydo 3 Back to top Link to comment https://bolterandchainsword.com/topic/353158-mandragola%E2%80%99s-legio-astorum-and-mortis-and-stuff/page/34/#findComment-5908172 Share on other sites More sharing options...
Sword Brother Adelard Posted February 8, 2023 Share Posted February 8, 2023 I emailed them for an FAQ, and asked the chat bot team to ask them too, and I know others have as well. May happen one day? It's almost becoming a customer services issue, not just a rules issue. Mandragola 1 Back to top Link to comment https://bolterandchainsword.com/topic/353158-mandragola%E2%80%99s-legio-astorum-and-mortis-and-stuff/page/34/#findComment-5908202 Share on other sites More sharing options...
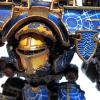
Mandragola Posted April 2, 2023 Author Share Posted April 2, 2023 I’ve made quite a bit of progress with my big dog. It’s now battle ready and has participated in five games at an event in Brighton. it did pretty well. It made it through four games barely damaged and killed many heretics (though never quite caused a vehicle to explode) but then suffered an unfortunate Horus-related accident. I ended up drawing that game and finished 3-1-1, surprisingly with the “best loyalist” prize. I quite like this photo, from a game against night lords. The pub’s lighting provides a suitably apocalyptic ambience. Interrogator Stobz, Trokair, Xenith and 5 others 6 2 Back to top Link to comment https://bolterandchainsword.com/topic/353158-mandragola%E2%80%99s-legio-astorum-and-mortis-and-stuff/page/34/#findComment-5928258 Share on other sites More sharing options...
Sword Brother Adelard Posted April 2, 2023 Share Posted April 2, 2023 "Oh Lawd he comin!" Interrogator Stobz and Oxydo 1 1 Back to top Link to comment https://bolterandchainsword.com/topic/353158-mandragola%E2%80%99s-legio-astorum-and-mortis-and-stuff/page/34/#findComment-5928310 Share on other sites More sharing options...
Lord_Borak Posted April 3, 2023 Share Posted April 3, 2023 He's one pretty looking boy. Have you used an airbrush or brushwork on him? Link to comment https://bolterandchainsword.com/topic/353158-mandragola%E2%80%99s-legio-astorum-and-mortis-and-stuff/page/34/#findComment-5928992 Share on other sites More sharing options...
Mandragola Posted April 3, 2023 Author Share Posted April 3, 2023 2 hours ago, Lord_Borak said: He's one pretty looking boy. Have you used an airbrush or brushwork on him? Just a brush. To be honest I could improve the blending quite a bit. It looks good at table distance though and I'm happy with the colours. Lord_Borak 1 Back to top Link to comment https://bolterandchainsword.com/topic/353158-mandragola%E2%80%99s-legio-astorum-and-mortis-and-stuff/page/34/#findComment-5929048 Share on other sites More sharing options...
Interrogator Stobz Posted April 5, 2023 Share Posted April 5, 2023 Looks Awesome Brother! Mandragola 1 Back to top Link to comment https://bolterandchainsword.com/topic/353158-mandragola%E2%80%99s-legio-astorum-and-mortis-and-stuff/page/34/#findComment-5930161 Share on other sites More sharing options...
Mandragola Posted January 9, 2024 Author Share Posted January 9, 2024 I got to play a couple of games of Titanicus at the weekend, which was awesome. It was my first event since our second child arrived in August. Two games at 2250 points threw me right back in at the deep end. Since I’d last played we’ve had the new guns from LI appear and I also hadn’t yet used conversion beamers - despite picking them up at WHFest in May last year. I built a battleforce to try these out with a couple of swarmer missile pods, one shudder missile pod and a couple of the smaller beamers in a Venator maniple, led by Lucius Praetorian the special Astorum Reaver. I also brought a much more standard Regia maniple. Everything but the Warlords had bastion shielding and the warlord with apocs had gyros. the hound on the left is new and finally battle-ready. I think it’s running pose has come out well - quite like my full-sized one. I’ll try to finish it and get some proper photos one day… Game 1 was against Laniaskara with loads of mutations. It was a very modified scenario in which the Loyalists had crashed out of the warp and emergency dropped on the planet, much to the surprise of the traitors who were all in shut down. This meant loyalists deep strikes down in random order between turns 1-3, facing in a random direction, while the traitors fired up their reactors and shields. It definitely helped speed up the game! I only had a warhound appear on turn 1, luckily behind a building, while the traitors really struggled to fire up their reactors. They had to pass a command check and corrupted engines had to roll 2 dice and pick the worst due to the warp storm. Only an uncorrupted warhound fired up. This was how things looked around turn 3 once everything had arrived. Over the next couple of turns the rest of my stuff arrived, scattered all over the place. I was fairly lucky with scattering except for my melee warlord, which scattered towards a pair of enemy warhounds and obligingly faced side on, giving them a pretty easy kill. I also lost my first Warhound to some lancers that came on from the flank behind it. Meanwhile though my own guns got to work on the enemy titans, which had few shields if any due to starting shut down. I managed to take down all the enemy engines apart from that in-corrupted warhound, which escaped. A convincing win for Astorum and quite a fun scenario. The second game was a bit more straightforward. I was up against a Fureans Fortis maniple with an extra warhound. We just had to kill each other but the traitors all started with orange reactors, while I had to roll a D10 whenever I fired a gun, permanently running out of ammo on a 1. Here’s our deployment. This was a better test for the new guns. I squadroned the Venator hounds and parked them on the back line and first fired them most of the game. Their swarmer missiles knocked down a lot of shields, which gave the reaver a fair number of conversion beamer shots at things. Lucius Praetorian was able to manage the heat generated by this. The beamer hound itself went orange and I greedily didn’t put it on repair orders, which meant it took quite a bit of damage - lesson learned! Meanwhile my Regia maniple did what it does, tanking the midfield and gradually wearing down the enemy maniple. Nothing died for the first couple of turns but in turn three the enemy maniple mostly exploded. At one point an enemy reaver charged my clawlord, did no damage to me with its chainfist and got destroyed by my return attack. Overall then this game went entirely according to plan, except that it took a long time to play. Nothing dying for two turns meant we didn’t lose any activations and the game didn’t speed up, as it usually does. It was lots of fun though and the result was pretty clear at the end of turn 3, with only 3 engines left to fact my battlegroup. I only had one titan run out of ammo, though it was my missile warhound and it lost both of its guns, which was awkward. It was great to get the titans out again. This remains my favourite GW game and I really hope they continue to support it. Spazmolytic, DuskRaider, Interrogator Stobz and 6 others 5 4 Back to top Link to comment https://bolterandchainsword.com/topic/353158-mandragola%E2%80%99s-legio-astorum-and-mortis-and-stuff/page/34/#findComment-6014551 Share on other sites More sharing options...
Master Ciaphas Posted January 10, 2024 Share Posted January 10, 2024 Thank you for the reports, Mandra! Lovely pictures and lovely to see a fellow Astorum player's titans! The running poses and the paint jobs are amazing! Kudos! Mandragola 1 Back to top Link to comment https://bolterandchainsword.com/topic/353158-mandragola%E2%80%99s-legio-astorum-and-mortis-and-stuff/page/34/#findComment-6014696 Share on other sites More sharing options...
Tar Aldarion Posted January 10, 2024 Share Posted January 10, 2024 Uh, congratulations on your reproduction! Two is a good number in that regard. And thanks for the reports. Sounds fun, especially the first scenario must have been total chaos. Do I understand it right that the traitors started on shutdown orders? That must have helped a lot, as Laniaskera tend to hit quite hard in my experience. I'm also yet to field all the new weapons. Did the swarmers debut in dual on one hound? Link to comment https://bolterandchainsword.com/topic/353158-mandragola%E2%80%99s-legio-astorum-and-mortis-and-stuff/page/34/#findComment-6014717 Share on other sites More sharing options...
Mandragola Posted January 10, 2024 Author Share Posted January 10, 2024 The traitors did indeed start shut down but the loyalists were off the board. I had to roll a 5+ to have them arrive in turn 1, 3+ in turn 2 and they were automatic on turn 3. When they arrived I could place them but they then scattered D6" and faced a random direction - which was their move for that turn. As such most of the traitor engines were active before I could hit them. I went with a swarmer pod on each of the venator hounds. One had shudder missiles on the other arm and the other had a conversion beamer. This meant I could first fire them and fire the two shudder pods if I wanted, but I also had options to do damage or slow things. The shudder missiles were useful in game 2 to slow down my opponent's brawler warlord, keeping it out of range for a turn. The 40" range is interesting. It's double what a VMB has but you lose a shot and the +1 for short range. VMB is still a great option when you're up close but swarmers let you stay back and first fire, so you live longer and probably put out more shots in total. They're less accurate though and you can't do the VMB's trick of getting +1 to hit at close range for targeted shots. Actually you get -1 to hit within 12". Even so they do work as finishers, especially against targets in the open. I found that 40" range was just enough to reach targets deployed 8" onto the board, once you included the size of the warhounds' bases. LameBeard, Master Ciaphas, Tar Aldarion and 1 other 4 Back to top Link to comment https://bolterandchainsword.com/topic/353158-mandragola%E2%80%99s-legio-astorum-and-mortis-and-stuff/page/34/#findComment-6014721 Share on other sites More sharing options...
Mandragola Posted April 4, 2024 Author Share Posted April 4, 2024 I’ve made a start on a few engines for Legions Imperialis. My plan is to do some Ignatum engines. There might not be all that many for now. This Warlord is the engine I expect to use most. I actually got hold of this model in a Grand Master Edition box. You could argue that I didn’t strictly need this, but here we are anyway. It’ll let me build some smaller buildings for LI and Warlords are awesome. Some more of the ruin bits and perhaps a dead Questoris will be added to this guy’s base at some point soon. Also due to buying loads of LI stuff I find I now have tons of unbuilt Warhounds. I’ve no idea what I’ll do with them. Audax is the obvious choice but Solaria could also be good. Something a bit more unusual like Lysander might also be fun. I don’t know what to do with my other Warlord. I could use it in a Solaria Dominus maniple with some of my many unbuilt knights or maybe build some corrupted engines for my Mortis. I’ve also got a reaver and warbringer on sprue, though those might be good for LI. And there are also the new plastic dire wolves to consider… though they’re not my favourite so I might skip those for now. Noserenda, LameBeard and Interrogator Stobz 3 Back to top Link to comment https://bolterandchainsword.com/topic/353158-mandragola%E2%80%99s-legio-astorum-and-mortis-and-stuff/page/34/#findComment-6032080 Share on other sites More sharing options...
Sword Brother Adelard Posted April 5, 2024 Share Posted April 5, 2024 With the plethora of claws, and claw parts on the new sprue, Audax is a supreme choice for a glut of hounds I think. They're also super easy to paint. Mandragola 1 Back to top Link to comment https://bolterandchainsword.com/topic/353158-mandragola%E2%80%99s-legio-astorum-and-mortis-and-stuff/page/34/#findComment-6032240 Share on other sites More sharing options...
Mandragola Posted April 5, 2024 Author Share Posted April 5, 2024 4 hours ago, Sword Brother Adelard said: With the plethora of claws, and claw parts on the new sprue, Audax is a supreme choice for a glut of hounds I think. They're also super easy to paint. They’re easy, true. But I’m not a huge fan of them, I think several others will probably do them and I have some non-warhound engines to play with. I’ll do something else. Some progress to report on the warlord. I’ve added a dead Questoris to the base, along with some more ruins, for a result I’m pretty happy with so far. Since taking this I’ve also gone over the toe joints and a few other areas to fill gaps. Were ready for spraying now. I really like the LI ruin set but one issue is that the base is sort of hollow when you look at it from the back. More GS has gone into filling the overhanging bit you can see here. It’s probably necessary for some reason but it’s a bit annoying. I’m not sure what load-out this guy should have. I’ve got a Grav arm spare and I might paint up some laser blasters for it I guess, though I’m not sure they’d see much use. This set up will probably do fine I think. Noserenda and LameBeard 2 Back to top Link to comment https://bolterandchainsword.com/topic/353158-mandragola%E2%80%99s-legio-astorum-and-mortis-and-stuff/page/34/#findComment-6032292 Share on other sites More sharing options...
Lord_Borak Posted April 23, 2024 Share Posted April 23, 2024 Poor little guy.... Nice work on repositioning the Warlords toes. Mandragola 1 Back to top Link to comment https://bolterandchainsword.com/topic/353158-mandragola%E2%80%99s-legio-astorum-and-mortis-and-stuff/page/34/#findComment-6036260 Share on other sites More sharing options...

Recommended Posts
Create an account or sign in to comment
You need to be a member in order to leave a comment
Create an account
Sign up for a new account in our community. It's easy!
Register a new accountSign in
Already have an account? Sign in here.
Sign In Now