jimbo1701 Posted February 4 Author Share Posted February 4 3 minutes ago, Dr_Ruminahui said: He turned out great - I particularly like how you did his shield. thanks. The shield was an afterthought tbh. I wanted it black but then figured a marbled look would be a bit less bland seeing as the armour is all black. Never painted marble before so I just looked at some images and used as manage shades of grey as I had to try and mimic it. I think it looks ok for a first attempt but would like to try it out again sometime. Dr_Ruminahui, ZeroWolf and Firedrake Cordova 3 Back to top Link to comment https://bolterandchainsword.com/topic/369161-jimbos-plog-armies-of-all-shapes-and-sizes/page/11/#findComment-6092641 Share on other sites More sharing options...
Rusted Boltgun Posted February 4 Share Posted February 4 That shield does look smart. I'm particularly enamoured of his ribs - I'll borrow that idea and put a slight twist on it for my version of the model, if I may! jimbo1701 1 Back to top Link to comment https://bolterandchainsword.com/topic/369161-jimbos-plog-armies-of-all-shapes-and-sizes/page/11/#findComment-6092643 Share on other sites More sharing options...
jimbo1701 Posted February 4 Author Share Posted February 4 7 minutes ago, Rusted Boltgun said: That shield does look smart. I'm particularly enamoured of his ribs - I'll borrow that idea and put a slight twist on it for my version of the model, if I may! Be my guest. I just filled them in white, put the red contrast (blood angels or Baal red I think) in the recesses then tidied up the black after. ZeroWolf, Firedrake Cordova and Rusted Boltgun 3 Back to top Link to comment https://bolterandchainsword.com/topic/369161-jimbos-plog-armies-of-all-shapes-and-sizes/page/11/#findComment-6092645 Share on other sites More sharing options...
ZeroWolf Posted February 4 Share Posted February 4 That shield looks really well done, good job. It looks great even considering it's a first attempt. Firedrake Cordova and jimbo1701 1 1 Back to top Link to comment https://bolterandchainsword.com/topic/369161-jimbos-plog-armies-of-all-shapes-and-sizes/page/11/#findComment-6092648 Share on other sites More sharing options...
Firedrake Cordova Posted February 5 Share Posted February 5 He came out very nicely, and the magnetising works great by the looks of it. As for the pile of shame ... put it in the hands of the Emperor and randomise it with dice? jimbo1701 and ZeroWolf 1 1 Back to top Link to comment https://bolterandchainsword.com/topic/369161-jimbos-plog-armies-of-all-shapes-and-sizes/page/11/#findComment-6092705 Share on other sites More sharing options...
jimbo1701 Posted February 18 Author Share Posted February 18 Hi all. Not much assembly of late instead I’ve actually got a game lined up (!) my first in a fair while. I’ve grabbed my second codex of the edition in the form of aeldari, probably my favourite 40K army. I have an old alaitoc army which is complete but has a few things outstanding I want to finish for it. I’ve taken about half those things and built them into a list to incentivise me to paint them before the game in about 10 days time. I need to finish my viper and war walker as well as some weapon options for various vehicles, then touch up some characters and paint some aspect / shroud runner squads. I’ve already upgraded my shining spear (exodite proxy) exarch with a shuriken cannon and upgraded 2 windriders to join the third in mounting one. Great fun to get these guys out again and really looking forward to a game with them. Rusted Boltgun, Grotsmasha, Wormwoods and 2 others 5 Back to top Link to comment https://bolterandchainsword.com/topic/369161-jimbos-plog-armies-of-all-shapes-and-sizes/page/11/#findComment-6095718 Share on other sites More sharing options...
Firedrake Cordova Posted February 19 Share Posted February 19 Alaitoc are probably my favourite craftworld, colourscheme-wise ... the jet bikes look good jimbo1701 1 Back to top Link to comment https://bolterandchainsword.com/topic/369161-jimbos-plog-armies-of-all-shapes-and-sizes/page/11/#findComment-6095751 Share on other sites More sharing options...
jimbo1701 Posted February 19 Author Share Posted February 19 8 hours ago, Firedrake Cordova said: Alaitoc are probably my favourite craftworld, colourscheme-wise ... the jet bikes look good Mine too. I’ll try to get a decent set of photos when they’re done. Here’s one from a while back with many of the units in the army. W.A.Rorie, Bouargh, Dr_Ruminahui and 5 others 5 3 Back to top Link to comment https://bolterandchainsword.com/topic/369161-jimbos-plog-armies-of-all-shapes-and-sizes/page/11/#findComment-6095828 Share on other sites More sharing options...
jimbo1701 Posted February 23 Author Share Posted February 23 (edited) On track to get things done for next weeks game. Chipping away an hour a night is paying off. These chaps just need some varnish now. Update. Small group shot sans things still on the painting desk and vehicles Edited February 23 by jimbo1701 Firedrake Cordova, Rusted Boltgun, W.A.Rorie and 1 other 3 1 Back to top Link to comment https://bolterandchainsword.com/topic/369161-jimbos-plog-armies-of-all-shapes-and-sizes/page/11/#findComment-6096427 Share on other sites More sharing options...
Firedrake Cordova Posted February 23 Share Posted February 23 The mottling on the jet bike works really nicely The yellow on the Guardian helmets looks like quite a nice tone, too jimbo1701 1 Back to top Link to comment https://bolterandchainsword.com/topic/369161-jimbos-plog-armies-of-all-shapes-and-sizes/page/11/#findComment-6096458 Share on other sites More sharing options...
jimbo1701 Posted February 27 Author Share Posted February 27 Creeping closer! Might get it all done by the time the game comes around. Firedrake Cordova, SvenIronhand, Tallarn Commander and 1 other 4 Back to top Link to comment https://bolterandchainsword.com/topic/369161-jimbos-plog-armies-of-all-shapes-and-sizes/page/11/#findComment-6097311 Share on other sites More sharing options...
jimbo1701 Posted March 2 Author Share Posted March 2 Painting right up to the 11th hour had a great game today and won 70:48. Have tried to take some reasonable photos of the 2k army, some close ups of some of the new units added and the whole army in its boxes. Determined to get it finished before the end of the edition! Grotsmasha, Tallarn Commander, W.A.Rorie and 3 others 6 Back to top Link to comment https://bolterandchainsword.com/topic/369161-jimbos-plog-armies-of-all-shapes-and-sizes/page/11/#findComment-6098074 Share on other sites More sharing options...
Firedrake Cordova Posted March 3 Share Posted March 3 They look great, although the shots of them in their box need to be marked as NSFW - all I can think of is chipping jimbo1701 and Dr_Ruminahui 1 1 Back to top Link to comment https://bolterandchainsword.com/topic/369161-jimbos-plog-armies-of-all-shapes-and-sizes/page/11/#findComment-6098119 Share on other sites More sharing options...
jimbo1701 Posted March 3 Author Share Posted March 3 19 minutes ago, Firedrake Cordova said: They look great, although the shots of them in their box need to be marked as NSFW - all I can think of is chipping Indeed, I am seeking a much better storage solution now the collection has grown, maybe magnetic. Firedrake Cordova 1 Back to top Link to comment https://bolterandchainsword.com/topic/369161-jimbos-plog-armies-of-all-shapes-and-sizes/page/11/#findComment-6098129 Share on other sites More sharing options...
jimbo1701 Posted March 4 Author Share Posted March 4 Though aside from the characters / hawks all the infantry are carefully laid out in another box at present for exactly that reason but the pic wouldn’t upload due to size. (Deep breaths) Firedrake Cordova 1 Back to top Link to comment https://bolterandchainsword.com/topic/369161-jimbos-plog-armies-of-all-shapes-and-sizes/page/11/#findComment-6098245 Share on other sites More sharing options...
jimbo1701 Posted March 16 Author Share Posted March 16 Hi all. Still here. Took a brief hiatus from painting but have been putting a few Krieg bits together. Put these guys on the painting desk for now. Emperors children test models, the accursed drop pod (trying to get painted for a game in 2 weeks) and alaitoc / exodites bright stallion knight. Need to work out how to magnetise the arms, thinking square magnets might be an option to keep the arms in place. phandaal, W.A.Rorie, Firedrake Cordova and 3 others 4 2 Back to top Link to comment https://bolterandchainsword.com/topic/369161-jimbos-plog-armies-of-all-shapes-and-sizes/page/11/#findComment-6100162 Share on other sites More sharing options...
Grotsmasha Posted March 16 Share Posted March 16 6 minutes ago, jimbo1701 said: Need to work out how to magnetise the arms, thinking square magnets might be an option to keep the arms in place. I recommend grabbing some brass rod and adding a pin above the magnet. The magnet will provide the hold and the pin will prevent rotation. First fit your magnets, and then once they're set, drill the hole for the pin against the magnet, this will make the alignment a snap. jimbo1701 and Firedrake Cordova 1 1 Back to top Link to comment https://bolterandchainsword.com/topic/369161-jimbos-plog-armies-of-all-shapes-and-sizes/page/11/#findComment-6100163 Share on other sites More sharing options...
jimbo1701 Posted March 16 Author Share Posted March 16 4 minutes ago, Grotsmasha said: I recommend grabbing some brass rod and adding a pin above the magnet. The magnet will provide the hold and the pin will prevent rotation. First fit your magnets, and then once they're set, drill the hole for the pin against the magnet, this will make the alignment a snap. I did try this his years ago on a different project but didn’t do a very good job of it. Maybe I will give it another go thanks. Grotsmasha 1 Back to top Link to comment https://bolterandchainsword.com/topic/369161-jimbos-plog-armies-of-all-shapes-and-sizes/page/11/#findComment-6100165 Share on other sites More sharing options...
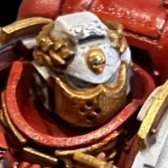
Firedrake Cordova Posted March 16 Share Posted March 16 I like how the Noise Marine is coming along jimbo1701 1 Back to top Link to comment https://bolterandchainsword.com/topic/369161-jimbos-plog-armies-of-all-shapes-and-sizes/page/11/#findComment-6100202 Share on other sites More sharing options...
Rusted Boltgun Posted March 16 Share Posted March 16 The noise marine looks fab but the red on the drop pod looks really good! I've got one part-assembled so feel your pain. Courage and honour, Frater - you'll get there! Firedrake Cordova and jimbo1701 1 1 Back to top Link to comment https://bolterandchainsword.com/topic/369161-jimbos-plog-armies-of-all-shapes-and-sizes/page/11/#findComment-6100244 Share on other sites More sharing options...
jimbo1701 Posted March 27 Author Share Posted March 27 Almost there! Just need to highlight around the chipping now and I think she’s ready to spray. Do t know if I’ve done a decent job with the weathering but went a bit more than I normally would as these things have dropped from orbit so shouldn’t look factory fresh. Annoyingly much of the detail won’t even be seen in game as it’s on the outer doors. W.A.Rorie, Dr_Ruminahui, Blissful Brushes and 2 others 5 Back to top Link to comment https://bolterandchainsword.com/topic/369161-jimbos-plog-armies-of-all-shapes-and-sizes/page/11/#findComment-6102278 Share on other sites More sharing options...
jimbo1701 Posted March 28 Author Share Posted March 28 The boys will get their first outing of 2025 tomorrow. Wish me luck! Finally finished the dreaded drop pod (in time for GW to update them according to Valrak) so fingers crossed can move onto painting a more exciting unit soon. Terminatorinhell, Rusted Boltgun, W.A.Rorie and 2 others 1 4 Back to top Link to comment https://bolterandchainsword.com/topic/369161-jimbos-plog-armies-of-all-shapes-and-sizes/page/11/#findComment-6102570 Share on other sites More sharing options...
Firedrake Cordova Posted March 29 Share Posted March 29 They look great together in the photos - I'm sure an army on the table top is going to look awesome On 3/27/2025 at 8:32 PM, jimbo1701 said: Annoyingly much of the detail won’t even be seen in game as it’s on the outer doors. You mean you don't descend them from head height making whooshing noises, and slowly open the doors when deploying them..?! jimbo1701 and Dr_Ruminahui 2 Back to top Link to comment https://bolterandchainsword.com/topic/369161-jimbos-plog-armies-of-all-shapes-and-sizes/page/11/#findComment-6102625 Share on other sites More sharing options...
jimbo1701 Posted March 29 Author Share Posted March 29 9 hours ago, Firedrake Cordova said: They look great together in the photos - I'm sure an army on the table top is going to look awesome You mean you don't descend them from head height making whooshing noises, and slowly open the doors when deploying them..?! But of course, but too fast to take in the detail. Have some photos but too large to upload if anyone knows an easy iPhone friendly solution? Firedrake Cordova and Rusted Boltgun 2 Back to top Link to comment https://bolterandchainsword.com/topic/369161-jimbos-plog-armies-of-all-shapes-and-sizes/page/11/#findComment-6102670 Share on other sites More sharing options...
jimbo1701 Posted April 15 Author Share Posted April 15 (edited) Hi all. Working on some bases for emperors children at present. Using the marbling technique. A few practice runs and I think I’ve settled on the best way to do it at scale. in other news of course Gw are releasing a new drop pod model after I spent months agonizing over painting one. Edited April 15 by jimbo1701 Tallarn Commander, Kurgan the Lurker, Rusted Boltgun and 4 others 5 2 Back to top Link to comment https://bolterandchainsword.com/topic/369161-jimbos-plog-armies-of-all-shapes-and-sizes/page/11/#findComment-6105354 Share on other sites More sharing options...
Recommended Posts
Create an account or sign in to comment
You need to be a member in order to leave a comment
Create an account
Sign up for a new account in our community. It's easy!
Register a new accountSign in
Already have an account? Sign in here.
Sign In Now