bigtrouble Posted March 5, 2022 Author Share Posted March 5, 2022 Here’s the first two sets of light gray edge highlights, and highlighting rivets, etc. I also started painting the chapter badge wings white, which I’m very glad I did, and painting the knee pad white. Still not certain what I’m putting there, but probably the crossed keys from the original forge world paint job. Link to comment https://bolterandchainsword.com/topic/373387-dark-angels-contemptor-project/page/2/#findComment-5802078 Share on other sites More sharing options...
bigtrouble Posted March 6, 2022 Author Share Posted March 6, 2022 Started doing some small color tests on the metal trim. I have 4 colors of metallic here, a copper, bronze/gold, and bright gold, as well as silver. Each of the other metals is mixed about 50:50 with silver to lighten it. I don’t want the metal trim to be super saturated against the bone base color. I started with small patches under the shins, but couldn’t see enough color contrast, so I did some of the trim on the side then added washes to see how the details would look. Lastly I painted a small section with the gold that I think I’ll be using. I’m not sold on any of these colors yet, so I may do the color test again in another area. Pearson73 and Valkia the Bloody 2 Back to top Link to comment https://bolterandchainsword.com/topic/373387-dark-angels-contemptor-project/page/2/#findComment-5802173 Share on other sites More sharing options...
Pearson73 Posted March 6, 2022 Share Posted March 6, 2022 I actually think a mix of the gold and silver could work! The picture of the lower leg with the volume detailing in gold, trim in silver, looks great. bigtrouble 1 Back to top Link to comment https://bolterandchainsword.com/topic/373387-dark-angels-contemptor-project/page/2/#findComment-5802200 Share on other sites More sharing options...
bigtrouble Posted March 7, 2022 Author Share Posted March 7, 2022 The gold trim is on, and I think it looks great so far. It needs a wash to tone down the brightness a bit. Right now it looks like the Mardi Gras robot. It’s here to party! Grotsmasha 1 Back to top Link to comment https://bolterandchainsword.com/topic/373387-dark-angels-contemptor-project/page/2/#findComment-5802393 Share on other sites More sharing options...
bigtrouble Posted March 8, 2022 Author Share Posted March 8, 2022 I did some testing on which wash to use on the gold trim before proceeding. I picked two less visible parts to test side by side, and used a Strong Tone, which is a deeper sepia color, and Soft Tone, which is what is used on the bone armor and is a light brown. One leg in the first photo of each, and in the second photo one half of the trim in each. Hard to tell from the photos maybe, but the Strong Tone wins. It produces a stronger shadow and more rich color. Link to comment https://bolterandchainsword.com/topic/373387-dark-angels-contemptor-project/page/2/#findComment-5802806 Share on other sites More sharing options...
bigtrouble Posted March 8, 2022 Author Share Posted March 8, 2022 WIP so far, with all the gold trim, the shoulders are now glued on, body is just pinned for transport, and weapons magnetized. Still a long way to go, but looking great! Silas7 1 Back to top Link to comment https://bolterandchainsword.com/topic/373387-dark-angels-contemptor-project/page/2/#findComment-5802808 Share on other sites More sharing options...
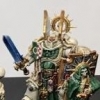
bigtrouble Posted March 9, 2022 Author Share Posted March 9, 2022 I’m in the final stages of details and highlights. I’ve added bright white edge highlights on corners and rivets, started brining the white up on the wings, layering up the green on the chest, did the chain, and have attended to some small details like the lenses. I like this process of taking photos periodically. It really helps identify things to improve and ensures I don’t miss details. I still have some white highlights to do on rivets, some metallic highlights on the engine parts, I plan on doing some heat effects on the exhaust stacks with blue and orange washes, and I still need to layer up the green on the front more. I need to address the eye lenses, they’re not great. I also don’t really like how the wings on the shoulder are going, so that might need a rework, or maybe just another pass with white. After all that, I still have a bunch of details to do on the lascannons and a bit more on the missile launcher as well. Grotsmasha and Dr_Ruminahui 2 Back to top Link to comment https://bolterandchainsword.com/topic/373387-dark-angels-contemptor-project/page/2/#findComment-5803117 Share on other sites More sharing options...
Pearson73 Posted March 10, 2022 Share Posted March 10, 2022 Those highlights have really brought things up a notch. Keep up the good work! Link to comment https://bolterandchainsword.com/topic/373387-dark-angels-contemptor-project/page/2/#findComment-5803345 Share on other sites More sharing options...
bigtrouble Posted March 12, 2022 Author Share Posted March 12, 2022 Almost there. In retrospect, I wish I had taken a couple more progress pics of the final details, as there were definitely many steps to the free hand parts, but I kind of got in that painting groove, and with limited time before it started raining again, I needed to be done by today to clear coat. I’ll set up the lights and a background later for the big reveal photos. Link to comment https://bolterandchainsword.com/topic/373387-dark-angels-contemptor-project/page/2/#findComment-5804165 Share on other sites More sharing options...
bigtrouble Posted March 13, 2022 Author Share Posted March 13, 2022 Here it is, what a fun model, but glad to be done! Shovellovin, Loquille, Khornestar and 4 others 7 Back to top Link to comment https://bolterandchainsword.com/topic/373387-dark-angels-contemptor-project/page/2/#findComment-5804285 Share on other sites More sharing options...
Valkia the Bloody Posted March 13, 2022 Share Posted March 13, 2022 Stunning work! All that detail! bigtrouble 1 Back to top Link to comment https://bolterandchainsword.com/topic/373387-dark-angels-contemptor-project/page/2/#findComment-5804318 Share on other sites More sharing options...
bigtrouble Posted March 13, 2022 Author Share Posted March 13, 2022 Stunning work! All that detail! Oh yeah, and of course as I look at the final work, I can see all the details that I would fix! Link to comment https://bolterandchainsword.com/topic/373387-dark-angels-contemptor-project/page/2/#findComment-5804324 Share on other sites More sharing options...
Pearson73 Posted March 14, 2022 Share Posted March 14, 2022 Gorgeous! Well worth all the effort! bigtrouble 1 Back to top Link to comment https://bolterandchainsword.com/topic/373387-dark-angels-contemptor-project/page/2/#findComment-5804400 Share on other sites More sharing options...
Recommended Posts
Create an account or sign in to comment
You need to be a member in order to leave a comment
Create an account
Sign up for a new account in our community. It's easy!
Register a new accountSign in
Already have an account? Sign in here.
Sign In Now