Making the Uniform of the Death Korps of Krieg 143rd Siege Artillery Reg.
10 Year badge today?! Well then.
Making the Mask
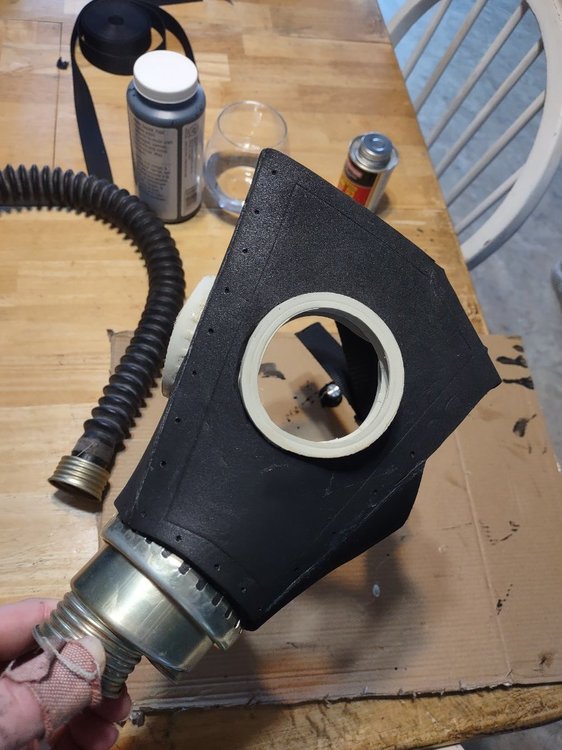
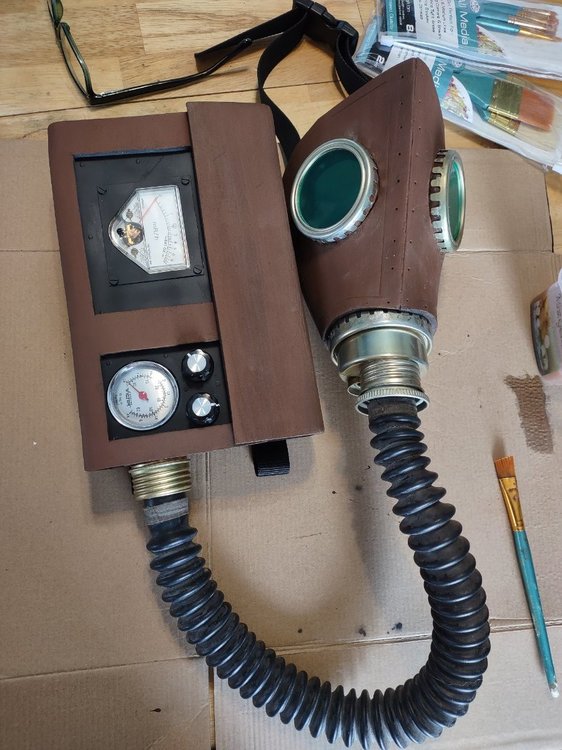
The Russian GP-5 is a great start. I watched 'Iron warrior's' youtube video and that talked me into making a foam face section with the GP-5 parts. He apparently had followed from Janovich on Etsy and youtube. So, I ordered some 5mil foam and got to work. I'd never done any work with this flexible foam; it's all new. Iron warrior also has a downloadable stencil you can buy to just cut out the mask section. This is very handy. I had to do some fitting work but it was fairly easy to get it all in place. I think if I did another one I'd use heat and try to bend the foam more (get it a bit more realistic). I just used brown craft paints. Unfortunately it dried very mono-tone. So I've been updating that to add some contrast - adding a bit of black and tan. I did take out the rubber gear and breathing pieces at the mouth, so I'm just breathing easily through the bottom hole- not breathing through the hose itself--that would be very uncomfortable. One could probably add a little 12v fan too, but I'm lazy.
Eyes
Iron warrior used window tint. I tried that and really didn't care for it. It was a lot of work and didn't really seal correctly. I kept it on the eye lenses, but added a sheet of green transparency. Since adepticon I've also now added some sponged on brown paint to add a bit of weathering. I think I'm going to try a patina as well... It's all too clean.
Chest Gear/Piece.
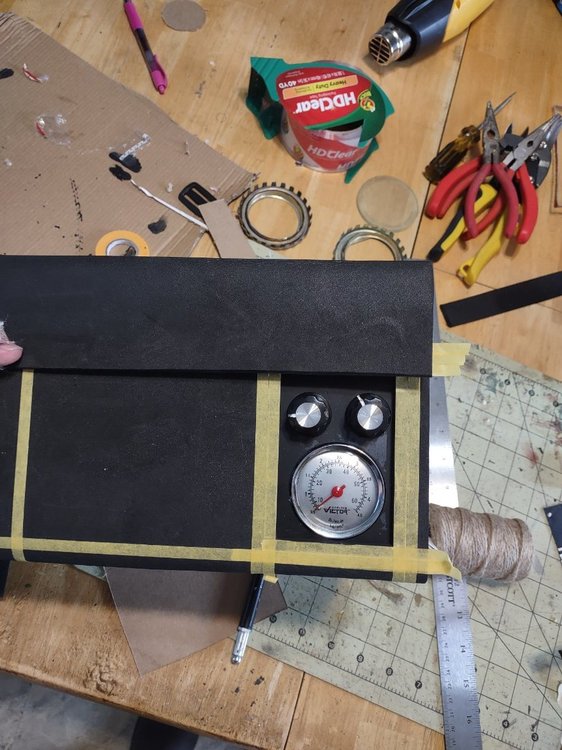
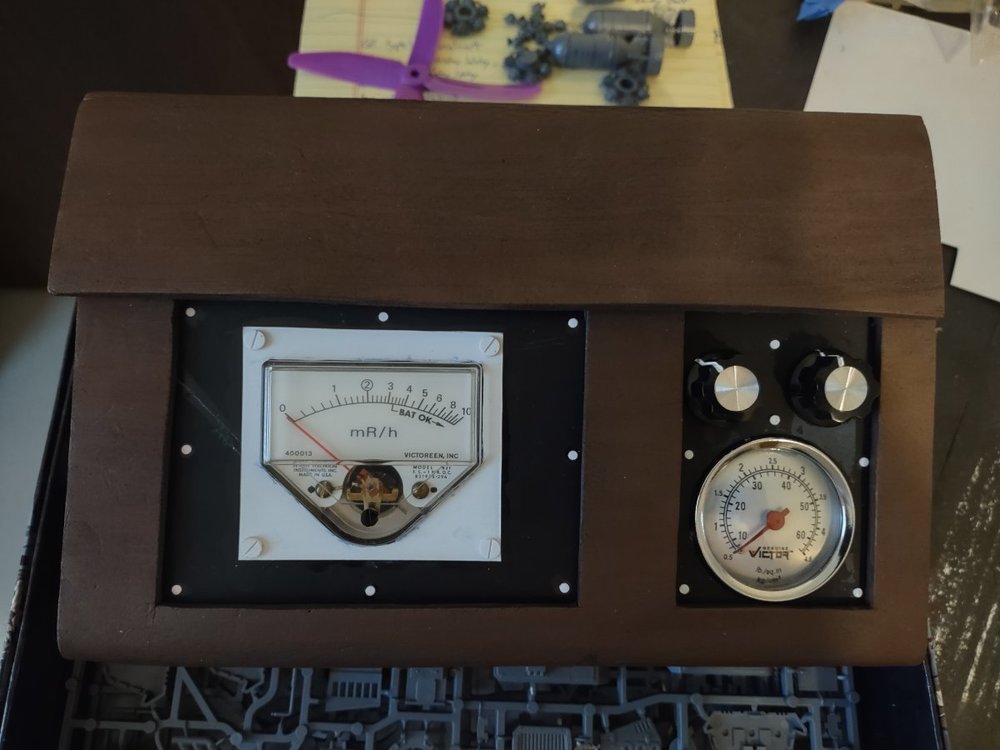
- Knobs. So, I wanted some knobs to adjust whatever the meter is supposed to be. I found bass knobs on ebay for dirt cheap. Good enough. I actually attached them with magnets so they can be turned easily. This is an easy & fast option, but the magnets aren't that strong and I did lose one during the convention. There are probably many ways to attach knobs. I'm open to options on that.
- Gauge. Next I just picked up an air pressure gauge. I fit that in there but realized I hadn't yet figured out what I want to do with the main-center portion of the chest gear here. As usually I lack a lot of planning in my projects and just start working on stuff. Iron Warrior and Janovich didn't have a ready tutorial on this part. I looked around online and actual leather kits were like $200-300. Nope (though they do like nice). I therefore went about making my own. I continued to use the 5mil foam because, well, that's what I'd ordered for the face mask. I don't know that I'd go with a much thinner foam as it might not look right.
- Size and Shape. The real trick here was finding a perfectly sized cardboard box that I could fit the foam over to make my little chest satchel rebreather thingy here. I wanted to make as few cuts as possible (as I can't cut a straight line all that well). I found the box. Turns out a Milkbone box was just what I needed. The dogs rejoiced as I emptied the treats from the box to them, and went about destroying their sacred milkbone box. Using contact cement, and a hot air gun I was able to mold the foam over the box and then cut and glue sections on the sides. Very easy.
- Front Flap. I used velco sections with a sticky/tape side. It might not be the coolest way to secure the front, but it's super easy and hidden - and cost effective. I can cut some foam bolts or buttons or whatever and secure them on in the future to make it look more detailed. For now it works really well.
- Assembly. The milkbone box was and is removable - the foam is just wrapped around it and I can still pull it out. This is super important as I'm hot gluing buttons and gauges inside the milkbone box. Need room to operate here.
- Measurements. I used tamiya tape to sketch out where I wanted everything to fit. This allowed me to cut straight, keep my lines straight across the whole project, and to plan on where things would go next. This was a good idea.
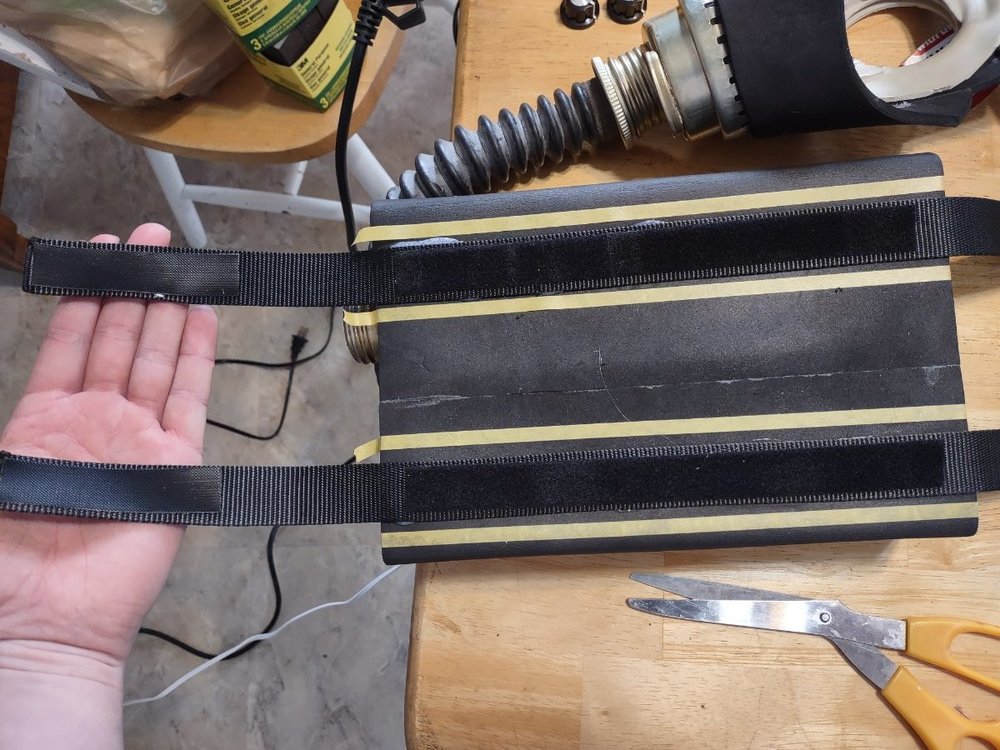
Securing the Chest piece to my field gear also could have been difficult. I chose an easy option - obviously real leather might look better. I think I should have bought brown webbing at least. Whatever, Velco works super easy to get this on and off. This was an easy solution.
Detailing the Chest Piece.
- Rivets and Screws. Making rivets is one of my favorites. I use UMM-USA punch and die sets to make rivets on leman russes, bunkers, railcars, zeppelins, and now cosplay. So, here instead of just blank styrene sheets painted black, I added a bit of detail. I also punched out circles, cut them in half, and added them as screws.
- Radiation Gauge. I thought it'd fit a particularly grimdark vibe if I installed an actual Geiger counter replacement part. I've got an air pressure gauge already. Even if it's not strictly cannon-lore, why not radiation? This is krieg after all. This was also cheap on Ebay. I was thinking of installing a backlight LED in there... I may do that. Or, maybe even a blinking light to signify too much radiation? There is perhaps some practicality in such a gauge. But, from an old soldier's point of view - anything on the chest like this is getting destroyed when diving to the ground or crawling on the ground. So for Krieg (especially) a low crawl is going to mean being absolutely smashed to the ground, crawling under and through barbed wire with machine gun fire over head. The chest piece design overall isn't really practical.
- Learning about Radiation. Here we have mili-roentgens per hour. The US Environmental protection agency website was informative on what this reading actually measures: "Exposure rate is the amount of ionizing radiation per hour in a person’s vicinity (measured in milliRoentgen per hour, mR/h), whereas dose rate is the biological effect on the body from exposure to that radiation (measured in nanoSieverts per hour, nSv/h). As an approximation, a radiological dose rate of 1 mR/h is roughly equal to an exposure rate of 10,000 nSv/h." They also note, "[t]he differences in exposure and dose are very subtle. Basically, exposure is the amount of radiation in the area, and dose is the amount of that radiation expected to be absorbed by a person. For gamma rays, there is approximately a one-to-one ratio between exposure rate and dose rate. One (1) milliRoentgen per hour (mR/h) is approximately 10,000 nanoSieverts per hour (nSv/h)."
Painting
So it's all coming together. Very cheap brushes and acrylic paint at Michael's. Again, it needs more contrast and weathering, but no project is ever really done.
Magnet: Hose from chest to face.
Ok, an important point I forgot here. There is no hole cut into the side of the chest piece for the hose. To secure the hose, I cut a circle piece of styrene to make an end cap. On that I put a giant magnet, like an uncomfortably powerful magnet one must be careful with. 1"x1/4" N52 Disc. Well, I'm sure putting together a warlord titan probably uses a larger one. Anyway, I made my end cap, put the magnet on there and filled it with hot glue. The hose normally would screw on, but this is really inconvenient. Magnetizing it all makes it super easy to take on and off again. Still, I don't know that My magnet is actually as strong as I'd like. It still comes off fairly easily. Too strong though, and I'd be getting caught on other people and things during the convention. There's definitely a tradeoff at some point.
Helmet.
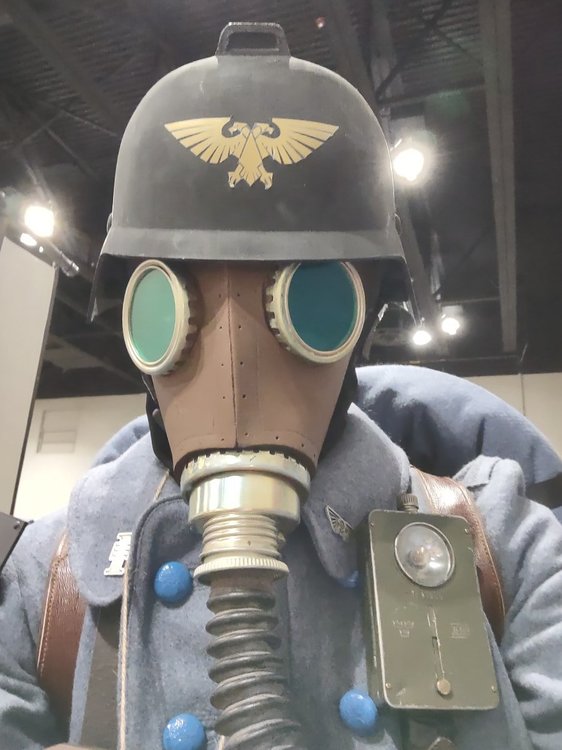
Here we are at Adepticon! I went with Janovich's helmet. I have no 3d printer skills. With a few months I'm sure I could get up to speed, but time is always short. It took a fair bit of sanding for the 3d printer lines, but this was expected. It's a great helmet and I recommend it. I did add an imperial eagle. It took a lot of time to cut it out as it was on a big sticker. Subsequently I've added a bunch of weathering and mud. I did experiment with helmet netting and a band (from my old kevlar), but ultimately it didn't look quite right. Again it's not cannon-lore, but that's not really my thing. I like to personalize. Anyway, I cut a lot of foam rectangles to make an interior helmet band. So this thing is actually very comfortable. Since I'd bought a lot of webbing off of Amazon I also made the chin straps here too. This could be one part to use real leather as it draws a lot of attention, but time is short. I'd also thought about going with the camo patterns from ww1 stahlhelmets but I'd prefer to avoid more historical reference which might be interpreted wrongly.
Field Gear.
I got an old Sweedish flashlight and mounted it to my gear. An actual WW1 trench flashlight/torch would be like $1000. Nope. So this is close enough.
Badges
I added an inquisition and imperial guard symbol to the collar. This might also be a good place for rank symbols... perhaps a captain rank. Though I'm also thinking about stitching on some sergeant rank to the trenchcoat instead.
Adepticon
It was fun. I'd never went in costume to such at thing. Lots of people pulled me aside to take photos, which I was happy to do. Many dads were excited while their kids were very afraid. It was funny to watch. I met others in costume. They were good fun. Some went so far as to refuse to speak, apparently remaining in character? I don't know. Seems like Krieg uses vox casters... I didn't build a lasgun, or bring a shovel. I didn't want some weird argument about having a 'weapon' and I was just there for the team tournament anyway.
Edited by Captain Caine 24th
0 Comments
Recommended Comments
There are no comments to display.
Create an account or sign in to comment
You need to be a member in order to leave a comment
Create an account
Sign up for a new account in our community. It's easy!
Register a new accountSign in
Already have an account? Sign in here.
Sign In Now