Search the Community
Showing results for tags 'Cosplay'.
Found 3 results
-
Apr 10 2023 WIP - Dorn, Uniform, Servo-Skull
Captain Caine 24th posted a blog entry in 40K Feast & Famine
Rogal Dorn #1. Casting Defect Texture. Previously I laid down the Tamiya putty texture, and added some brass handles. I lost my metal files somewhere... so the flame cuts still need re-working. Using various files, sandpaper, and a hobby knife creates a varied texture. This is too uniform. I'll either re-work it, or hit it hard on Rogal Dorn #2. In law, legal briefs are never done, just due. Just the same in Hobby, there's always more to do--but, I need an army ready for 10th edition upcoming this summer. But, this might be an easy enough fix. Also, I should have made more brass handles. More customization is always better. In some ways this is just an opportunity to experiment and figure out what should be on the next Dorn. Yes, I bought 3x. Under coat/Primer. Since I'm using Tamiya, which has great coverage, I'm not really anticipating much of the black and white from an under coat will show through. I've seen some use a splotchy, uneven black/white/grey as an undercoat. This creates a very interesting complexity to the paint job. I went instead with white on the raised surfaces, and black in the recesses. I used vallejo white and black primer. I suppose I could have also just went all black or all white. I see lots of youtube videos doing all black and it just seems like a tremendous waste of time to build up color over it. But, what do I know - talk me into it. It's all a learning experience. Main Paint. I went with Tamiya Medium blue this time. Usually I do the medium blue followed by a zenithal spray of mixes of progressively lighter blue. Here I just experimented a bit with the undertone to see what it'd look like. It definitely reads much more blue than grey. Interestingly on camera here it looks all grey and doesn't pick up the transitions. Hmmmm. I can modulate that with the oils too. But, I did want to push a bit more contrast on this model. One hard part is being impatient - I should be taping off every panel for each airbrush spray. In failing that there is a lot of imprecision in my light sources. Another hard part is getting the values right. Let's say we've got a nice square panel, and I'm working from light (almost white) blue, down to a dark (almost black) blue at the bottom. Should 80% be the normal blue, with 10% transitions at the top and bottom? Hard to say. The classic misstep is seen in painting black. A sharp edge highlight of grey/blue and you've got a model that reads to the eye as black. But, if you add too much highlight, the black doesn't read the same and you just have a grey model. Oil Paint Rendering. Following Rinaldi's tank art book is what needs to happen next. Little dots of varied oil colors, subtley wiped down with odorless turpentine create great varied surface effects. It also helps smooth out the 'airbrushed look.' It's amazing to me that the 1/35 scale modellers use yellows, magentas, all kinds of colors to subtly change the hue. Anyway, Forgot this step, and going back for it. Also, some white can really help push contrast. It can also help make an aged paint look. It can also do rain streaks (well, an off-white anyway). Lots of fun to be had here. We'll have to separate out various oil stages to make sure the paint doesn't reactivate and ruin the effect. Decals. Ok, Decals these days are awesome. I use microsol and microset, but I see Ak, MIG and other companies all have their own proprietary version now. Maybe they're better. I don't know. Again, I guess this is a warm-up Rogal Dorn. The oil paint rendering/modulation needed to happen before the decals. I got too excited and didn't follow the process. Also should have slowed down for the lore - what specific brigade/battalion are these guys supposed to be from? Then again, uniforms at Vraks don't dictate uniforms in every environment. Chipping. I just used a sponge with some Rhinox Hide for a quick heavy weathering. It's far better with a brush, but very slow. It's also better to use instead of brown, a lighter version of the paint color - here I've got Tamiya medium blue, and I could have made chipped paint with the light blue. I do typically do the hairspray technique for chipping instead of brush or sponge, but again, I just wanted to move this thing forward. Oil weathering. I'll do a wash/pin wash of burnt umber or some such in oil across the whole thing. I also like to add black oil rather thick in controlled points around various panels/parts that might have some oil leaking. Some light rust color also helps blend the chipping. Multiple colors is much more realistic. Pigment powders. I'll be handling the model a lot. Powders will wipe off. They're also hard to see if you apply a clear coat over them--they never look quite right. I think powders will come into play more with mud and dirt in the tracks. Also the exhaust right now is just rhinox hide with a light rust wash. I'd like to stipple lots of oranges, reds, and browns on there. Mud on the tracks. I'll slow down for this. This is a big step, and one people usually go way too far on. Right now I just have some browns on there as a base color. I'll add a lot of vallejo mud effects, then probably a lot of pigments, static grass, and sand to get the right variations in the texture. Maybe I should add some barbed wire too. Tank commanders. I got out an old 1999 tank commander. Man, I don't even remember this guy, I think he was pre-krieg lore. Been in the bits box a LONG LONG TIME. Even if he doesn't look great, it's good to finally use him. He needs some wash and some detailing, but he's on his way. Very tight fit. Uniform 143rd I went in with some tan and black to get some contrast going on the mask. Obviously still a lot of work to do, but it's starting to read a bit better to the eye. I stippled some brown and silver on the helmet New Project. Servo skull. I wanted to improve the display board in everyway I can. Part of that is the overall presentation. I've long thought Candles, symbols, and daemonology books would be great alongside an Inquisition army. Test tubes and medical charts might be great for Tyranids. Maps and operations orders I think are on point for for astra militarum. But, I want to make it more in universe. So, I'm working on a servo skull. If I knew more about Arduino and programming I think some really cool things could be done with special effects on this - motion tracking, lights, sounds, etc. I even found Halloween tutorials! But, realistically if anything went wrong, I wouldn't know how to trouble shoot it. It could be another $100 dead-end. Still, there's something to be said for pushing my abilities and trying new things. In fact that's a huge driving force of my last two years at Adepticon. For now I got cheap pipe fittings, hoses and cables, and fake plastic spikes for a halo. Lots of completely unanswered design questions here. No idea how to make the eye-pieces yet. Is this going to be much more difficult than I thought? Maybe. I need to look up some tutorials on servo skulls. IF I can figure out a servo sweep program for Arduino, I still have the laser line from my aliens project last year that never panned out. I was thinking I could have the laser line sweep over my army list, like the skull is reading it or something. Of course I'd still have to figure out how to fit the laser and servo into the skull... The problem is the skull I bought is much more detailed and awesome than I anticipated (very cheap on amazon). And, to have such detail, it requires thicker harder resin. So it'll be a pain to mount things on. Lots of heavy drilling work ahead. A cheaper plastic skull would be much easier to work with, but this thing nearly looks real. I wonder if I should try scribing latin phrases into the skull? -
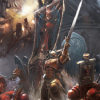
10 Year badge today?! Well then. Making the Mask The Russian GP-5 is a great start. I watched 'Iron warrior's' youtube video and that talked me into making a foam face section with the GP-5 parts. He apparently had followed from Janovich on Etsy and youtube. So, I ordered some 5mil foam and got to work. I'd never done any work with this flexible foam; it's all new. Iron warrior also has a downloadable stencil you can buy to just cut out the mask section. This is very handy. I had to do some fitting work but it was fairly easy to get it all in place. I think if I did another one I'd use heat and try to bend the foam more (get it a bit more realistic). I just used brown craft paints. Unfortunately it dried very mono-tone. So I've been updating that to add some contrast - adding a bit of black and tan. I did take out the rubber gear and breathing pieces at the mouth, so I'm just breathing easily through the bottom hole- not breathing through the hose itself--that would be very uncomfortable. One could probably add a little 12v fan too, but I'm lazy. Eyes Iron warrior used window tint. I tried that and really didn't care for it. It was a lot of work and didn't really seal correctly. I kept it on the eye lenses, but added a sheet of green transparency. Since adepticon I've also now added some sponged on brown paint to add a bit of weathering. I think I'm going to try a patina as well... It's all too clean. Chest Gear/Piece. Knobs. So, I wanted some knobs to adjust whatever the meter is supposed to be. I found bass knobs on ebay for dirt cheap. Good enough. I actually attached them with magnets so they can be turned easily. This is an easy & fast option, but the magnets aren't that strong and I did lose one during the convention. There are probably many ways to attach knobs. I'm open to options on that. Gauge. Next I just picked up an air pressure gauge. I fit that in there but realized I hadn't yet figured out what I want to do with the main-center portion of the chest gear here. As usually I lack a lot of planning in my projects and just start working on stuff. Iron Warrior and Janovich didn't have a ready tutorial on this part. I looked around online and actual leather kits were like $200-300. Nope (though they do like nice). I therefore went about making my own. I continued to use the 5mil foam because, well, that's what I'd ordered for the face mask. I don't know that I'd go with a much thinner foam as it might not look right. Size and Shape. The real trick here was finding a perfectly sized cardboard box that I could fit the foam over to make my little chest satchel rebreather thingy here. I wanted to make as few cuts as possible (as I can't cut a straight line all that well). I found the box. Turns out a Milkbone box was just what I needed. The dogs rejoiced as I emptied the treats from the box to them, and went about destroying their sacred milkbone box. Using contact cement, and a hot air gun I was able to mold the foam over the box and then cut and glue sections on the sides. Very easy. Front Flap. I used velco sections with a sticky/tape side. It might not be the coolest way to secure the front, but it's super easy and hidden - and cost effective. I can cut some foam bolts or buttons or whatever and secure them on in the future to make it look more detailed. For now it works really well. Assembly. The milkbone box was and is removable - the foam is just wrapped around it and I can still pull it out. This is super important as I'm hot gluing buttons and gauges inside the milkbone box. Need room to operate here. Measurements. I used tamiya tape to sketch out where I wanted everything to fit. This allowed me to cut straight, keep my lines straight across the whole project, and to plan on where things would go next. This was a good idea. Securing the Chest piece to my field gear also could have been difficult. I chose an easy option - obviously real leather might look better. I think I should have bought brown webbing at least. Whatever, Velco works super easy to get this on and off. This was an easy solution. Detailing the Chest Piece. Rivets and Screws. Making rivets is one of my favorites. I use UMM-USA punch and die sets to make rivets on leman russes, bunkers, railcars, zeppelins, and now cosplay. So, here instead of just blank styrene sheets painted black, I added a bit of detail. I also punched out circles, cut them in half, and added them as screws. Radiation Gauge. I thought it'd fit a particularly grimdark vibe if I installed an actual Geiger counter replacement part. I've got an air pressure gauge already. Even if it's not strictly cannon-lore, why not radiation? This is krieg after all. This was also cheap on Ebay. I was thinking of installing a backlight LED in there... I may do that. Or, maybe even a blinking light to signify too much radiation? There is perhaps some practicality in such a gauge. But, from an old soldier's point of view - anything on the chest like this is getting destroyed when diving to the ground or crawling on the ground. So for Krieg (especially) a low crawl is going to mean being absolutely smashed to the ground, crawling under and through barbed wire with machine gun fire over head. The chest piece design overall isn't really practical. Learning about Radiation. Here we have mili-roentgens per hour. The US Environmental protection agency website was informative on what this reading actually measures: "Exposure rate is the amount of ionizing radiation per hour in a person’s vicinity (measured in milliRoentgen per hour, mR/h), whereas dose rate is the biological effect on the body from exposure to that radiation (measured in nanoSieverts per hour, nSv/h). As an approximation, a radiological dose rate of 1 mR/h is roughly equal to an exposure rate of 10,000 nSv/h." They also note, "[t]he differences in exposure and dose are very subtle. Basically, exposure is the amount of radiation in the area, and dose is the amount of that radiation expected to be absorbed by a person. For gamma rays, there is approximately a one-to-one ratio between exposure rate and dose rate. One (1) milliRoentgen per hour (mR/h) is approximately 10,000 nanoSieverts per hour (nSv/h)." Painting So it's all coming together. Very cheap brushes and acrylic paint at Michael's. Again, it needs more contrast and weathering, but no project is ever really done. Magnet: Hose from chest to face. Ok, an important point I forgot here. There is no hole cut into the side of the chest piece for the hose. To secure the hose, I cut a circle piece of styrene to make an end cap. On that I put a giant magnet, like an uncomfortably powerful magnet one must be careful with. 1"x1/4" N52 Disc. Well, I'm sure putting together a warlord titan probably uses a larger one. Anyway, I made my end cap, put the magnet on there and filled it with hot glue. The hose normally would screw on, but this is really inconvenient. Magnetizing it all makes it super easy to take on and off again. Still, I don't know that My magnet is actually as strong as I'd like. It still comes off fairly easily. Too strong though, and I'd be getting caught on other people and things during the convention. There's definitely a tradeoff at some point. Helmet. Here we are at Adepticon! I went with Janovich's helmet. I have no 3d printer skills. With a few months I'm sure I could get up to speed, but time is always short. It took a fair bit of sanding for the 3d printer lines, but this was expected. It's a great helmet and I recommend it. I did add an imperial eagle. It took a lot of time to cut it out as it was on a big sticker. Subsequently I've added a bunch of weathering and mud. I did experiment with helmet netting and a band (from my old kevlar), but ultimately it didn't look quite right. Again it's not cannon-lore, but that's not really my thing. I like to personalize. Anyway, I cut a lot of foam rectangles to make an interior helmet band. So this thing is actually very comfortable. Since I'd bought a lot of webbing off of Amazon I also made the chin straps here too. This could be one part to use real leather as it draws a lot of attention, but time is short. I'd also thought about going with the camo patterns from ww1 stahlhelmets but I'd prefer to avoid more historical reference which might be interpreted wrongly. Field Gear. I got an old Sweedish flashlight and mounted it to my gear. An actual WW1 trench flashlight/torch would be like $1000. Nope. So this is close enough. Badges I added an inquisition and imperial guard symbol to the collar. This might also be a good place for rank symbols... perhaps a captain rank. Though I'm also thinking about stitching on some sergeant rank to the trenchcoat instead. Adepticon It was fun. I'd never went in costume to such at thing. Lots of people pulled me aside to take photos, which I was happy to do. Many dads were excited while their kids were very afraid. It was funny to watch. I met others in costume. They were good fun. Some went so far as to refuse to speak, apparently remaining in character? I don't know. Seems like Krieg uses vox casters... I didn't build a lasgun, or bring a shovel. I didn't want some weird argument about having a 'weapon' and I was just there for the team tournament anyway.
-
Krieg Display Board 2023. Spotlights. This year I wanted spotlights. The forgeworld version are long OOP, and when they show up on ebay every other year they're about $50+. Zinge makes great spotlights. However, I also need a stand for the spotlight. Kromlech makes a great heavy weapon base with a tri-pod. It's a bit too tall for my liking, but it'll work. I chose to put it on a 65mm base because I wanted to hook up electrical. I gave it a quick zenithal with the airbrush on Castellan green working up a bit with layer colors. Importantly I had to drill out the wiring holes prior to assembling the battery and LED components (only the wires would fit through drilled holes, not the LED or buttons). I set the button up on the base itself as the base isn't deep enough to hide everything. So there's a little push button on top there. Evans designs for electrical - works perfect. I'm sure if one was tech saavy it could be constructed cheaper than a pre-made kit. And they Work! Sand Bags! Way cheaper than green stuff. Roll out logs. cut small bits. Depress those bits with cloth for texture. Cut the sides and add a little flair for the cinched opening of the sand bag. Board Construction. Basically it's the same as last year. I'm not happy with that, but it's a practical reality. I put a lot of effort into the altantic wall/maginot line style defense, but it still reads very similar to last year. If I'd started earlier in the year, I might have had more time to think over what works and what doesn't. A vision rarely matches the actual product. Oh well. Experimentation doesn't always work out. I didn't have time to run planks down the trenches, so it's lacking some detail too (though this can be added now). I will say I do l like the texture more this year. Wood glue and sand - not mixing in plaster as it looks too sloppy. Rather, plaster ended up looking like plaster, and I want this to look like sand. I have no doubt there are many great recipes for mud and dirt out there in the diorama world. I think I also want to experiment with some grass and trees for more detail. Getting ready for judging! Hi everybody! Here's me. I finally went off the deep end and and joined the costume club. I'll post separately on that. So, this was an early morning. We'd stayed up very late and worked hard hours leading into it. I'd made most of the board, and brought it down to finish at the hotel. The team really stepped up and helped slather some paint all over the board for me. I was too far behind to finish it alone. For the team tournament there's judging starting at 7 am and 12 noon. We go with the morning spot because it's easier to get situated in the morning instead of after game 1 at lunch time when everybody is moving around. It's chaos at noon. However, noon is also when all the hobby stars, youtubers and games workshop is walking about. The fun part of the day is looking across hundreds of gaming tables and seeing the zepplin still standing on the sidewall. Lots and lots of players are really great, and come over to introduce themselves to get pictures.