Apr 10 2023 WIP - Dorn, Uniform, Servo-Skull
Entry posted by Captain Caine 24th in 2023
1077 views
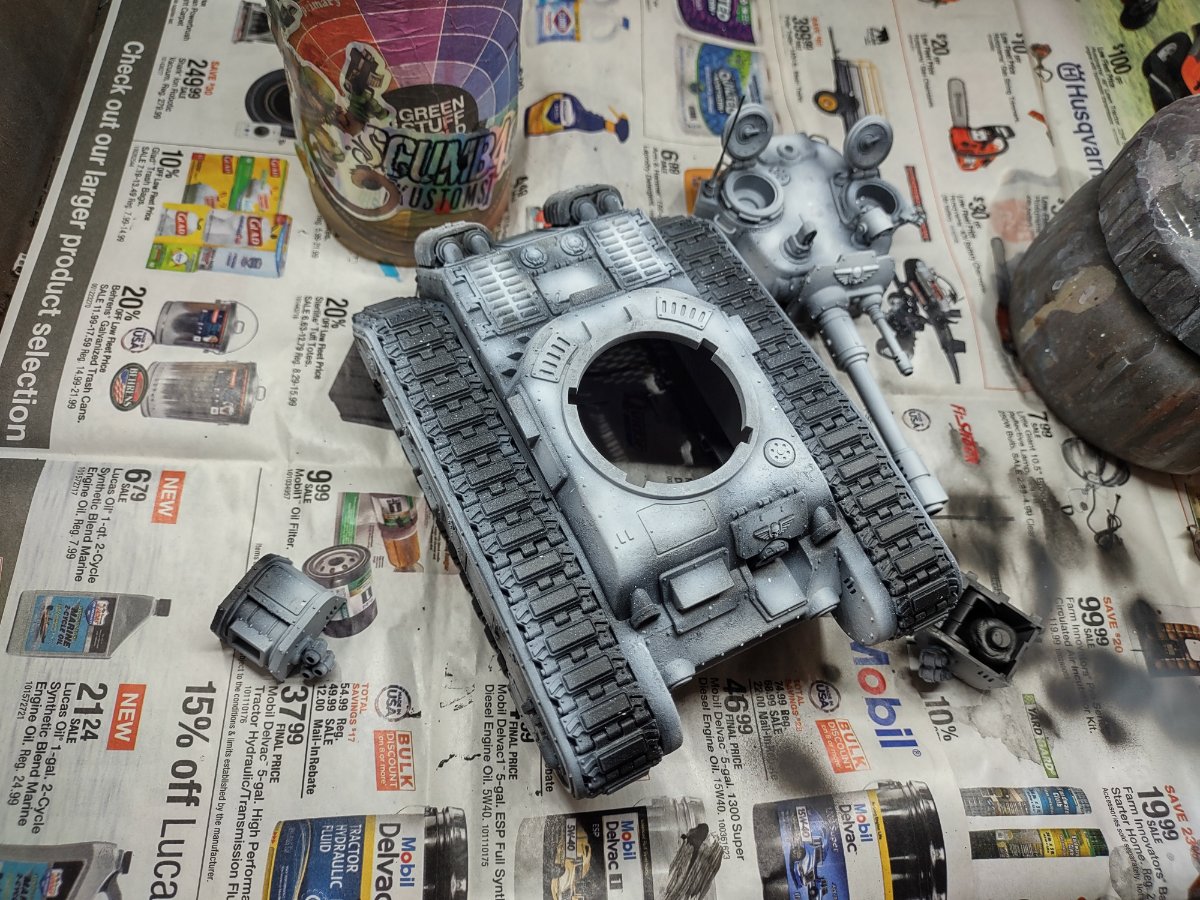
Rogal Dorn #1.
- Casting Defect Texture. Previously I laid down the Tamiya putty texture, and added some brass handles. I lost my metal files somewhere... so the flame cuts still need re-working. Using various files, sandpaper, and a hobby knife creates a varied texture. This is too uniform. I'll either re-work it, or hit it hard on Rogal Dorn #2. In law, legal briefs are never done, just due. Just the same in Hobby, there's always more to do--but, I need an army ready for 10th edition upcoming this summer. But, this might be an easy enough fix. Also, I should have made more brass handles. More customization is always better. In some ways this is just an opportunity to experiment and figure out what should be on the next Dorn. Yes, I bought 3x.
- Under coat/Primer. Since I'm using Tamiya, which has great coverage, I'm not really anticipating much of the black and white from an under coat will show through. I've seen some use a splotchy, uneven black/white/grey as an undercoat. This creates a very interesting complexity to the paint job. I went instead with white on the raised surfaces, and black in the recesses. I used vallejo white and black primer. I suppose I could have also just went all black or all white. I see lots of youtube videos doing all black and it just seems like a tremendous waste of time to build up color over it. But, what do I know - talk me into it. It's all a learning experience.
-

- Main Paint. I went with Tamiya Medium blue this time. Usually I do the medium blue followed by a zenithal spray of mixes of progressively lighter blue. Here I just experimented a bit with the undertone to see what it'd look like. It definitely reads much more blue than grey. Interestingly on camera here it looks all grey and doesn't pick up the transitions. Hmmmm. I can modulate that with the oils too. But, I did want to push a bit more contrast on this model. One hard part is being impatient - I should be taping off every panel for each airbrush spray. In failing that there is a lot of imprecision in my light sources. Another hard part is getting the values right. Let's say we've got a nice square panel, and I'm working from light (almost white) blue, down to a dark (almost black) blue at the bottom. Should 80% be the normal blue, with 10% transitions at the top and bottom? Hard to say. The classic misstep is seen in painting black. A sharp edge highlight of grey/blue and you've got a model that reads to the eye as black. But, if you add too much highlight, the black doesn't read the same and you just have a grey model.
- Oil Paint Rendering. Following Rinaldi's tank art book is what needs to happen next. Little dots of varied oil colors, subtley wiped down with odorless turpentine create great varied surface effects. It also helps smooth out the 'airbrushed look.' It's amazing to me that the 1/35 scale modellers use yellows, magentas, all kinds of colors to subtly change the hue. Anyway, Forgot this step, and going back for it. Also, some white can really help push contrast. It can also help make an aged paint look. It can also do rain streaks (well, an off-white anyway). Lots of fun to be had here. We'll have to separate out various oil stages to make sure the paint doesn't reactivate and ruin the effect.
- Decals. Ok, Decals these days are awesome. I use microsol and microset, but I see Ak, MIG and other companies all have their own proprietary version now. Maybe they're better. I don't know. Again, I guess this is a warm-up Rogal Dorn. The oil paint rendering/modulation needed to happen before the decals. I got too excited and didn't follow the process. Also should have slowed down for the lore - what specific brigade/battalion are these guys supposed to be from? Then again, uniforms at Vraks don't dictate uniforms in every environment.
- Chipping. I just used a sponge with some Rhinox Hide for a quick heavy weathering. It's far better with a brush, but very slow. It's also better to use instead of brown, a lighter version of the paint color - here I've got Tamiya medium blue, and I could have made chipped paint with the light blue. I do typically do the hairspray technique for chipping instead of brush or sponge, but again, I just wanted to move this thing forward.
- Oil weathering. I'll do a wash/pin wash of burnt umber or some such in oil across the whole thing. I also like to add black oil rather thick in controlled points around various panels/parts that might have some oil leaking. Some light rust color also helps blend the chipping. Multiple colors is much more realistic.
- Pigment powders. I'll be handling the model a lot. Powders will wipe off. They're also hard to see if you apply a clear coat over them--they never look quite right. I think powders will come into play more with mud and dirt in the tracks. Also the exhaust right now is just rhinox hide with a light rust wash. I'd like to stipple lots of oranges, reds, and browns on there.
- Mud on the tracks. I'll slow down for this. This is a big step, and one people usually go way too far on. Right now I just have some browns on there as a base color. I'll add a lot of vallejo mud effects, then probably a lot of pigments, static grass, and sand to get the right variations in the texture. Maybe I should add some barbed wire too.
-

- Tank commanders. I got out an old 1999 tank commander. Man, I don't even remember this guy, I think he was pre-krieg lore. Been in the bits box a LONG LONG TIME. Even if he doesn't look great, it's good to finally use him. He needs some wash and some detailing, but he's on his way. Very tight fit.
-
.thumb.jpg.2a407d3226a73a1518ba9d7c50554eab.jpg)
.jpg.16d65388f2f913bbb4802c0586aeb675.jpg)
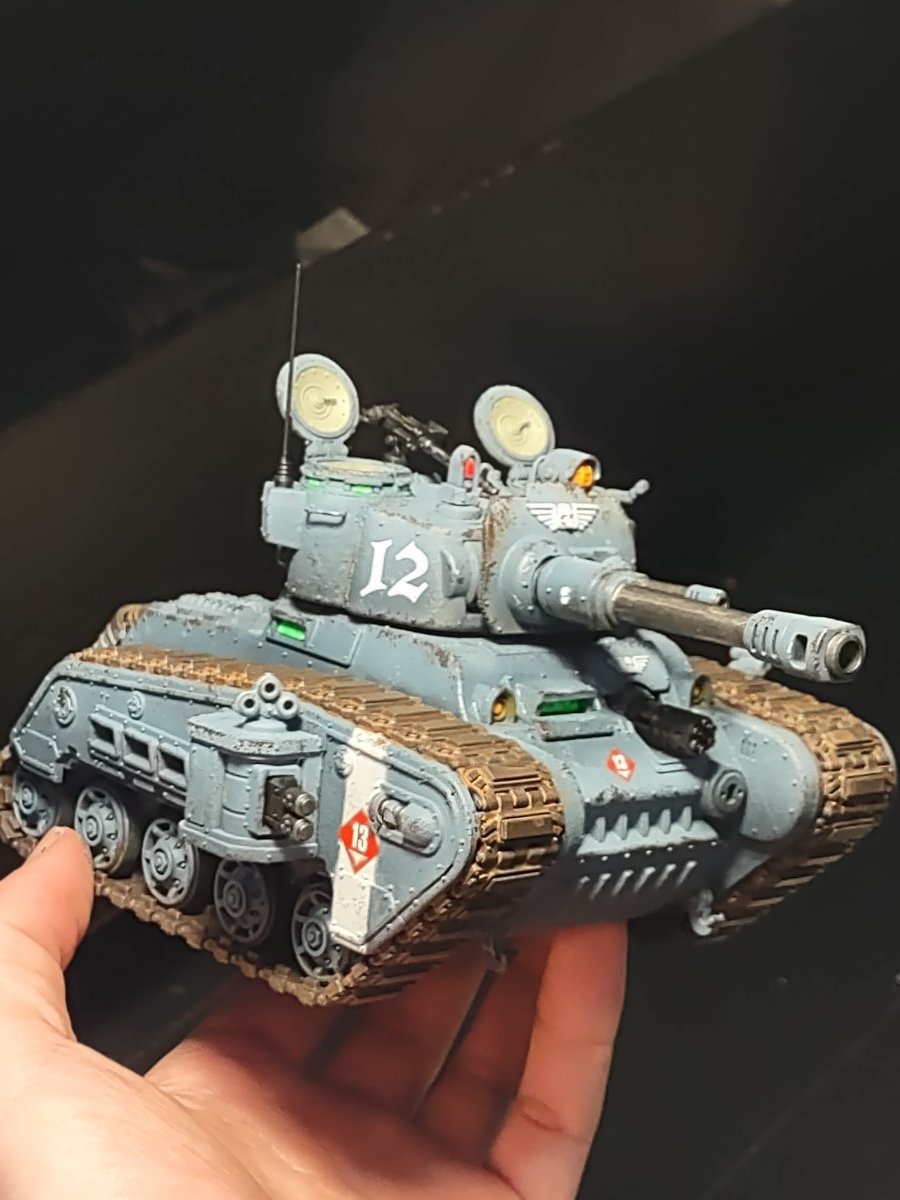
Uniform 143rd
- I went in with some tan and black to get some contrast going on the mask. Obviously still a lot of work to do, but it's starting to read a bit better to the eye.
- I stippled some brown and silver on the helmet
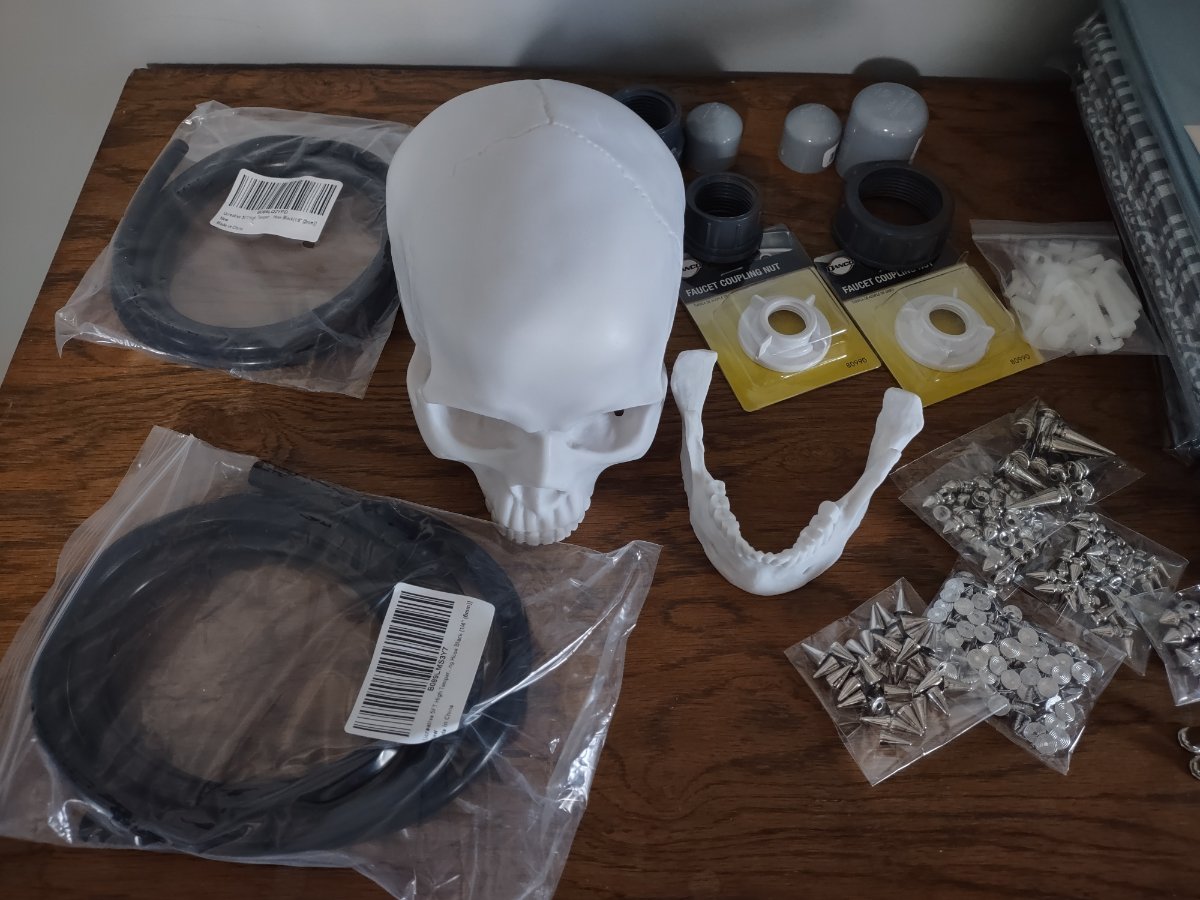
New Project. Servo skull.
I wanted to improve the display board in everyway I can. Part of that is the overall presentation. I've long thought Candles, symbols, and daemonology books would be great alongside an Inquisition army. Test tubes and medical charts might be great for Tyranids. Maps and operations orders I think are on point for for astra militarum. But, I want to make it more in universe. So, I'm working on a servo skull. If I knew more about Arduino and programming I think some really cool things could be done with special effects on this - motion tracking, lights, sounds, etc. I even found Halloween tutorials! But, realistically if anything went wrong, I wouldn't know how to trouble shoot it. It could be another $100 dead-end. Still, there's something to be said for pushing my abilities and trying new things. In fact that's a huge driving force of my last two years at Adepticon. For now I got cheap pipe fittings, hoses and cables, and fake plastic spikes for a halo. Lots of completely unanswered design questions here. No idea how to make the eye-pieces yet. Is this going to be much more difficult than I thought? Maybe. I need to look up some tutorials on servo skulls.
- IF I can figure out a servo sweep program for Arduino, I still have the laser line from my aliens project last year that never panned out. I was thinking I could have the laser line sweep over my army list, like the skull is reading it or something. Of course I'd still have to figure out how to fit the laser and servo into the skull... The problem is the skull I bought is much more detailed and awesome than I anticipated (very cheap on amazon). And, to have such detail, it requires thicker harder resin. So it'll be a pain to mount things on. Lots of heavy drilling work ahead. A cheaper plastic skull would be much easier to work with, but this thing nearly looks real.
- I wonder if I should try scribing latin phrases into the skull?
Edited by Captain Caine 24th
0 Comments
Recommended Comments
There are no comments to display.
Create an account or sign in to comment
You need to be a member in order to leave a comment
Create an account
Sign up for a new account in our community. It's easy!
Register a new accountSign in
Already have an account? Sign in here.
Sign In Now