Search the Community
Showing results for tags 'review'.
-
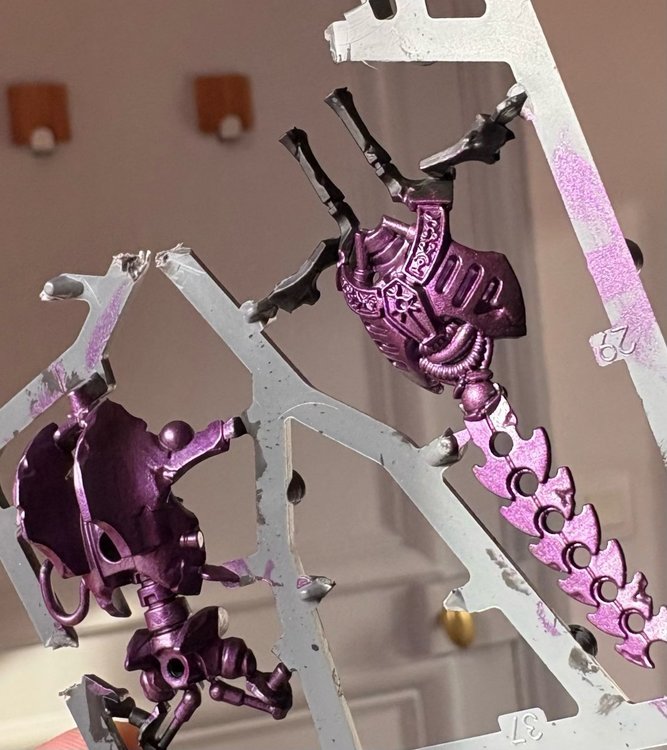
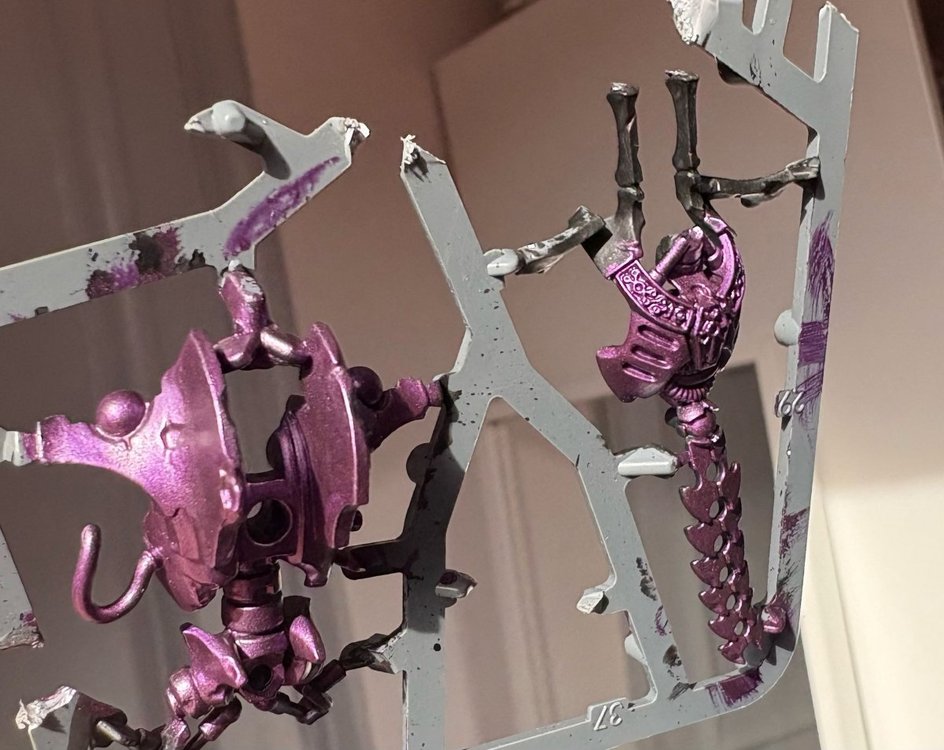
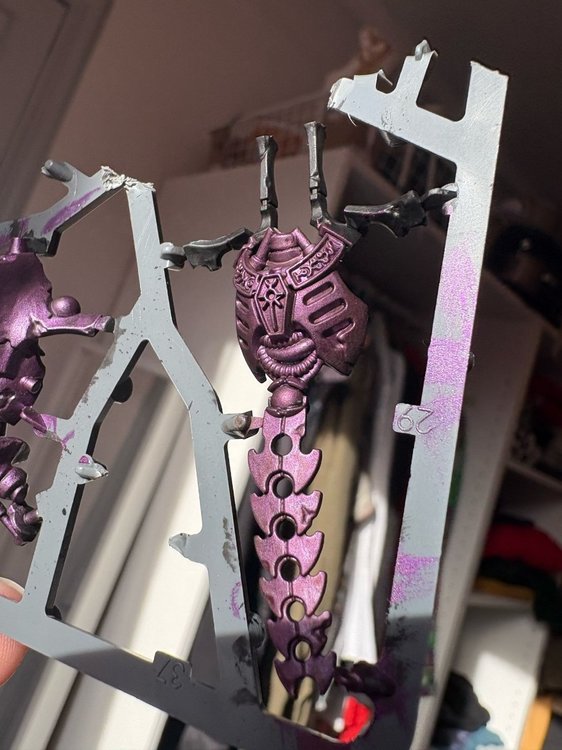
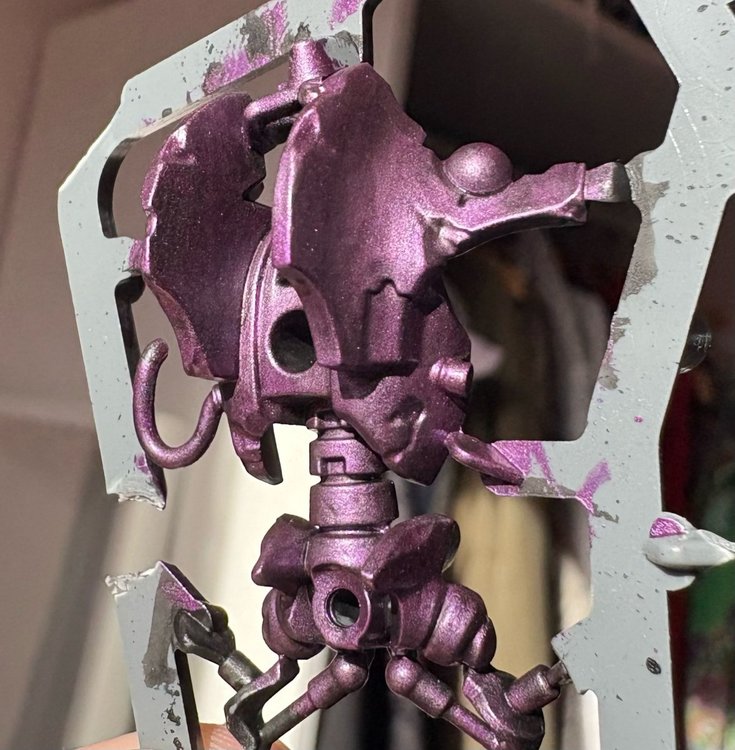
Hello everyone! I thought I'd share my thoughts on this paint from Duncan's brand!! I ordered it as well as GSW's Persian Violet (which I have not yet received) to test out purples for my 30k Emperor's Children, and I tried it today!!! TL;DR: It's great!! Just a quick disclaimer: I'm by no means an accomplished or experienced painter: I have about 1k points of Necrons painted up, and that's about it!! But still wanted to give my opinion in case anyone else was considering this paint :))). So, to test it out, I used some unassembled parts I had lying around: these are the back and front bits of the Skorpekh Lord's body, I believe. I primed them with Abaddon Black (two thin coats of which, of course), then applied the paint as I would any other metallic (thinned down with some water): (Apologies for the picture quality) One somewhat thinned-down coat of Emperor's Purple basically covered all of it immediately, tho the big smooth "panels" on the back bit needed an additional coat (which seems pretty standard as far as metallic paints go, with a similar coverage to that of Leadbelcher, in my experience painting Necrons). Overall, very happy with the paint's coverage! It's such a pretty purple!!, and basically exactly what I wanted: a nice, metallic royal purple but with pink undertones, rather than blue. Of course, up close like this, you can kinda see the mica flakes, but irl it's a very smooth paint. Then, I wanted to see what it looked like shaded. On the front bit (in the above image, the bit that's to the right) I shaded with Reikland Fleshshade, and on the back bit (left) I used Nuln Oil. It's pretty hard to see on pictures, but the difference is *kinda* visible, so just in case, here's what I got!!: Shaded with Reikland Fleshshade ^ Shaded with Nuln Oil ^ The difference is really quite subtle, and even more so on the pictures, but you can still kinda see it: as expected, the Reikland Fleshshade made the tone a bit more redish, while the Nuln Oil darkened it slightly, and both do a reasonably-ish good job of highlighting recesses - tho perhaps I was didn't apply enough shade. The effect the Nuln Oil had is the most difficult to see on the pictures, but it really did darken it up, almost making the color a bit colder; and it feels like the Reikland Fleshshade matted the paint considerable more than its black counterpart, tho it's still visibly metallic and reflective. Definitely try this for yourself, as the difference isn't super apparent on camera, and is especially subtle with the amount of shade I used!! I think I will do more tests, applying more Nuln Oil but to just the recesses, as I love the bright color it has prior to the Nuln Oil treatment; if you want a darker metallic purple, try shading it completely!!! :D For more variation, I might see what applying a thin coat of Doomfire Magneta does, and could try Ardcoat to make it shinier/glossier!! But the purpose of this review is mainly to show the effect of the paint itself, which you can see in the first two pics!! I hope this was helpful to some!!!! Honestly, Emperor's Purple just feels like a purple Leadbelcher (as someone who uses that one a lot to paint my crons), which is definitely a compliment!! Great coverage, awesome color, what a great purple!! Definitely recommend!! :D
-
Hope its ok to post this - I succumbed to the many Instagram adverts that I was seeing, and bought one of these. Thought i'd do a review for anyone curious as to what its really like and whats in the box etc. To be fair, I wanted a new wet pallet to try, and have been using just a glass jar or a mug for my paint water, so figured why not give it a whirl. FYI - not actually tried the wet palette at the time of recording, but have used it since recording the video, and while its smaller than my Army Painter one, the two palettes together have the same sort of area and I've found that the palette paper lies smoother on the sponge than my AP painter one which tends to crinkle easily. Cheers
-
The intention of this review is to inform any of the KS backers or individuals who may buy one of these second-hand, I’ve already seen a couple listed on eBay. I do not wish to make light of anything that has to do with the kickstarter itself, only look at the product in hand. I also hope this creates a network of people who can share builds, hacks and other advice regarding this terrain system. This review is based on the “Medium” Backer Cathedral, I did NOT get the Daedelus expansion (which was included in the promotional material) or the fabric mat. As this backer reward was said to be the one used to create the images used in the KS campaign, I feel this offers the most level playing field in comparing what was shown to what was delivered. This system used a tension clip system to attach pre-printed die cut pieces to each other to make a gothic style cathedral inspired terrain for warhammer and other analogous game systems. TL:DR Pros: Well printed. Die cuts popped out easily. Terrain is HUGE. Lots of possibilities. Cardboard holds up nicely. Cons: Assembly videos provided by RH are limited. Clip system was hard on the hands. Cardboard will most likely not respond well to repeated rebuilding. One-shot: I got what I paid for and am happy with the final result, however the road to get there was a journey with quite a learning curve, and not by choice. What was advertised: Kit sizes: https://i.imgur.com/Zv7GAeW.jpeg Promotional images: https://warstages.net/gallery.html What I made: V1 V2 For scale: In Depth I was pleasantly surprised that the printing quality held up, of all the things involved with this terrain KS, that was my biggest concern. It holds up, and the contrast is nice. I did not make any notice of details being cut off or parts being off center. Once all together it makes an impressive scene. The cardboard is sturdy but there are certain parts that need extreme care to not bend in assembly - such as archways along the sides - are very prone to bending at clip points. Many scatter terrain elements had tabs which bent easily or off entirely. On the flip side the platforms are sturdy, and the bigger one, "High Command" held my resin Castigator. The clip system works. However after 15-30 minutes of assembly the constant pushing and coaxing of clips was hard on the fingers. I eventually resorted to using the table, a ball peen hammer, and padded work gloves to minimize wear & tear while slotting clips. You really need to plan out your clip layout if you want to bling out your builds with all the extra greebles provided. This review will go through a few things concerning some the marquee pieces. Instructions were provided as a QR code to a private youtube site which lists 36 videos as of this writing. I expected them to be something along the line of, “do THIS to make the scene you saw in the pictures”. Maybe even a PDF showing layouts they used. But more than half of the videos are for the scatter terrain, the rest cover SOME of the major assemblies, and one of them is exclusive to the extra large kit backers (which was helpful for ideas). Perhaps they’ll add more. I found it to be insufficient for someone to make a casual go at this. If you’re watching the videos on a phone it can be very frustrating as the assembler points to a clip (there’s no talking in MOST of them, just a very, very repetitive soundtrack.) and you’re squinting trying to see which one it was. My naming convention for each is as named in the assembly video list: https://www.ragingheroes.com/pages/assembling-warstages CHOIR: This piece has the largest footprint of the lot and appears front and center in many of the promotional pieces. It makes use of an angled clip which is infuriating to use and was single-handedly the most stressful part of any of the builds. The windows are long and skinny and prone to bending when pressing them together with the angled clips. The upper part of the flying buttress does not attach to the structure, which is annoying to my propensity to secure things. Seems prone to bending as I almost did it myself just moving it around. There is a part shown in the promotional images (Tryptic, per the backer info) that is provided, but there are no clip slot cutouts where this very specific railing is supposed to go. It won’t fit anywhere else, I tried. HIGH COMMAND: Heavily used in the promotional images, however what you DON’T see clearly is that the stairs cannot attach flush to the platform. The stairs have tabs extending from the sides that intersect the angled platform preventing the clips from fully attaching. It looks janky. I cut off the offending tabs since they’re an integral part of this platform. WALLS: This assembly video specifically deals with parts from the Daedelus extension, but has a generic title card, so if you’re a little confused and wondering if you’re missing parts before realizing it’s just something you didn’t get, you’re not alone. No other assembly videos pertaining to wall builds for the cathedral, which make up a large portion of the frames provided. I ended up looking at the promotional photos for ideas on how they might have put them together but ended up just doing my own thing. TRIANGLE TOWER: I opted for making four tall and two short towers instead of 2 super tall and 2 tall towers as advertised. Ridiculously tall for a tabletop game, there’s little to no units that would end up going that high, much less get there, or have any tactical reason to do so. SCREENS: Looks cool but the bases provided suck and slip off super easily. I actually used two inverted toppers for bases from the :”Triangle Tower” build. I think they missed the mark on these. If they simply made the slots at the bottom of some of the screen the same width as the slots on the floor and platforms it would have offered up some better alternatives. GATES: As of this writing the video for this part has been taken down for some reason. Very fiddly construction and I was sweating bullets trying to get all the big pieces slotted the way they show in the video. Biggest golly gee is this platform they put up at the very top. It’s a 1x4 pierce that has slots all the way around and they don’t even use any of them. I ended up removing the platform, used extra connectors to shore up the gates and used the platform to build my walls. The hinge clips are not that good and come apart easily when moving the doors. I was short two clips to fully install the doors for all three gates, but I actually prefer to use the right angle clip for an open position and the single straight clip for closed. BELL TOWER: You get two bell towers but an extra two of the top half, which makes for an odd piece on the tabletop as scatter terrain. Luckily some of the parts can be repurposed to make a small riser and alternative guardrails. SCATTER TERRAIN: I liked most of the little bits. The crates and bookcases are solid, and a lot of the computer screens and displays have many ways of being added to the terrain. I passed on the candelabra and trimmed the lights down to use with clips and added them as interior / exterior lights. I didn’t care for the Pipes, Air Recycling Unit, Med Station or Fireplace and let my kids put them together and keep them. Either the construction was janky or I just didn’t like the look of the finished piece. I’ve got plenty of resin and plastic scatter terrain to use instead. RANDO STUFF: In the end, I had a lot of walkways and other random bits leftover, which is fine. But there were these pieces which never came up in an assembly video, nor could I divine any use for them as the slots don't match up with ANYTHING. edit: font color changed for better readability
- 3 replies
-
- terrain
- raging heros
-
(and 2 more)
Tagged with:
-
This is something that may be of particular interest to Custodes players, but might also be helpful to anyone looking for a good undercoat for gold. For the longest time, I'd been priming miniatures in black, and then using something like Mournfang Brown to basecoat sections that were to be gold. It works okay, but you have the primer, then a couple thin coats of brown, then 1-2 thin coats of gold. I've used Vallejo AV primer for the longest time, and I brush it on because weather and space concerns really keep me from using aerosol sprays or an airbrush. But I've heard a lot of good things about Stynylrez from Badger. They have a red-brown primer that looked to be perfect. However, with the really cold weather we've had here for the last couple months, there was no way I could mail-order it and not have it frozen to uselessness by the time I get home to get the mail. Well, the weather's finally warmed up to the mid-40s so I ordered some a couple of days ago and it arrived today. I have got to say, the stuff is wonderful. It goes on nice and smooth, even with a brush, It's self-leveling like Vallejo but it dries with a matte surface rather than the shiny finish of Vallejo primer. It's got more tooth for what you'll paint over it, and coverage is great. And where Vallejo's ideal cure time is measured in days (one to three days was killing me to wait), Stynylrez cures in hours. I primed a couple of Custodians before dinner, watched a little TV and came back to basecoat the gold. They were ready to go. Here's the best part. Where I used to have to do three thin coats of gold to cover the black primer, Gold goes over red-brown Stynylrez in One. Thin. Coat. And the brown undercoat makes the gold look really rich and warm. Because you're applying fewer coats of primer, basecoat, and gold to cover, detail is preserved far better and the model doesn't look "painted". I highly recommend this stuff for anyone who paints Custodes, Stormcast, or anything where you'll be doing a lot of gold. You'll wonder why you waited so long.
