Daemon Smith Posted June 28, 2011 Share Posted June 28, 2011 Really nice Lamenter! Been watching this thread for a while, and I love you're work! Keep up the awesomness!! Link to comment https://bolterandchainsword.com/topic/172997-lamenters-actual-scale-space-marines/page/17/#findComment-2805075 Share on other sites More sharing options...
popkhorne Posted June 29, 2011 Share Posted June 29, 2011 AWESOME, your talos looks pretty much exactly how i imagined him, a few suggestions though on how to make him more characterful Talos is described in the books as having prophecies inscribed into his armour that set him apart, that might be something to add with the paint but it might look interesting to have them actually carved in also most important is that talos is supposed to have a nostraman rune carved into the forehead of his helmet, its pretty much his trademark and would be sort of a glaring omission but anyway looks awesome so far keep it up! also you should feel free to add a loincloth if you want, it would look cool and theres no where that says he doesn't have one... Link to comment https://bolterandchainsword.com/topic/172997-lamenters-actual-scale-space-marines/page/17/#findComment-2805906 Share on other sites More sharing options...
Vairocanum Posted June 29, 2011 Share Posted June 29, 2011 Whoa that looks so amazing, but I think the cover of the book has talos with a fw khorne beserker style helmet with studs, it still looks awesome either way! Link to comment https://bolterandchainsword.com/topic/172997-lamenters-actual-scale-space-marines/page/17/#findComment-2806298 Share on other sites More sharing options...
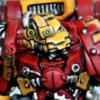
Lamenter Posted July 2, 2011 Author Share Posted July 2, 2011 also most important is that talos is supposed to have a nostraman rune carved into the forehead of his helmet, its pretty much his trademark and would be sort of a glaring omission but anyway looks awesome so far keep it up! Thanks for the input, I had no idea about the rune. I sculpted it to be similar to the rune shown on the book cover artwork. Whoa that looks so amazing, but I think the cover of the book has talos with a fw khorne beserker style helmet with studs, it still looks awesome either way! Pretty sure it's a mark V helm, just that the respirator is depicted in a more triangular shape than usual. ____________________________________________ I finished Talos the other night. Not really sure what to say about it. I like the sword but I think it could be done better. The night lords shoulder pad came out really nice and clean, very pleased with that. http://masteroftheforge.com/files/images/chaos/talos3.jpg http://masteroftheforge.com/files/images/chaos/talos4.jpg http://masteroftheforge.com/files/images/chaos/talos5.jpg http://masteroftheforge.com/files/images/chaos/talos6.jpg http://masteroftheforge.com/files/images/chaos/talos7.jpg Link to comment https://bolterandchainsword.com/topic/172997-lamenters-actual-scale-space-marines/page/17/#findComment-2808485 Share on other sites More sharing options...
Drudge Dreadnought Posted July 2, 2011 Share Posted July 2, 2011 The armor looks great, but I'm not sold on the sword. It just looks like a standard power weapon to me, not like the super strong relic blade it's supposed to be. Link to comment https://bolterandchainsword.com/topic/172997-lamenters-actual-scale-space-marines/page/17/#findComment-2808492 Share on other sites More sharing options...
Lamenter Posted July 2, 2011 Author Share Posted July 2, 2011 The armor looks great, but I'm not sold on the sword. It just looks like a standard power weapon to me, not like the super strong relic blade it's supposed to be. You're right, neither am I. I'm going to try and resculpt the decorative part this weekend. Link to comment https://bolterandchainsword.com/topic/172997-lamenters-actual-scale-space-marines/page/17/#findComment-2808757 Share on other sites More sharing options...
popkhorne Posted July 2, 2011 Share Posted July 2, 2011 AWESOME, although i agree about the power sword. Are you going to paint it aswell? Link to comment https://bolterandchainsword.com/topic/172997-lamenters-actual-scale-space-marines/page/17/#findComment-2808786 Share on other sites More sharing options...
cathar the great Posted July 2, 2011 Share Posted July 2, 2011 Is there any specific reason why he is looking in that direction? I think the pose would be more powerful if he was looking the other way, as if he is resting his sword and surveying the battlefield. Link to comment https://bolterandchainsword.com/topic/172997-lamenters-actual-scale-space-marines/page/17/#findComment-2808815 Share on other sites More sharing options...
Dorns Padawan Posted July 2, 2011 Share Posted July 2, 2011 Lamenter: You have done A D-B proud with your version of Talos! I think he looks awesome! Regarding his relic blade, I actaully quite like it, perhaps my only crit is it could be a bit longer?? He really looks the biz! I defo agree with you though regarding the FW helms, they do look awesome, can't wait to get my hands on a couple of them. Do you have plans for the rest of First Claw??? Hope A D-B veiws this thread as see's what you done. Link to comment https://bolterandchainsword.com/topic/172997-lamenters-actual-scale-space-marines/page/17/#findComment-2808828 Share on other sites More sharing options...
Lamenter Posted July 27, 2011 Author Share Posted July 27, 2011 I did redo the sword but I seem to have lost pics of it. I won't be painting it, but hopefully the new owner might send me pics when it is. Moving on.... http://masteroftheforge.com/files/images/combatsquad/squad1.jpg http://masteroftheforge.com/files/images/combatsquad/squad2.jpg http://masteroftheforge.com/files/images/combatsquad/squad3.jpg http://masteroftheforge.com/files/images/combatsquad/squad4.jpg http://masteroftheforge.com/files/images/combatsquad/squad5.jpg I didn't really get around to making a "work in progress" post about this squad as I've been really busy working on a number of projects at once. Pretty standard work, all in all. I'm definitely a believer in using power armour arms rather than the older technique of using terminator arms, sure it's more work, but the results are always more worthwhile. I'm especially pleased with the Thunder Hammerer's hands, they came out real nice. They still require accessories adding but otherwise these are done. It's been nice to just work on some basic artscale Space Marines, sometimes the really elaborate character conversions detract from the pure appeal of the scaled up Space Marines (in my opinion anyway). Link to comment https://bolterandchainsword.com/topic/172997-lamenters-actual-scale-space-marines/page/17/#findComment-2831365 Share on other sites More sharing options...
Lamenter Posted July 27, 2011 Author Share Posted July 27, 2011 This 5 man Grey Knight squad are to based on Grey Knights immediately after the Heresy. As such they have Nemesis Force Weapons in the style of those on 1st edition Grey Knights, ie: Halberds with storm bolters built in. http://masteroftheforge.com/files/images/greyknights/greyknightsquadsmall.jpg http://masteroftheforge.com/files/images/greyknights/nemesishalberd.jpg I opted to use the older metal Terminators as a base for the legs as I find them to be much better posed than the plastic ones which seem to me to be a bit too widely spread. Adding GS to metal is more difficult than adding to plastic, I'm not entirely certain why that is but I would advise beginners to use plastic models as a base. The Grey Knight plastic torsos are unusually deep compared to regular Space Marines so I used no spacer in between the front and back. The NFW has had its blade removed and attached lower down so that a cut down bolter would fit atop of the blade. The bolter barrel had to be replaced so that it was in a better position. The added =I= symbol also fit perfectly and the cable was my first try out of my new TubeTool from Masq-Mini and I'm very pleased with it. The backpacks are nearly done and just require some detailing. The final piece of the puzzle is adding the arms. I've lengthened the arms (using plasticard spacers) and greenstuffed over them to add the necessary size. When I'm working on individual bits like this and I need to put them somewhere for the GS to cure without getting damaged I use a large blob of poster BluTac (sometimes I also add temporary pins to hold small pieces by). http://masteroftheforge.com/files/images/greyknights/blutak.jpg Should have another update of the squad very soon, with a size comparison. Link to comment https://bolterandchainsword.com/topic/172997-lamenters-actual-scale-space-marines/page/17/#findComment-2831367 Share on other sites More sharing options...
Legio Draconis Posted July 27, 2011 Share Posted July 27, 2011 Those new grey knights look badass. Link to comment https://bolterandchainsword.com/topic/172997-lamenters-actual-scale-space-marines/page/17/#findComment-2831387 Share on other sites More sharing options...
Keyoz Devastrius Posted July 28, 2011 Share Posted July 28, 2011 I love those NFW but the build in storm bolters need some form of ammo feeds or clips. Link to comment https://bolterandchainsword.com/topic/172997-lamenters-actual-scale-space-marines/page/17/#findComment-2831717 Share on other sites More sharing options...
Lamenter Posted July 28, 2011 Author Share Posted July 28, 2011 I love those NFW but the build in storm bolters need some form of ammo feeds or clips. I agree they need it, but there doesn't seem to be many options to make it fit. Besides, I don't see any on the original NFWs as far as I can tell. Link to comment https://bolterandchainsword.com/topic/172997-lamenters-actual-scale-space-marines/page/17/#findComment-2831732 Share on other sites More sharing options...
Olis Posted July 28, 2011 Share Posted July 28, 2011 As always, inspiring stuff, brother. :) Link to comment https://bolterandchainsword.com/topic/172997-lamenters-actual-scale-space-marines/page/17/#findComment-2831845 Share on other sites More sharing options...
Mr Yellow Posted August 1, 2011 Share Posted August 1, 2011 http://masteroftheforge.com/wp-content/uploads/2011/07/talos3.jpg As always, excellent stuff. I did just realise though, shouldn't the curvy bit of the sword hilt be the other way round. Generally that part of the sword is designed to stop enemies' weapons slide down the blade and onto the soft bits behind it. Link to comment https://bolterandchainsword.com/topic/172997-lamenters-actual-scale-space-marines/page/17/#findComment-2835295 Share on other sites More sharing options...
Lamenter Posted August 1, 2011 Author Share Posted August 1, 2011 As always, excellent stuff. I did just realise though, shouldn't the curvy bit of the sword hilt be the other way round. Generally that part of the sword is designed to stop enemies' weapons slide down the blade and onto the soft bits behind it. yeah, you're right of course. The sword was supposed to be based off of this image: http://images.wikia.com/warhammer40k/image...Soul_Hunter.jpg I don't have a pic of it but I did re-do the hilt to something closer to the artwork, and not so much of a cop-out. ___________________________________________________ http://masteroftheforge.com/files/images/greyknights/greyknightsquadsmall2.jpg click for larger image. http://masteroftheforge.com/files/images/greyknights/justicar.jpg Justicar http://masteroftheforge.com/files/images/greyknights/psycannon.jpg shoulder mounted psycannon This is the first Grey Knight squad I've done and I think they've come out rather respectable. I had quite a specific brief for the Justicar to resemble a model I did a couple of years ago. I also go the chance to add a shoulder mounted psycannon (I have a bit of a thing for shoulder mounted ranged weapons, not sure why). Took quite a while to make it fit nicely, but I think it works. I wanted the psycannon to be pointing in the same direction as the Justicar's bionic eye, as if the two are linked. The rest of the squad came together quite naturally from using mostly Grey Knight components. The whole squad is pretty self explanatory to anyone who's seen my work before. I had abandoned the idea of build a full Grey Knights army for myself, but I'm rather keen now to have a small force in future, and I'll probably try and replicate that Justicar for my own collection. ___________________________________________________ Also just finished a set of icons for Skyrar's Dark Wolves. The mold is made from a silicone rubber but more on that later. http://masteroftheforge.com/files/images/icons/darkwolves.jpg Link to comment https://bolterandchainsword.com/topic/172997-lamenters-actual-scale-space-marines/page/17/#findComment-2835317 Share on other sites More sharing options...
KJB Posted August 1, 2011 Share Posted August 1, 2011 That Justicar is fantastic, you make it look so easy, all I can use green stuff for is plugging up holes... :huh: Oh, and as for Talos, I guessed who he was just by the crack on the chest plate, awesome model - fancy doing some Iron Hands? (that I could then shamelessly copy...) Link to comment https://bolterandchainsword.com/topic/172997-lamenters-actual-scale-space-marines/page/17/#findComment-2835386 Share on other sites More sharing options...
Lamenter Posted August 16, 2011 Author Share Posted August 16, 2011 - fancy doing some Iron Hands? (that I could then shamelessly copy...) Thanks. I got to admit I've been putting off tackling bionics. Not sure about Iron Hands, but marines with bionics is definitely on the cards for a future project. Sorry for the long delay on updates, got a lot on my plate at the moment. I really wasn't sure how well this model was going to turn out, but now I've finished it I have to admit that it pains me to part with him. The legs are built up over regular Terminator legs but rather than repose the legs I simply based him on a slight slope, which made a huge difference. Making Mark VIII armour requires a little more attention to detail but isn't so different from Mark VII to be a big issue. Most of the rest of the model is standard procedure, building a base model on which to sculpt a "skin". The shield is a FW Black Templar Storm Shield with all the detail removed. To do this I first removed as much detail as I could with clippers and a knife being careful not to damage the shield itself. Because of the harmful nature of resin dust I took some fine grade wet&dry paper and sanded it off under a running tap (not hot water) until I had a smooth finish. This way the dust is just washed away harmlessly, leaving your lungs intact. I didn't have a second Deathwatch terminator pad (found in the box sets) spare so I made one using a Blu-Stuff one piece mold (coming soon to a webstore near you!). Everything else is pretty self explanatory, the Thunder Hammer head is from Lysander obviously. The helm is also magnetized with an alternative bare head, also allows easier painting. As I can't keep this mini for my own collection, I'll be using it as a guideline for my own Company Champion when I finally get time for my own army. http://masteroftheforge.com/files/images/deathwatch/fist2.jpg http://masteroftheforge.com/files/images/deathwatch/fist3.jpg http://masteroftheforge.com/files/images/deathwatch/fist4.jpg http://masteroftheforge.com/files/images/deathwatch/fist5.jpg I also posted a Mini-Tutorial to go with this on my website on how make make the Imperial Laurel, someone might find useful I'm sure: [url="http://masteroftheforge.com[/url] Link to comment https://bolterandchainsword.com/topic/172997-lamenters-actual-scale-space-marines/page/17/#findComment-2848919 Share on other sites More sharing options...
Firenze Posted August 16, 2011 Share Posted August 16, 2011 Damn you Lamenter ;) You're making me want to do my planned Alpha Legion force true scale now ^_^ I know I shouldnt, but it is soo tempting... Link to comment https://bolterandchainsword.com/topic/172997-lamenters-actual-scale-space-marines/page/17/#findComment-2848930 Share on other sites More sharing options...
Lamenter Posted August 16, 2011 Author Share Posted August 16, 2011 Damn you Lamenter ;) You're making me want to do my planned Alpha Legion force true scale now ^_^ I know I shouldnt, but it is soo tempting... It's a curse. I can't even consider collecting a Space Marine force in regular scale now, but I can't find the time to devout to my own collection either :( Link to comment https://bolterandchainsword.com/topic/172997-lamenters-actual-scale-space-marines/page/17/#findComment-2848936 Share on other sites More sharing options...
alejandrinus Posted August 16, 2011 Share Posted August 16, 2011 Wow Lamenter iimpressive GS skills, the squad of grey knights are awesome really like the old style halberds and the IF champion is full of character. BTW how did you did the GS rivets in the IF champion shield, somekind of selfmade tool ? Thanks in advance and waiting for more GS goodness :) Link to comment https://bolterandchainsword.com/topic/172997-lamenters-actual-scale-space-marines/page/17/#findComment-2849329 Share on other sites More sharing options...
Commander S. Caesare Posted August 16, 2011 Share Posted August 16, 2011 Here's the finished Chaplain Durendin - Guardian of Names http://www.masteroftheforge.com/files/images/greyknights/gkchaplain/durendin1.jpg He carries and protects one of the Grey Knights sacred tomes, a book that records the name of each and every Grey Knight to have died protecting mankind. If that's not a role for a Chaplain I don't know what is. I though Durendin had a pair of Lightning Claws, a sacred weapon of the great heroes within the Chapter. Link to comment https://bolterandchainsword.com/topic/172997-lamenters-actual-scale-space-marines/page/17/#findComment-2849344 Share on other sites More sharing options...
Lamenter Posted August 16, 2011 Author Share Posted August 16, 2011 Wow Lamenter iimpressive GS skills, the squad of grey knights are awesome really like the old style halberds and the IF champion is full of character.BTW how did you did the GS rivets in the IF champion shield, somekind of selfmade tool ? Thanks in advance and waiting for more GS goodness B) Thanks. I'm especially pleased with the Imperial Fist I have to say B) The rivets were done in two parts. First a small ball of GS flattened into a tiny disc about 1.5 mm across. When that had cured I added a pre-made rivet on top of it. The rivets I currently use are Grandt Line (google it and you should find a supplier no problem), but there are plenty of alternatives, www.scalehardware.com/ for example do tiny brass rivets, nuts and bolts. I though Durendin had a pair of Lightning Claws, a sacred weapon of the great heroes within the Chapter. I don't know about that, but I based his armour at least off the description given in the first Grey Knights novel. Link to comment https://bolterandchainsword.com/topic/172997-lamenters-actual-scale-space-marines/page/17/#findComment-2849350 Share on other sites More sharing options...
Commander S. Caesare Posted August 16, 2011 Share Posted August 16, 2011 According to the few conversations with Durendin and Justicar Alaric, Durendin had a pair of Lightning Claws and one of his arms was purely black, to signify his badge of office. At first when I read the series, I was tripped out that this Chaplain had the L-Claws. But seeing your version, I would fall on my face on concrete. Link to comment https://bolterandchainsword.com/topic/172997-lamenters-actual-scale-space-marines/page/17/#findComment-2849354 Share on other sites More sharing options...
Recommended Posts
Archived
This topic is now archived and is closed to further replies.