Brother Lionheart Posted February 11, 2014 Share Posted February 11, 2014 Very nice work so far, brother. Can't wait to see the final result! Link to comment https://bolterandchainsword.com/topic/272170-blood-ravens-5th-battle-company-wip/page/3/#findComment-3592163 Share on other sites More sharing options...
Ch@oZ Posted February 12, 2014 Share Posted February 12, 2014 Maybe do some scratches on it, just for that little bit extra. Otherwise, nice! Meaning the shield? I guess bloody handprints would be better as contrast. Based with Bleached Bone, then heavily washed with Devlan Mud. then I drybrushed them with Bleached Bone to bring the base color back, and gave them a wash with heavily watered down Kommando Khaki. Last I the blacklining around the edges with strait Devlan Mud. Thanks, i'm gonna try it out on some of my helmets, I'll see how it turns out. Link to comment https://bolterandchainsword.com/topic/272170-blood-ravens-5th-battle-company-wip/page/3/#findComment-3592736 Share on other sites More sharing options...
BKZer0 Posted February 12, 2014 Author Share Posted February 12, 2014 Thanks, i'm gonna try it out on some of my helmets, I'll see how it turns out. One thing to note, where I said that I washed it with heavily watered Kommando Khaki. I mean HEAVILY watered. To the point where it almost looks like dirty paint water. The point of this step was just to cut the inconsistency in the finish on the areas with wash, and the areas with bare paint. It also made the wash look more beige brown, and less chocolate brown. Link to comment https://bolterandchainsword.com/topic/272170-blood-ravens-5th-battle-company-wip/page/3/#findComment-3592872 Share on other sites More sharing options...
BKZer0 Posted February 14, 2014 Author Share Posted February 14, 2014 I have a relatively small update. I finished the my Terminator Arms. As dumb as it sounds I really enjoyed painting these. I was able to put a decent amout of effort into the detail work. It was definately a welcomed change from the rank and file Space Marine arms. Here is an upclose picture of a power fist with a "RAVENS" heraldry banner. http://www.40k.zombiecrisis.org/20140209_212355.jpg Here in another picture of the same fist with another bearing laurels. This picture was actually taken for a friend. I have the fists on the tip of my finer to illustrate to him just how small these parts actually are. http://www.40k.zombiecrisis.org/20140209_230909.jpg Here is a picture of my first power sword. I really like how the gradient came out. Not bad from brushwork, right? I had envisioned the piece going from black > green > white. However, the finished piece ended up being more green > white. I am happy enough with the outcome that I don't think I will change it. http://www.40k.zombiecrisis.org/20140210_010246.jpg Lastly here is a picture of all 10 arms. http://www.40k.zombiecrisis.org/20140210_010730.jpg My next post will likely be of all 5 Terminators with their arms. I would have assembled them already, but I am still on the fence about what arm(s) should go with what torso/leg combo, and what types of poses I should use. Captain Semper and Lord Marshal Ragnrok 2 Back to top Link to comment https://bolterandchainsword.com/topic/272170-blood-ravens-5th-battle-company-wip/page/3/#findComment-3594469 Share on other sites More sharing options...
BrotherCaptainArkhan Posted February 14, 2014 Share Posted February 14, 2014 Just to say that I love that power sword effect. If you don't mind, I am going to [attempt to] steal it shamelessly for my Sons of Tyr. Will give credit of course. Link to comment https://bolterandchainsword.com/topic/272170-blood-ravens-5th-battle-company-wip/page/3/#findComment-3594497 Share on other sites More sharing options...
gezabutla Posted February 14, 2014 Share Posted February 14, 2014 Fantastic work! I love how you've taken the time to add all of the appropriate squad markings, it really enhances the quality of the models.Keep 'em coming :D Link to comment https://bolterandchainsword.com/topic/272170-blood-ravens-5th-battle-company-wip/page/3/#findComment-3594564 Share on other sites More sharing options...
deathspectersgt7 Posted February 15, 2014 Share Posted February 15, 2014 Have say ditto on the powersword. Link to comment https://bolterandchainsword.com/topic/272170-blood-ravens-5th-battle-company-wip/page/3/#findComment-3594680 Share on other sites More sharing options...
Lord Marshal Ragnrok Posted February 15, 2014 Share Posted February 15, 2014 wow the sword looks great! how did you do it? Link to comment https://bolterandchainsword.com/topic/272170-blood-ravens-5th-battle-company-wip/page/3/#findComment-3595092 Share on other sites More sharing options...
BKZer0 Posted February 15, 2014 Author Share Posted February 15, 2014 (edited) wow the sword looks great! how did you do it? I painted the entire sword Vallejo Model Color Lime Green. Then, made an extremely thin wash of Vallejo Model Color German Cam. Bright Green, and wet blended from the cross guard of the sword about 1/2 way up the blade. It took 2 passes. Then I made a very thin, thinner than milk, wash of Citadel Layer White Scar, and carefully wet blended from the tip of the blade down, brushing from side to side, not lengthwise. This took more than 10 coats. I did this on less and less of the blade with each pass until I was just painting the tip of the blade. All the metal bits that touch the blade I "black lined" with an old bottle of Citadel Wash Thraka Green. Edited February 15, 2014 by BKZer0 Link to comment https://bolterandchainsword.com/topic/272170-blood-ravens-5th-battle-company-wip/page/3/#findComment-3595266 Share on other sites More sharing options...
jeremy1391 Posted February 16, 2014 Share Posted February 16, 2014 These are coming along very nicely! Link to comment https://bolterandchainsword.com/topic/272170-blood-ravens-5th-battle-company-wip/page/3/#findComment-3595447 Share on other sites More sharing options...
Lord Marshal Ragnrok Posted February 16, 2014 Share Posted February 16, 2014 (edited) wow the sword looks great! how did you do it? I painted the entire sword Vallejo Model Color Lime Green. Then, made an extremely thin wash of Vallejo Model Color German Cam. Bright Green, and wet blended from the cross guard of the sword about 1/2 way up the blade. It took 2 passes. Then I made a very thin, thinner than milk, wash of Citadel Layer White Scar, and carefully wet blended from the tip of the blade down, brushing from side to side, not lengthwise. This took more than 10 coats. I did this on less and less of the blade with each pass until I was just painting the tip of the blade. All the metal bits that touch the blade I "black lined" with an old bottle of Citadel Wash Thraka Green. that is a lot of work for one sword. i think ill try a similar method tho. this is one of the few power sword paint jobs i actually like Edited February 16, 2014 by The Lord Marshal Link to comment https://bolterandchainsword.com/topic/272170-blood-ravens-5th-battle-company-wip/page/3/#findComment-3595708 Share on other sites More sharing options...
GumbaFish Posted February 17, 2014 Share Posted February 17, 2014 Nice army! I know it was a while ago but for future reference to reduce silvering from decals, in addition to trimming the edges as you mentioned, it helps if you first apply a gloss coat to the area where you are going to apply the decal. I use the Micro Gloss from micromark personally so I can just brush It on only the area I need and don't need to fuss with sprays. Link to comment https://bolterandchainsword.com/topic/272170-blood-ravens-5th-battle-company-wip/page/3/#findComment-3596638 Share on other sites More sharing options...
BKZer0 Posted February 18, 2014 Author Share Posted February 18, 2014 I have another update. Small steps right? Here are my terminaotrs WITH arms. I decided to pose them more or less how they appear on the box. http://www.40k.zombiecrisis.org/20140210_204622.jpg http://www.40k.zombiecrisis.org/20140210_205042.jpg http://www.40k.zombiecrisis.org/20140210_205144.jpg http://www.40k.zombiecrisis.org/20140210_204718.jpg http://www.40k.zombiecrisis.org/20140210_204737.jpg And a group shot: http://www.40k.zombiecrisis.org/20140210_204605.jpg Next up, Tactical Squad arms. Brother Lionheart 1 Back to top Link to comment https://bolterandchainsword.com/topic/272170-blood-ravens-5th-battle-company-wip/page/3/#findComment-3597439 Share on other sites More sharing options...
BKZer0 Posted February 21, 2014 Author Share Posted February 21, 2014 Minor update. I finished the 20 arms from my second Tactical Squad. Here are my headless marines: http://www.40k.zombiecrisis.org/20140217_134717.jpg Bolters in Process: http://www.40k.zombiecrisis.org/20140216_223757.jpg Plasma Pistol: http://www.40k.zombiecrisis.org/20140215_200656.jpg Next up Command Squad appendages. I have a feeling I am going to enjoy them. I got to paint a lot of parts I have never painted before. Shields, Plasma Rifle, Appothecary parts, and a few farbricated weapons. Brother Lionheart 1 Back to top Link to comment https://bolterandchainsword.com/topic/272170-blood-ravens-5th-battle-company-wip/page/3/#findComment-3599750 Share on other sites More sharing options...
BKZer0 Posted February 21, 2014 Author Share Posted February 21, 2014 I just posted 3 tutorials in the Painting Tutorials section. First How I paint my plasma weapons: http://www.bolterandchainsword.com/topic/287112-6-simple-steps-for-painting-plasma-weapon-coils/ Next, How I paint my weapon barrels: http://www.bolterandchainsword.com/topic/287114-painting-burnt-barrels-for-plasma-and-flamer-weapons/ Last, How I painted the power sword: http://www.bolterandchainsword.com/topic/287119-painting-a-simple-power-sword/ I thought you guys might enjoy. Lord Marshal Ragnrok 1 Back to top Link to comment https://bolterandchainsword.com/topic/272170-blood-ravens-5th-battle-company-wip/page/3/#findComment-3599923 Share on other sites More sharing options...
BKZer0 Posted February 24, 2014 Author Share Posted February 24, 2014 My command squad is nearing completion. My next post should be all of their torsos with arms/legs/poses. Here is a little preview of the Apothecary. Up close of the Narthecium. http://www.40k.zombiecrisis.org/20140217_222024.jpg Arms ready to assemble. http://www.40k.zombiecrisis.org/20140217_230744.jpg Two veterans, a champion, a banner bearer, and a captain to go. Those units will have a few fun things to paint. Namely a master crafted bolter, and a plasma rifle. Link to comment https://bolterandchainsword.com/topic/272170-blood-ravens-5th-battle-company-wip/page/3/#findComment-3602486 Share on other sites More sharing options...
Rob_Loken Posted February 24, 2014 Share Posted February 24, 2014 Still looking awesome. That's a very nice white you've managed to achieve there. Link to comment https://bolterandchainsword.com/topic/272170-blood-ravens-5th-battle-company-wip/page/3/#findComment-3602575 Share on other sites More sharing options...
BKZer0 Posted March 3, 2014 Author Share Posted March 3, 2014 Time for a large® update. I finished my command squad torsos. These were my favorite models to paint mostly because each one was different. I have never painted a master crafted bolter or a plasma rifle. It was a very welcome change from painting 20 assault marine arms and pistols, and 20 tactical marines arms and bolters. After the Apothecary, the next thing I worked on was my veteran with plasma rifle. Here are his arms: http://www.40k.zombiecrisis.org/20140219_003655.jpg It was a very detailed little model. The plasma coils are brigher in person. They are a little washed out in this picture. Next is the veteran with the master crafter bolter. The model came as part of the command squad set. http://www.40k.zombiecrisis.org/20140219_213816.jpg Here is a lovely upclose of the bolter itself: http://www.40k.zombiecrisis.org/20140219_203958.jpg I would like to get more of them from a bits store if I can. Next we move onto the champion. I'll be honest I have mixed feelings about this model overall. He seems like he is more adorned and detailed than my captain. I think I am going to have to weigh my captain down with a lot more bits and scrolls and seals just to make him look more important. http://www.40k.zombiecrisis.org/20140221_004537.jpg Next we move onto my captain. He uses a plasma pistol and "power hammer" which is a power sword count-as. I am bending the rules a little bit with this. I stated this earlier in my log, but the codex says: "Replace bolt pistol and/or chainsword with: power sword". Now in the wargear section there is no specific entry for “power sword” only “power weapon” where it states “A power weapon (typically a sword or axe, but sometimes a glaive, halberd or mace)”. So I chose to use a “power mace” instead. The definition of a mace is “A blunt weapon, a type of club or virge—that uses a heavy head on the end of a handle to deliver powerful blows.” Essentially I am using a power hammer, a type of mace. From a rules standpoint, I would assume it to be a power sword in the shape of a hammer. Here is the model unassembled: http://www.40k.zombiecrisis.org/20140221_215243.jpg If anyone is wondering, the hammer is made from a gray knights spear with the head from a terminator thunderhammer. The bent arm was in the space marine commander kit. Here is my Captain (torso) assembled. http://www.40k.zombiecrisis.org/20140221_220546.jpg I am really happy with the pose. He will be stairing down the sights of the gun when complete. And a pic of the whole gang. http://www.40k.zombiecrisis.org/20140221_224046.jpg That banner will literally be the last thing I paint... Link to comment https://bolterandchainsword.com/topic/272170-blood-ravens-5th-battle-company-wip/page/3/#findComment-3608181 Share on other sites More sharing options...
Lord Marshal Ragnrok Posted March 3, 2014 Share Posted March 3, 2014 looking good! the headless blood ravens! Link to comment https://bolterandchainsword.com/topic/272170-blood-ravens-5th-battle-company-wip/page/3/#findComment-3608221 Share on other sites More sharing options...
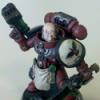
BKZer0 Posted March 12, 2014 Author Share Posted March 12, 2014 (edited) Update on shoulders... GW Bleach Bone (or whatever random name they call it nowadays) is my least favorite color. Last time I painted marine shoulders, it was a terrible experience. This time around I opted for a different approach. I decided to bust out the airbrush. I have a nice new Iwata Eclipse HP-CS which comes with a 3.5mm nozzle. the 3.5mm nozzle works great for all paint except GW paints. I took everything apart and installed a .5mm nozzle/needle kit which remedied the problem quite nicely. Here was my first attempt at airbrushing a shoulder. The splatter on the left is me attempting to unclog the brush before I switched to the .5mm setup. http://www.40k.zombiecrisis.org/20140222_202505.jpg This was my assembly line set up with all my marine's shoulders. I got them all done with a perfect finish in one shot. http://www.40k.zombiecrisis.org/20140222_235410.jpg The next thing I did was paint the black rims, and weather each pad. This was done by carefully washing each pad with Devlan Mud, then drybrushing them with Bleached Bone. Last a wash of 60:40 water:Devlan Mud is used just to darken the drybrushing added to the pad. The pads are also blacklined using Devlan Mud. (Don't be alarmed, those ratty looking brushed in the picture are my drybrushes.) http://www.40k.zombiecrisis.org/20140303_002302.jpg You can see in the above picture I started out painting my Apothecary shoulder with a red symbol. I thought that would look good, but after some thought, I realized that he would be the only model to not have any Bleached Bone on him anywhere, so I repainted his symbol in Bleached Bone. The official artwork for DoW has the symbol in white, so I thought it was a good compromise. http://www.40k.zombiecrisis.org/20140303_004128.jpg Next I moved onto my Captain's Shoulder. It came out EXACTLY as I wanted it to. I purchased the shoulder from chapterhouse studio. It was not the best quality, and required extensive cleaning, but for $1, I could not pass it up. It adds a real nice unique feeling to the model. This was also my first attempt at paint a large scale gem. http://www.40k.zombiecrisis.org/20140305_215124.jpg Here is a look at my Command Squad Shoulders all painted and decaled up. The picture was take pre clear coat, and before the decals fully dried and set. http://www.40k.zombiecrisis.org/20140306_000608.jpg Next I worked on the terminators. Again pre decal setting. http://www.40k.zombiecrisis.org/20140306_225457.jpg Last. This is a look at what all the shoulders look like once the decals have had a chance to dry. At this point they have be coated with Testors Dull Coat which is probably the best coating for models ever made. There is a bonus tactical shoulder in the picture. That was the one from the beginning of the thread. The one that I painted all on its own to test the airbrush. http://www.40k.zombiecrisis.org/20140308_131806.jpg More to come soon. Only 40 more pads to go.... Edited March 12, 2014 by BKZer0 Rob_Loken, depthcharge12 and Squeaky 3 Back to top Link to comment https://bolterandchainsword.com/topic/272170-blood-ravens-5th-battle-company-wip/page/3/#findComment-3619468 Share on other sites More sharing options...
deathspectersgt7 Posted March 12, 2014 Share Posted March 12, 2014 Wow those look Great! Lord Marshal Ragnrok 1 Back to top Link to comment https://bolterandchainsword.com/topic/272170-blood-ravens-5th-battle-company-wip/page/3/#findComment-3619491 Share on other sites More sharing options...
Squeaky Posted March 12, 2014 Share Posted March 12, 2014 Ouch 40 more great stuff though mate will be worth it in the end :) Link to comment https://bolterandchainsword.com/topic/272170-blood-ravens-5th-battle-company-wip/page/3/#findComment-3619507 Share on other sites More sharing options...
reckoning Posted March 12, 2014 Share Posted March 12, 2014 Cant wait to see this finished. Lookin really good. Link to comment https://bolterandchainsword.com/topic/272170-blood-ravens-5th-battle-company-wip/page/3/#findComment-3619663 Share on other sites More sharing options...
Monstra Sumus Posted March 13, 2014 Share Posted March 13, 2014 Real labour of love here man, stellar work. Particularly like the glow on your power sword and the black raven pauldron. Link to comment https://bolterandchainsword.com/topic/272170-blood-ravens-5th-battle-company-wip/page/3/#findComment-3619703 Share on other sites More sharing options...
Lord Marshal Ragnrok Posted March 18, 2014 Share Posted March 18, 2014 wow those look amazing! Link to comment https://bolterandchainsword.com/topic/272170-blood-ravens-5th-battle-company-wip/page/3/#findComment-3625325 Share on other sites More sharing options...
Recommended Posts
Create an account or sign in to comment
You need to be a member in order to leave a comment
Create an account
Sign up for a new account in our community. It's easy!
Register a new accountSign in
Already have an account? Sign in here.
Sign In Now